


How to create a website #14: Website Security
10/12/2021How to create a website #14: Website Security
10/12/2021
Website speed is the first quality index. Yes, your website is very beautiful, attractive and intuitive, but if it doesn’t load in a maximum of 5 seconds, no one will notice it.
As with previous articles, if you haven’t read the Successful Web Design or The Online Business Guide, I encourage you to read the article Website speed optimization: Introduction, quick guide and useful tips to understand what it is is speed optimization. I will recommend two approaches: one free and one that requires a small investment.
Image Optimization
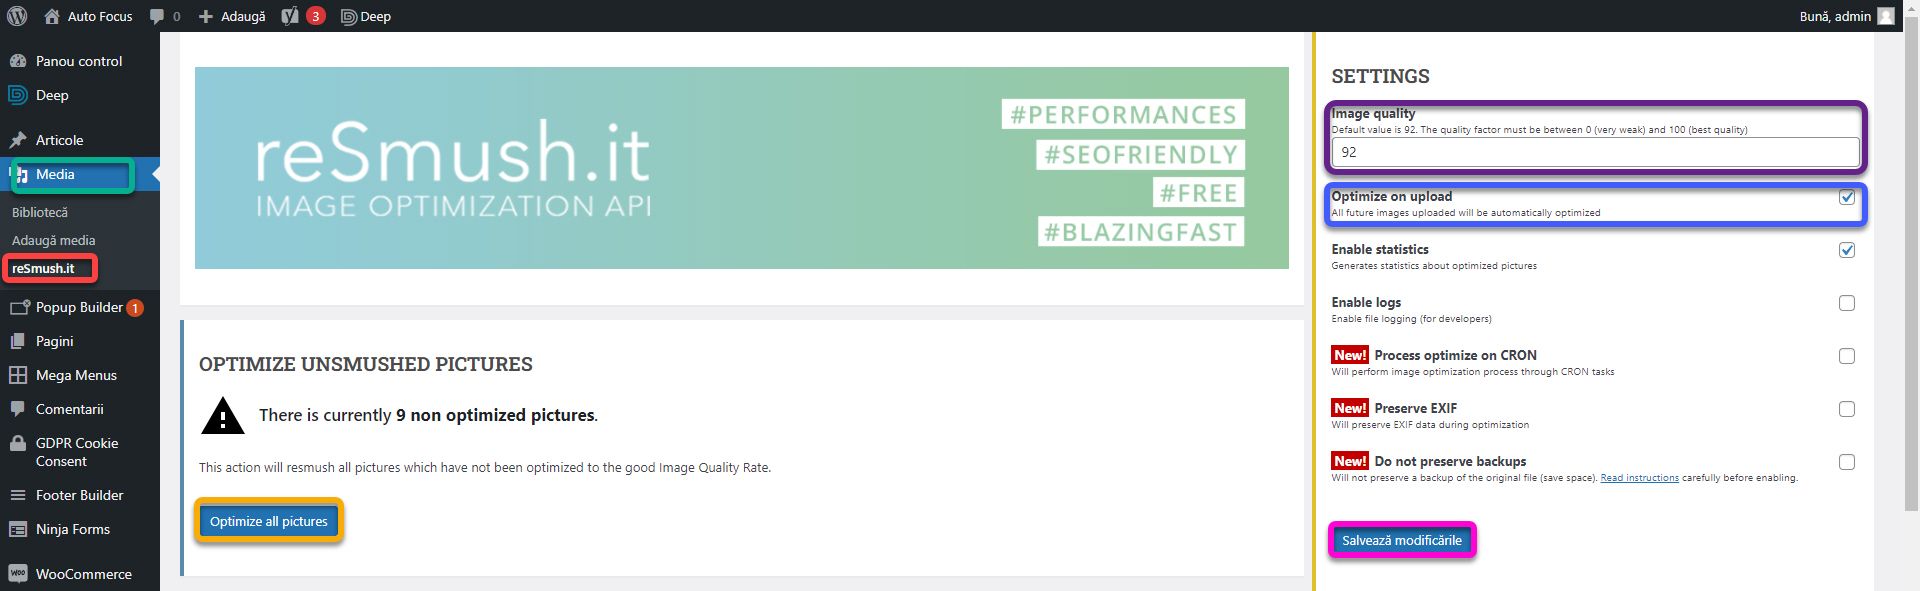
We start with image optimization which takes place absolutely free of charge. Install and activate the reSmush.it plugin.
Go to Media then to reSmush.it. On the right you will find a settings menu. Image quality defines how hard images are compressed. Set it to 80. It’s a good threshold that doesn’t affect quality very much. The checkbox Optimize on upload ensures that all images will be optimized as you add them. Depending on the server upload speed, it may take longer to upload images. Click Save Changes. To optimize the images uploaded so far, click Optimize all pictures.
When the plugin is deactivated, all uploaded images will return to their original quality. Nothing is lost.
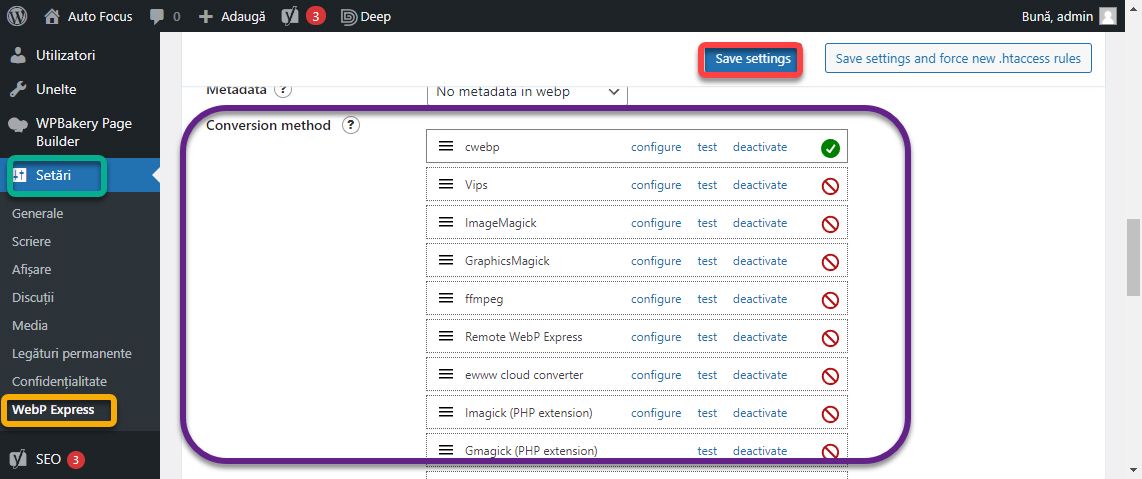
We talked a lot in articles and books about the new WebP image format. So, the second way to optimize the images we will use is WebP Express. It automatically creates copies of images converted to webp format. If the visitor’s browser supports the format, it will receive the webp image. If not, you will receive the jpg image.
The plugin has all the necessary configurations ready, just needs to be activated. Go to Settings, WebP Express. Scroll down to the Conversion method section. Here are listed with a green check mark, the ways in which the server on which your website is located can convert images. If nothing is checked, the server will not be able to convert and you will not be able to use the plugin. Click Save settings to activate it.
Free Plugins
We will install two plugins that facilitate code optimization and enable caching. The first is Autoptimize. It will generate the server level cache. From the top bar, click Autoptimize. Alternatively, go to Settings, Autoptimize. Enable Optimize JavaScript Code and Aggregate JS-files. JavaScript code will be minified and concatenated.

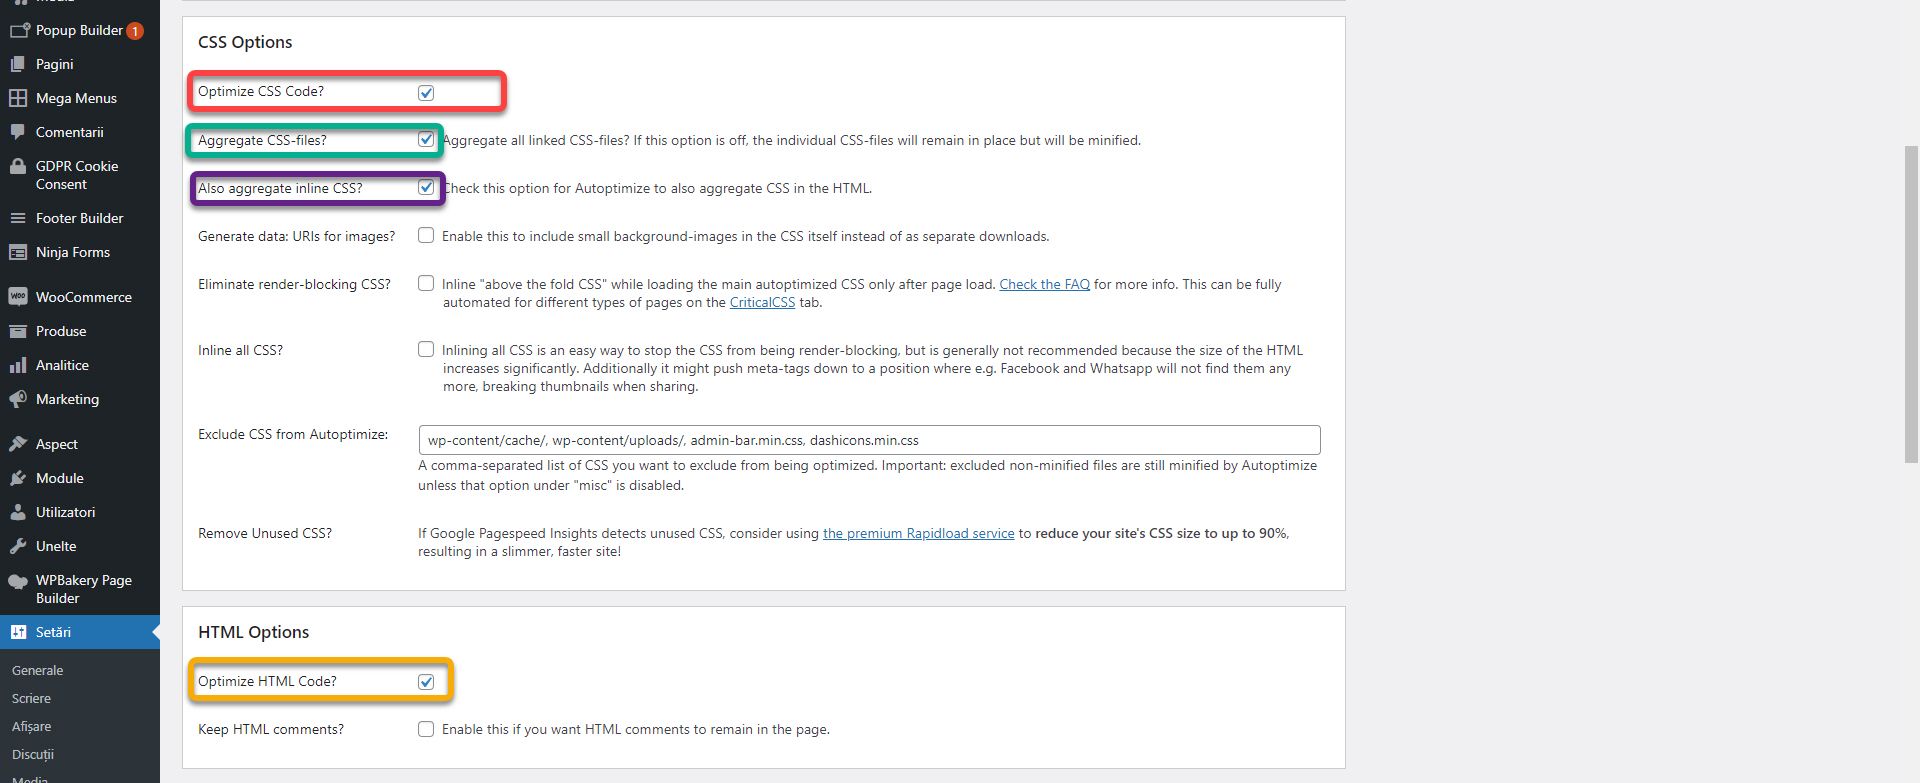
From the CSS section, enable Optimize CSS Code, Aggregate CSS-files and Also aggregate inline CSS. From the HTML section, enable Optimize HTML Code. CSS and HTML codes will be optimized.
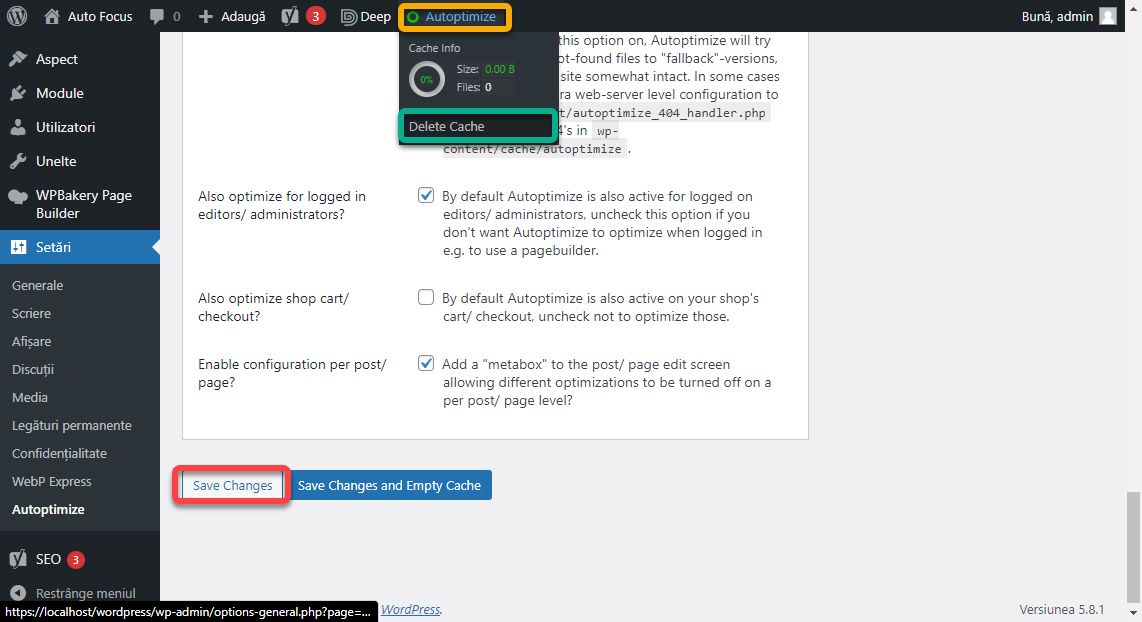
Click the Save Changes button at the bottom. Every time you make changes to your pages, products, articles, or website structure, it’s a good idea to clear your cache to make sure they’re visible. Hover over the Autoptimize button and click Delete Cache.
To enable browser-level caching, we will use WP Super Cache. After activation, go to Settings, WP Super Cache. Check Caching on and click Update status.

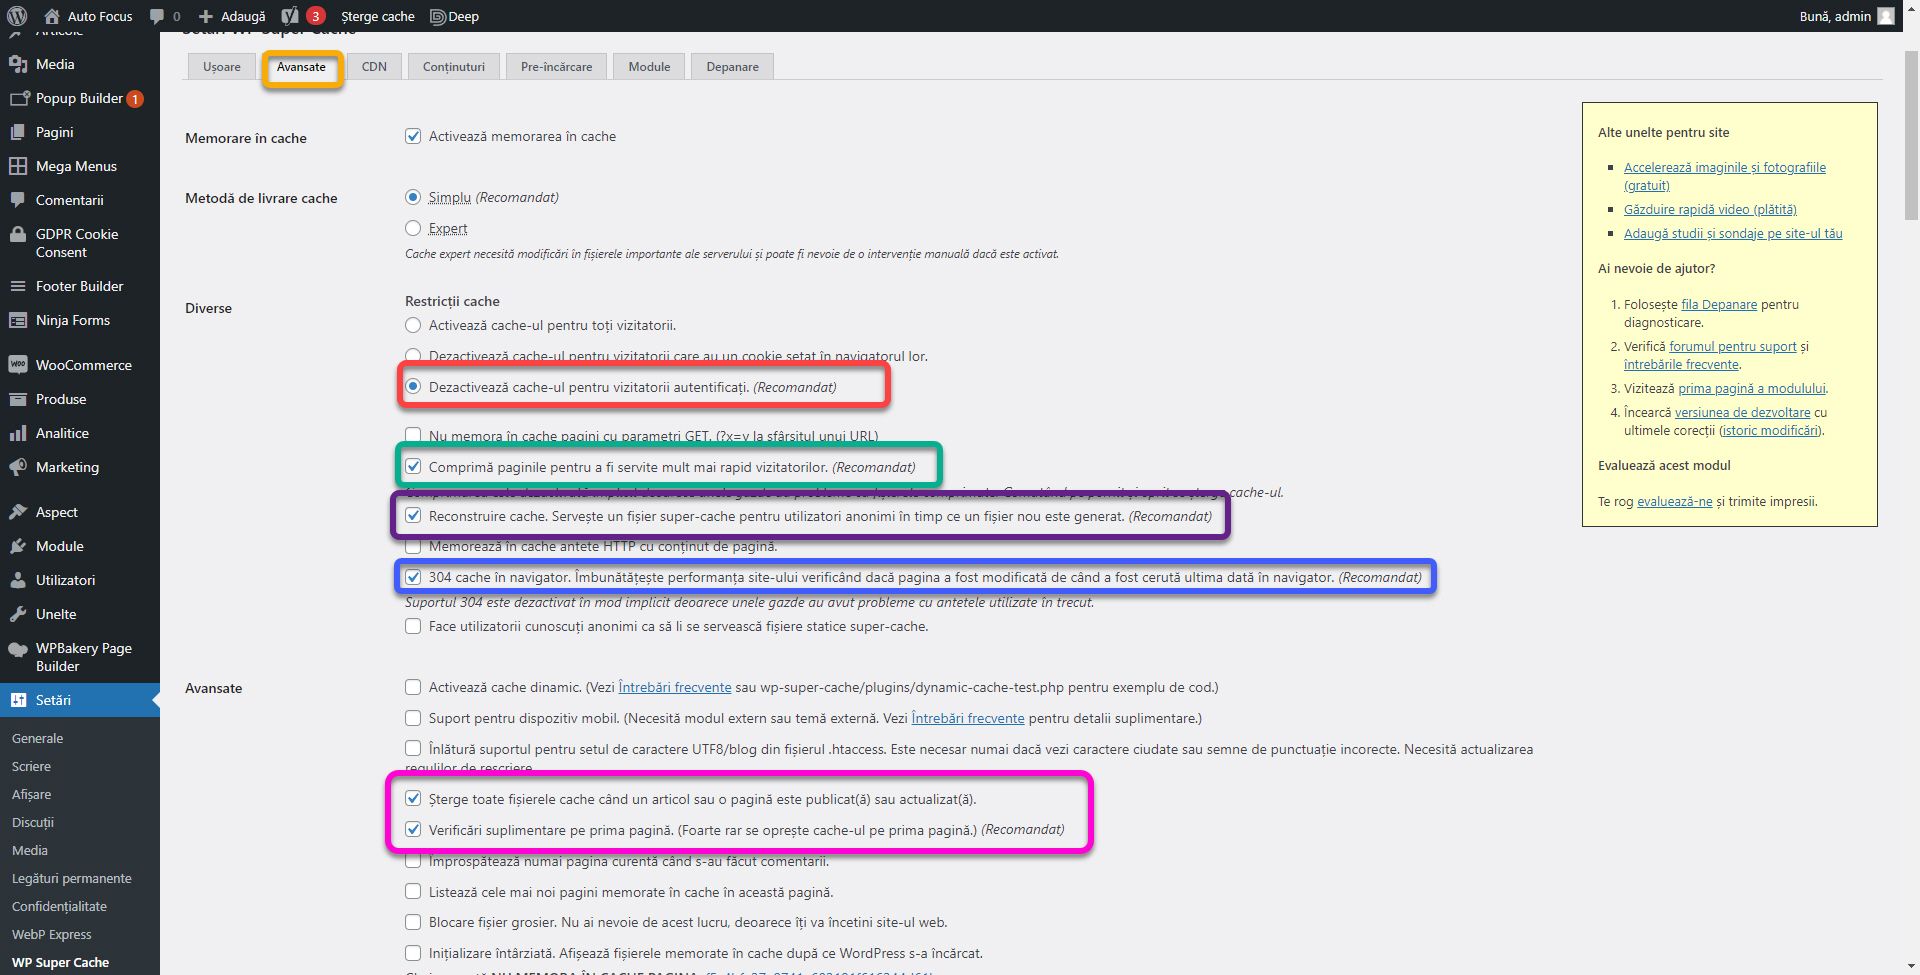
Go to the Advanced tab and check the following:
- Disable caching for logged in visitors.
- Compress pages so they’re served more quickly to visitors.
- Cache rebuild.
- 304 Browser caching.
- Clear all cache files when a post or page is published or updated.
- Extra homepage checks.
Go below and click the Update Status button.
To clear the cache, click the Delete Cache button in the top bar.

Premium Plugins
The above two plugins can be equated to one: WP Fastest Cache. In its free version, it is not as effective. Instead, the premium version brings some very interesting features. Do not combine them with the free plugins above, having the same functionality conflicts will occur. Install and activate the plugin in both free and premium version. Using the new WordPress side menu button called WP Fastest Cache, go to the options page. Check all options except Mobile and Mobile Theme. Click Submit.

Their explanation is as follows:
- Cache Sistem: Enable the caching system.
- Widget Cache: It also caches widgets.
- Preload: Creates caches automatically even if there are no hits on that page.
- Logged-in Users: Disables caching for logged in users. Very useful to be able to see design changes in real time.
- New Post / Update Post: Clear the cache when an article is published or updated.
- Minify HTML, CSS, JS: All such options must be enabled. Actively decreases file size.
- Combine JS / CSS: Concatenates all CSS and JS files into a single file to increase download speed.
- GZIP: Enables GZIP content compression.
- Browser Caching: Enable browser-level caching.
- Disable Emojis: Optionally, disable the font required for emojis.
- Render Blocking JS: Moves all JS files that are loaded into the header in the footer section to shorten the display time of the content. Warning, it may have minor conflicts with certain versions of the Revolution Slider plugin. If the carousels are not loaded in incognito mode, disable this option.
- Google Fonts: Loads Google fonts asynchronously.
- Lazy Load: Allows images to be loaded only when the user scrolls to them. This decreases the number of files downloaded when the page loads.
To clear the cache, place the cursor on the Delete Cache button at the top of the control panel, and click Delete Cache and Minified CSS / JS.

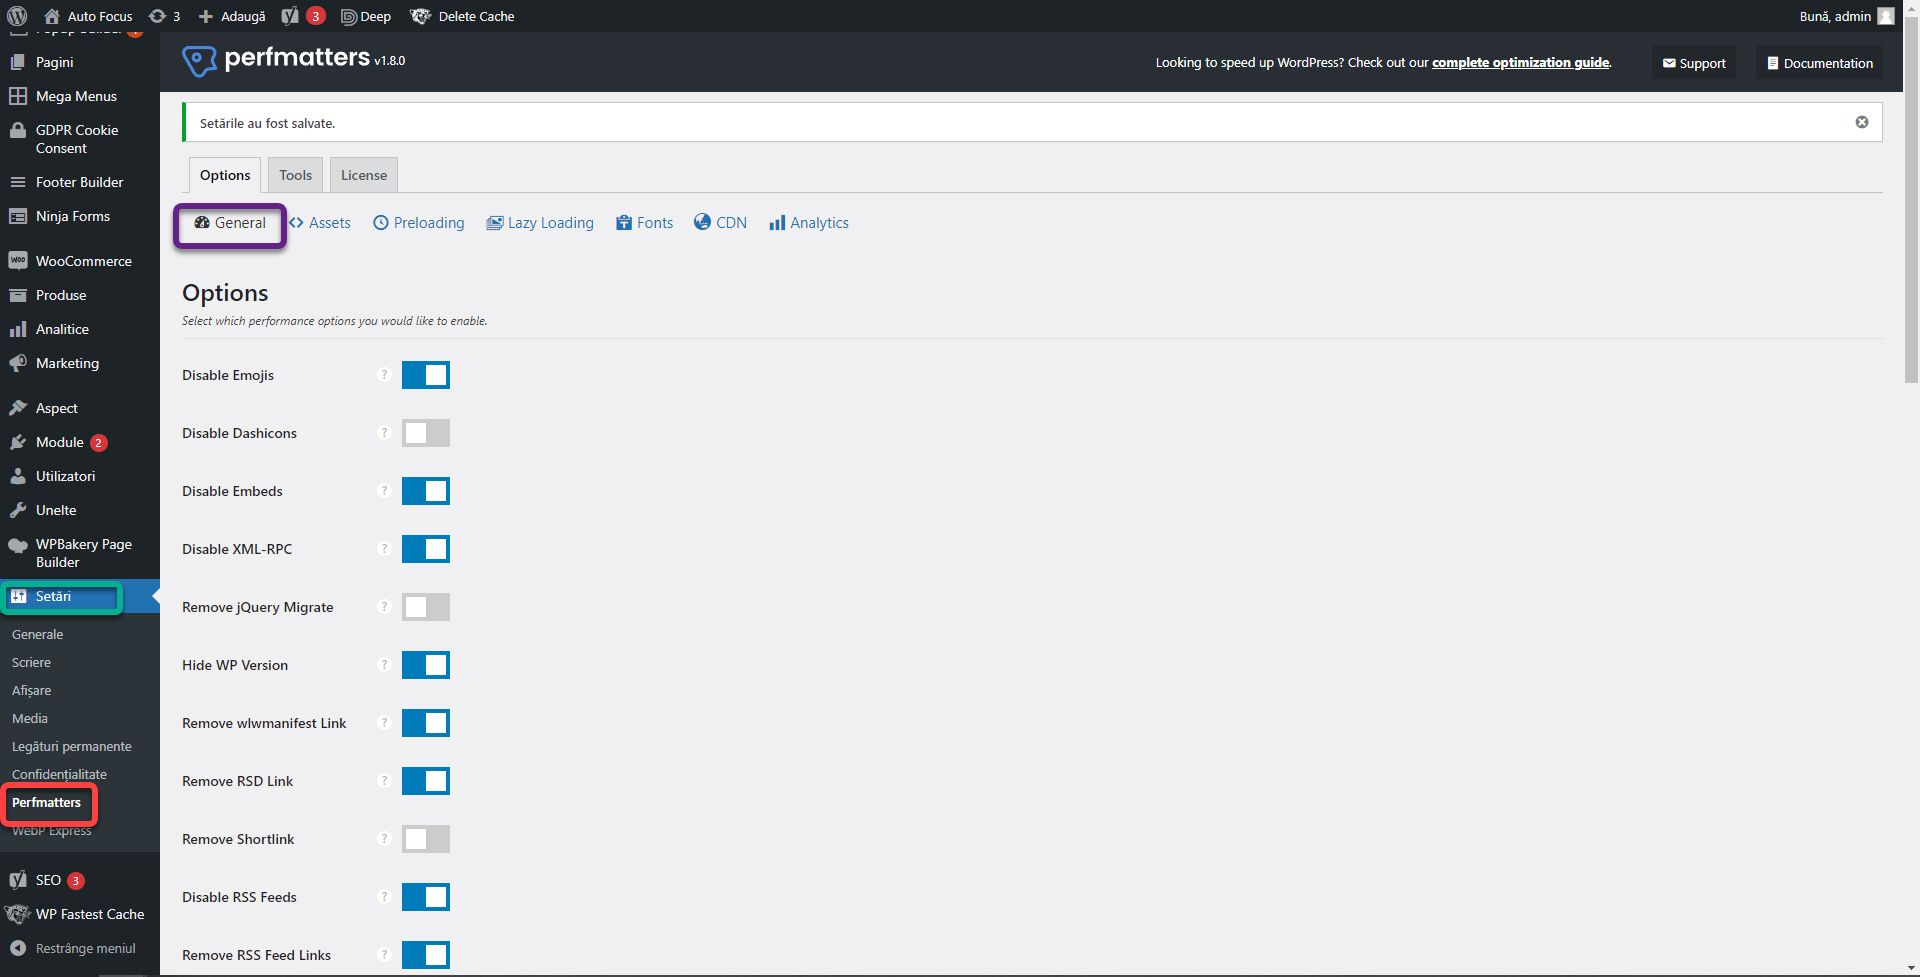
WordPress is like a swiss knife, it comes with a lot of tools that you may not need. That’s why we have the Perfmatters plugin. Go to Settings, Permatters. From the General settings, check the following:
- Disable Emojis, if you don’t use emojis.
- Disable Dashicons, they are the icons related to the WordPress control panel. They are uploaded even if the visitor is not logged in and does not see them. CAREFUL! Do not check the option if you use Ninja Forms because certain functions are based on Dashicons.
- Disable Embeds, when you insert a YouTube link, it automatically becomes a video. You can disable this feature especially if you use WPBakery Page Builder.
- Disable XML-RPC, a feature that allows you to publish content remotely. It is recommended to be disabled because many attacks take place through this file.
- Hide WP Version, hides WordPress version. Very important for security, as some of the attacks are based on exploiting the vulnerabilities of certain versions. If it is hidden the whole process is much harder.
- Remove wlwmanifest Link, removes the Windows Live Writer label, which is not used in the vast majority of cases.
- Remove RSD Link, is linked to XML-RPC and can be disabled.
- Disable Google Maps, disables the Google Maps API if it has been integrated with any plugin or theme. Classically embedded maps will continue to work.
- Disable Comments, disables the comments feature.
- Remove Comment URLs, disables the comments link option.
- Limit Post Revisions, I recommend up to 5 revisions so as not to load the database.
- Custom Login URL, allows you to change the login address from / wp-admin to anything you want. Very useful, because a large part of security attacks take place on the password.
The rest of the options depend on each case and the combination of plugins. Once activated, the functionality must be retested.
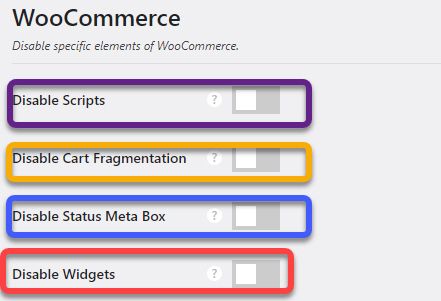
From the WooCommerce section, which only appears if the plugin is present, you can activate:
- Disable Scripts, which will disable WooCommerce’s CSS and JS code on any page other than the dedicated ones, such as Cart or Product. Not recommended if you display products on other pages as well.
- Disable Cart Fragmentation, the basket fragmentation function updates the number of products in the basket without reloading the page. It is recommended to activate the option if you have a large volume of traffic and you notice a high consumption of resources.
- Disable Status Meta Box, disables the status borders on the control panel.
- Disable Widgets, disables all WooCommerce pieces. Not recommended if you want them to continue working.
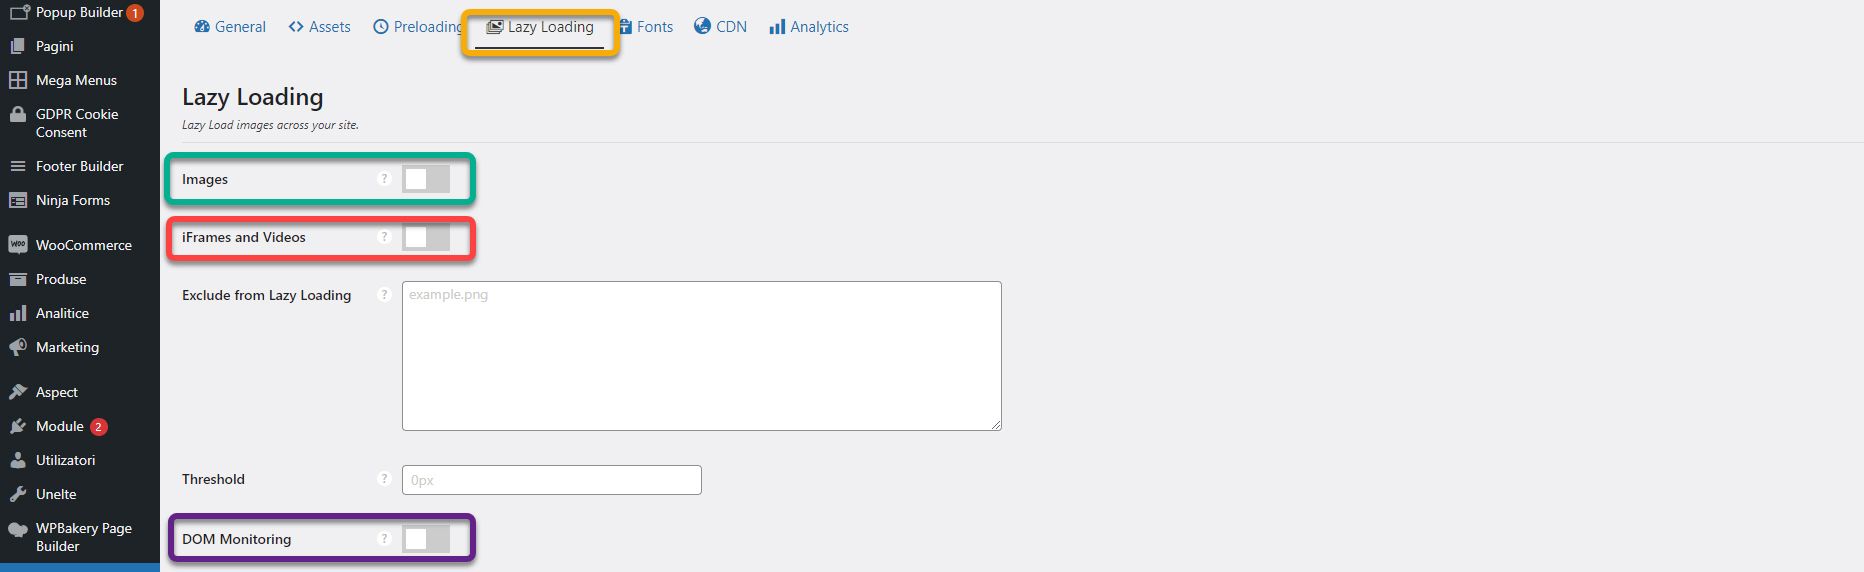
From the Lazy Loading section, you can turn off the display of Images by ticking Images, Videos by ticking iFrames and Videos, or even content by ticking DOM, until the user scrolls next to them.
From the Fonts section you can disable Google fonts altogether by checking Disable Google Fonts if you want to use a system font like Arial or Times New Roman. If not, enable the Local Google Fonts option which will serve the fonts directly from your server without making an HTTP connection to Google.

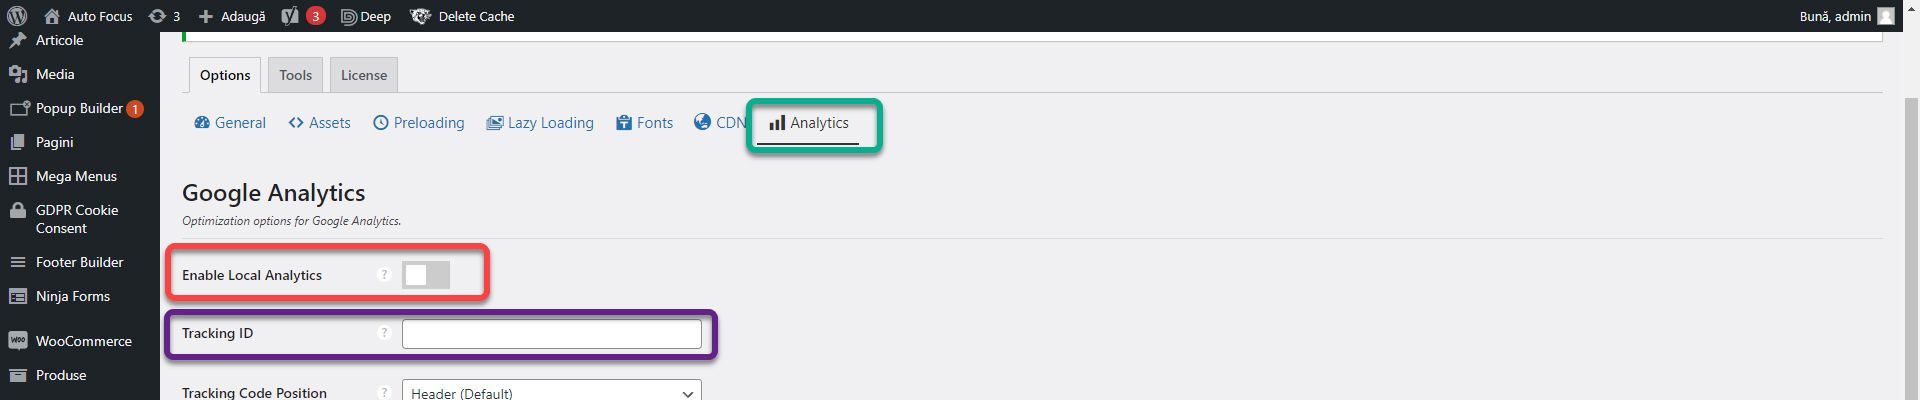
In the Analytics section you can configure Google Analytics. Enable Local Analytics allows you to serve files directly from your server without having to connect to Google. In the Tracking ID field you can enter the Analytics code.
Database optimization
It is not a step you have to take at the beginning, but it is something you adjust over time. As you install and uninstall themes or plugins, write articles and pages, residual entries are stored in the database. They need to be cleaned once. When too much is collected, the database slows down. The result differs depending on how often you clean. If you do it after 2-3 years, you may gain a few seconds. Pay attention! Always make a backup before optimizing the database.
For optimization, we will use the WP-Sweep plugin. Go to Tools, then Sweep. Each category has a button called Sweep. You can press them individually, or press the Sweep All button at the bottom.
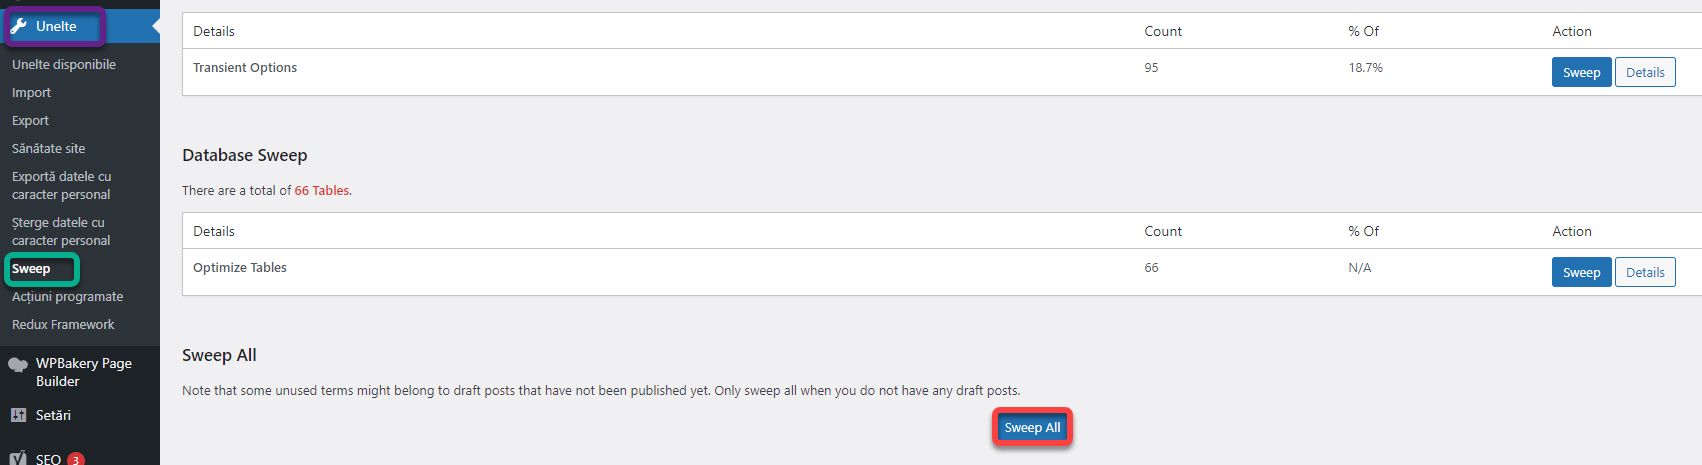
- Post Sweep: Deletes revisions, drafts, pages, and trash items, or unused content.
- Comment Sweep: Deletes spam, trash or unapproved comments.
- User Sweep: Deletes remaining data from deleted users.
- Term Sweep: Delete orphaned entries from the database.
- Option Sweep: Deletes obsolete theme and plugin settings. This is the only one that could cause problems. If after cleaning the website does not behave or looks like before, restore the backup and skip this step.
- Database Sweep: Optimizes tables in the database.
As before, if you have questions or need help, I’m waiting for you on the SenDesign Community Facebook group! This is where the series of tutorials ends. From here you can deepen WordPress through a lot of practice. The book Successful Web Design is the next step, you will find all the theory you need to be a successful web designer.


