


How to create a website #12: Setting up an online shop
26/11/2021
How to create a website #14: Website Security
10/12/2021How to create a website #12: Setting up an online shop
26/11/2021How to create a website #14: Website Security
10/12/2021
In a highly digitalized world, positioning in engines like Google dictates the success of your website. Because the vast majority of internet users do not go beyond the first page of results. You are not on the front page, you do not exist.
Before you get started you need to have an idea of what SEO optimization means. You can read one of the books Successful Web Design or The Online Business Guide. Alternatively you can read the following articles:
- SEO optimization – What is it and how does it affect Google listings?
- On-Page SEO Optimization – Correct content optimization
- The secrets behind a successful Blog.
Blog Setup
In the case of Auto Focus, I omitted the Blog section of the Deep theme. It’s time to take care of it. Go to Deep, Options (formerly Theme Options) and click on Blog. Blog Template is how posts are displayed. I recommend you try every option in the drop-down list to see which one you like. Next to Blog Template Layout, choose how the posts will be listed on the blog page. For this example, select List style.
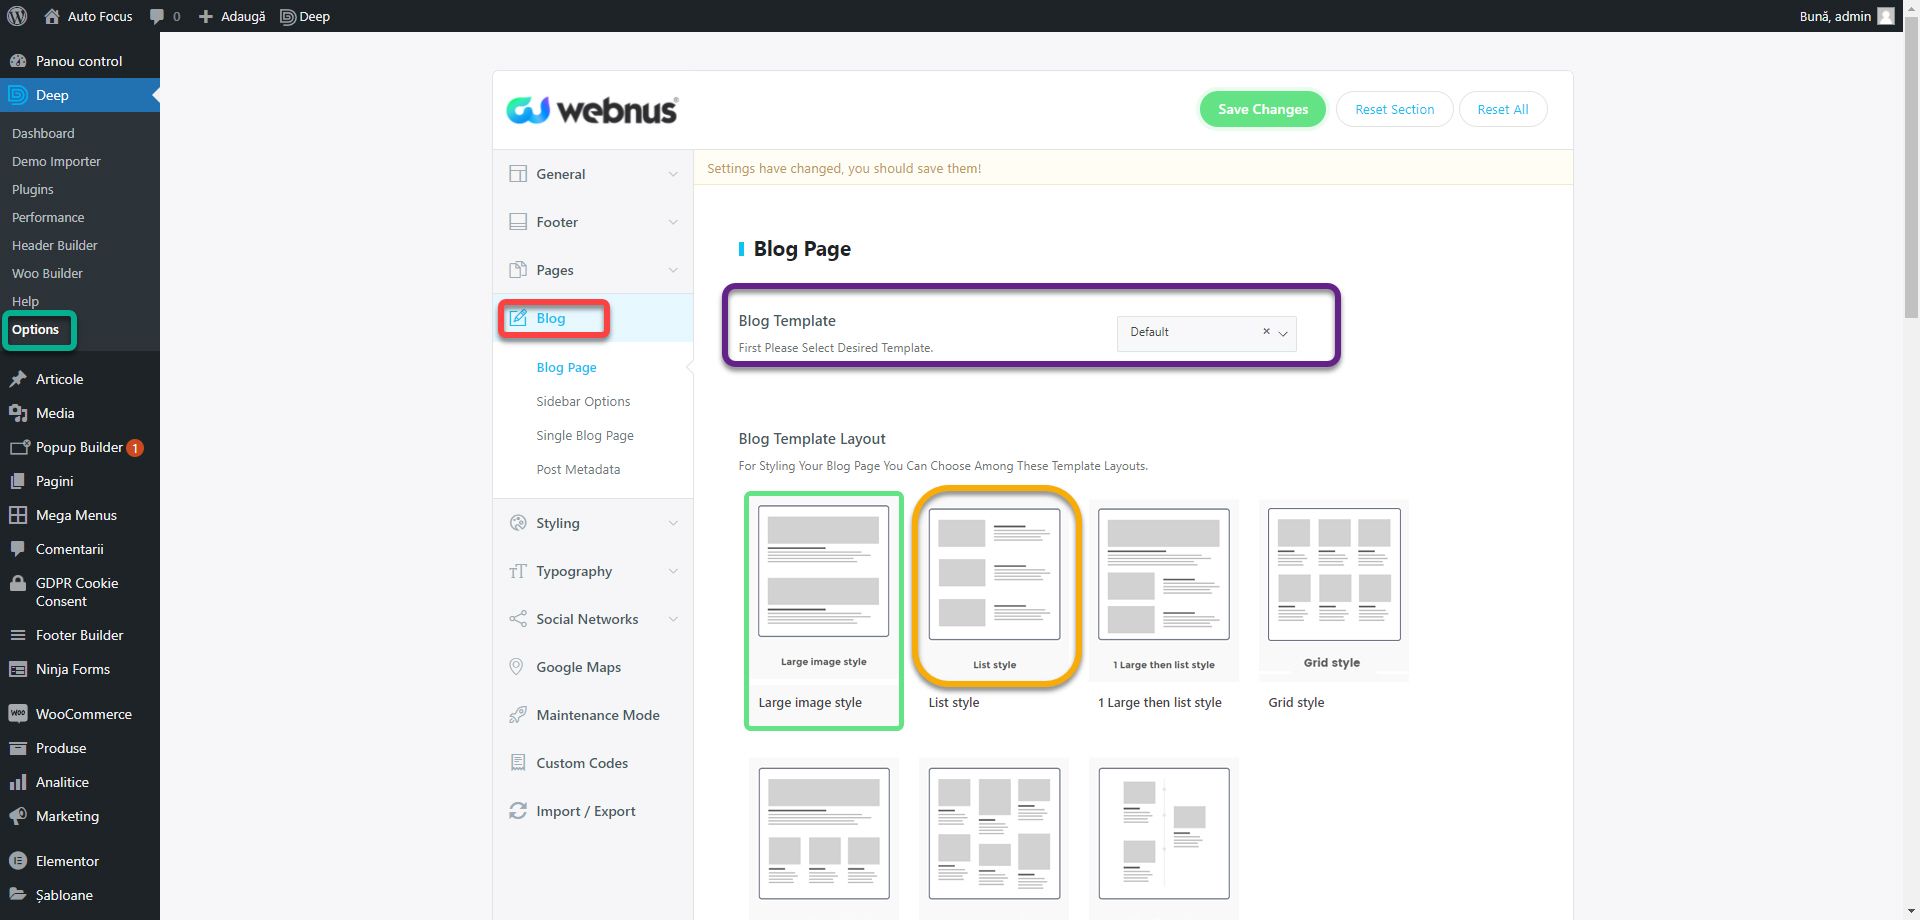
Blog Sidebar Position controls which side of the blog widget bar is displayed on. It can be left, right, both or hidden. On the Blog page, each post listed has a short summary automatically extracted from its first paragraphs. When Excerpt Or Full Blog Content is unchecked, the summary text is displayed truncated. When checked, the entire contents of the post will be displayed, which is not recommended. Excerpt Length For Large Posts and Excerpt Length For List, Grid, Timeline & Masonry Posts control the truncate limit of the summary. For example, the first 93 characters (letters, numbers, spaces, or symbols) in the text of the post will be displayed. Excerpt Length For Large Posts applies to Blog Template Layout type 1 Large then list, in which the first post is larger than the others. This way you can have a larger or smaller summary than the rest of the list. Blog Page Title controls whether or not the title is displayed on the Blog page, and the Blog Page Title Text defines the title of the page.
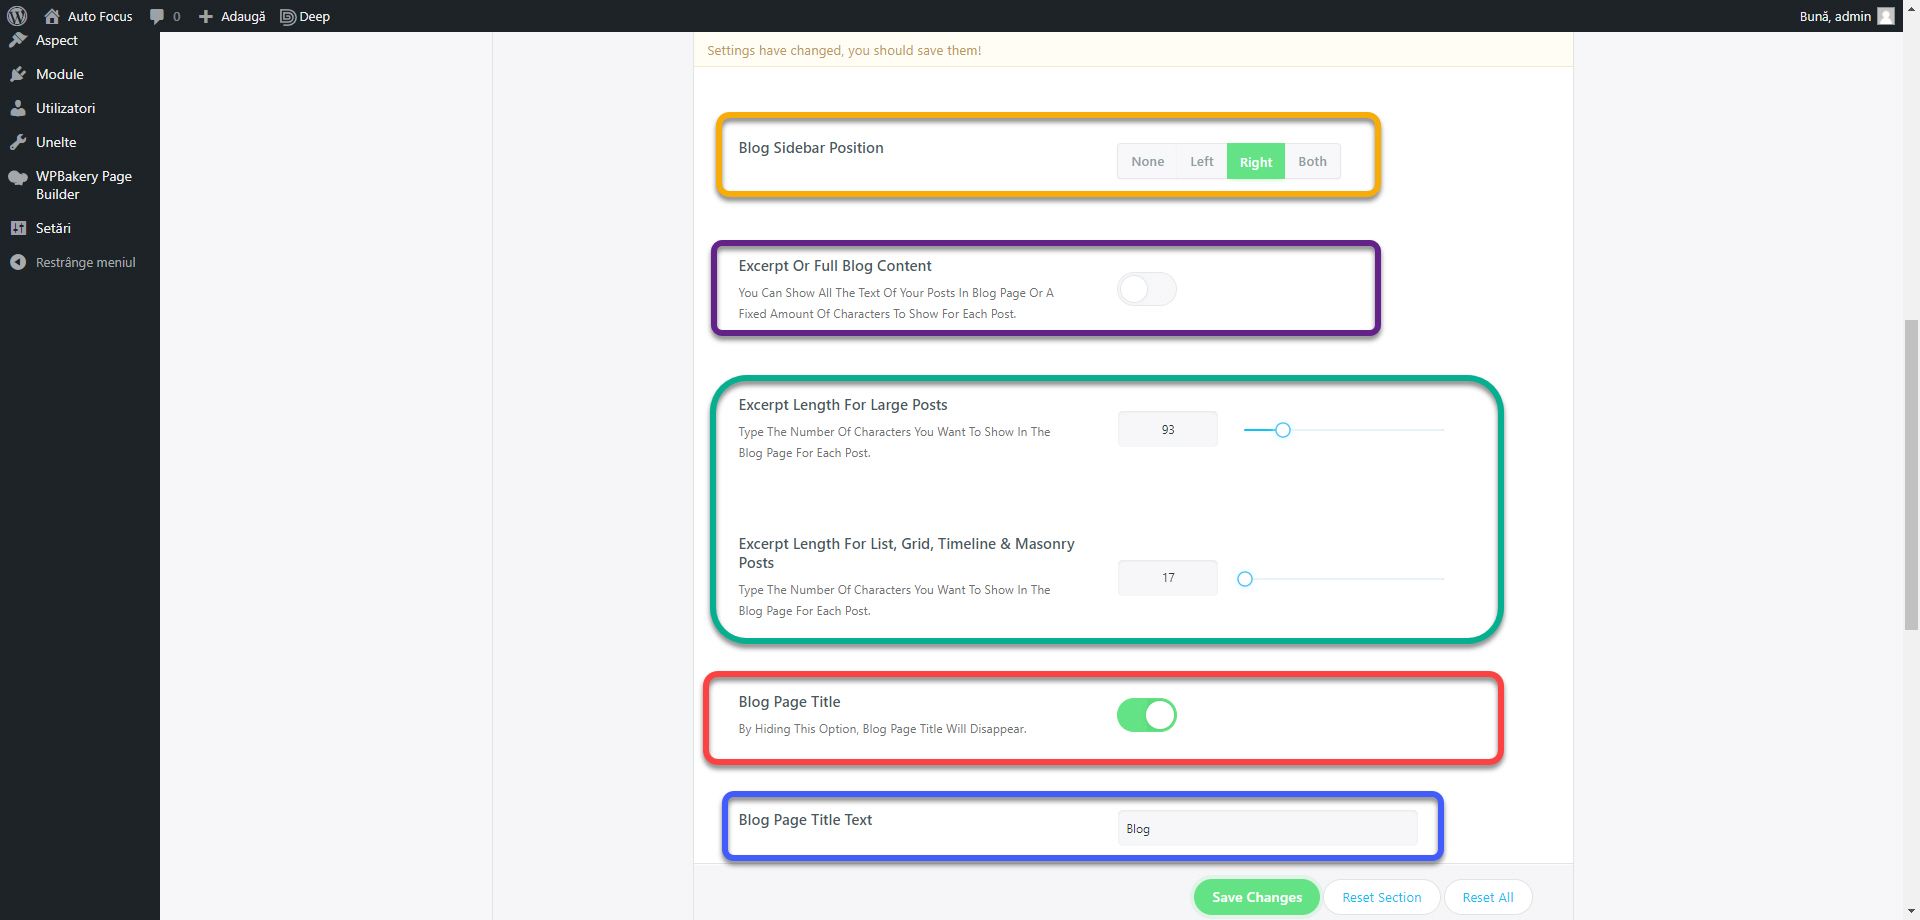
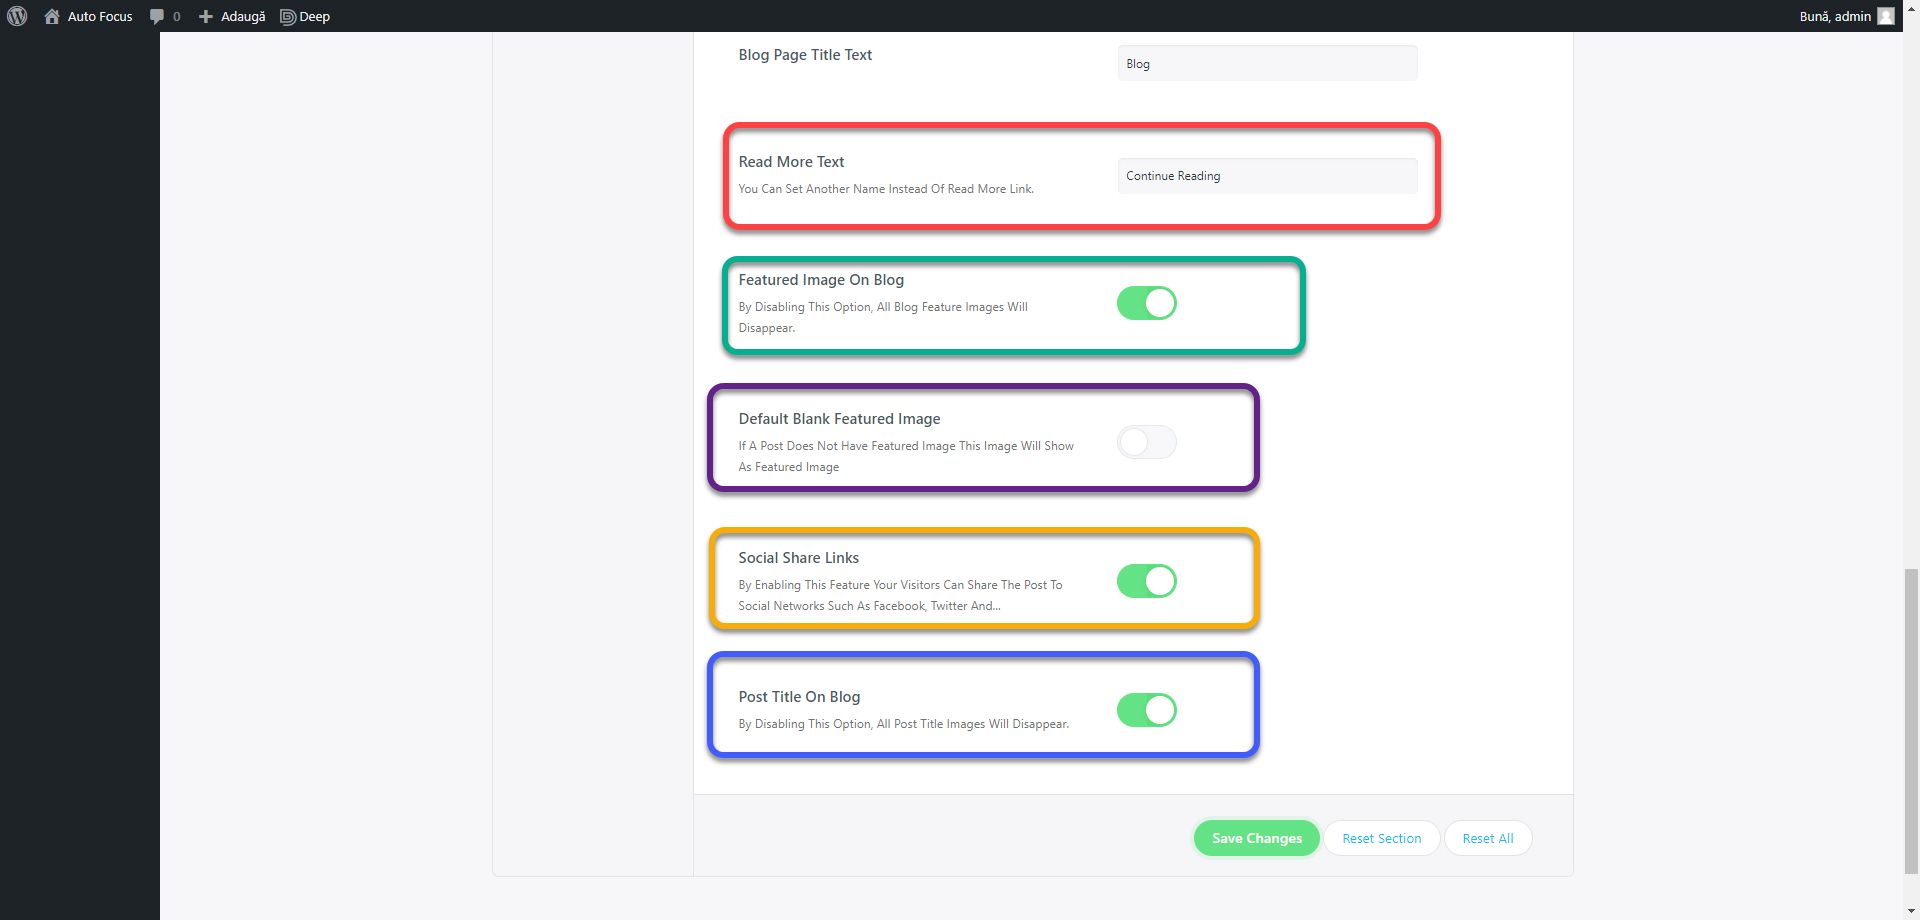
In the blog page, after the summary of each post, there is a button that has the link to the post. Read More Text controls the text of this button. Featured Image on Blog enables or disables featured images of posts. Leave this option checked as the featured image is an important element of blogging and SEO optimization. If you check Default Blank Featured Image, you will be able to set a default representative image for each item that does not have one set. I recommend leaving this option unchecked as each post should have a unique image! Social Share Links activates distribution links on social networks, and Post Title on Blog displays the title of the post. Leave them both checked.
There isn’t much to change in the Sidebar Options subsection. Sidebar Layout defines the style of the widget bar. Try all the styles to see which one suits you. Sidebar Size defines the width of the bar. Only change it if you have a specific need. If you check Widgets Custom Shadow / Padding / Margin / Border, a multitude of options will appear to change the appearance of the widgets in the sidebar. There are finesse options that we will not address now. Title Shape sets the shape of the widgets title in the sidebar of the blog.

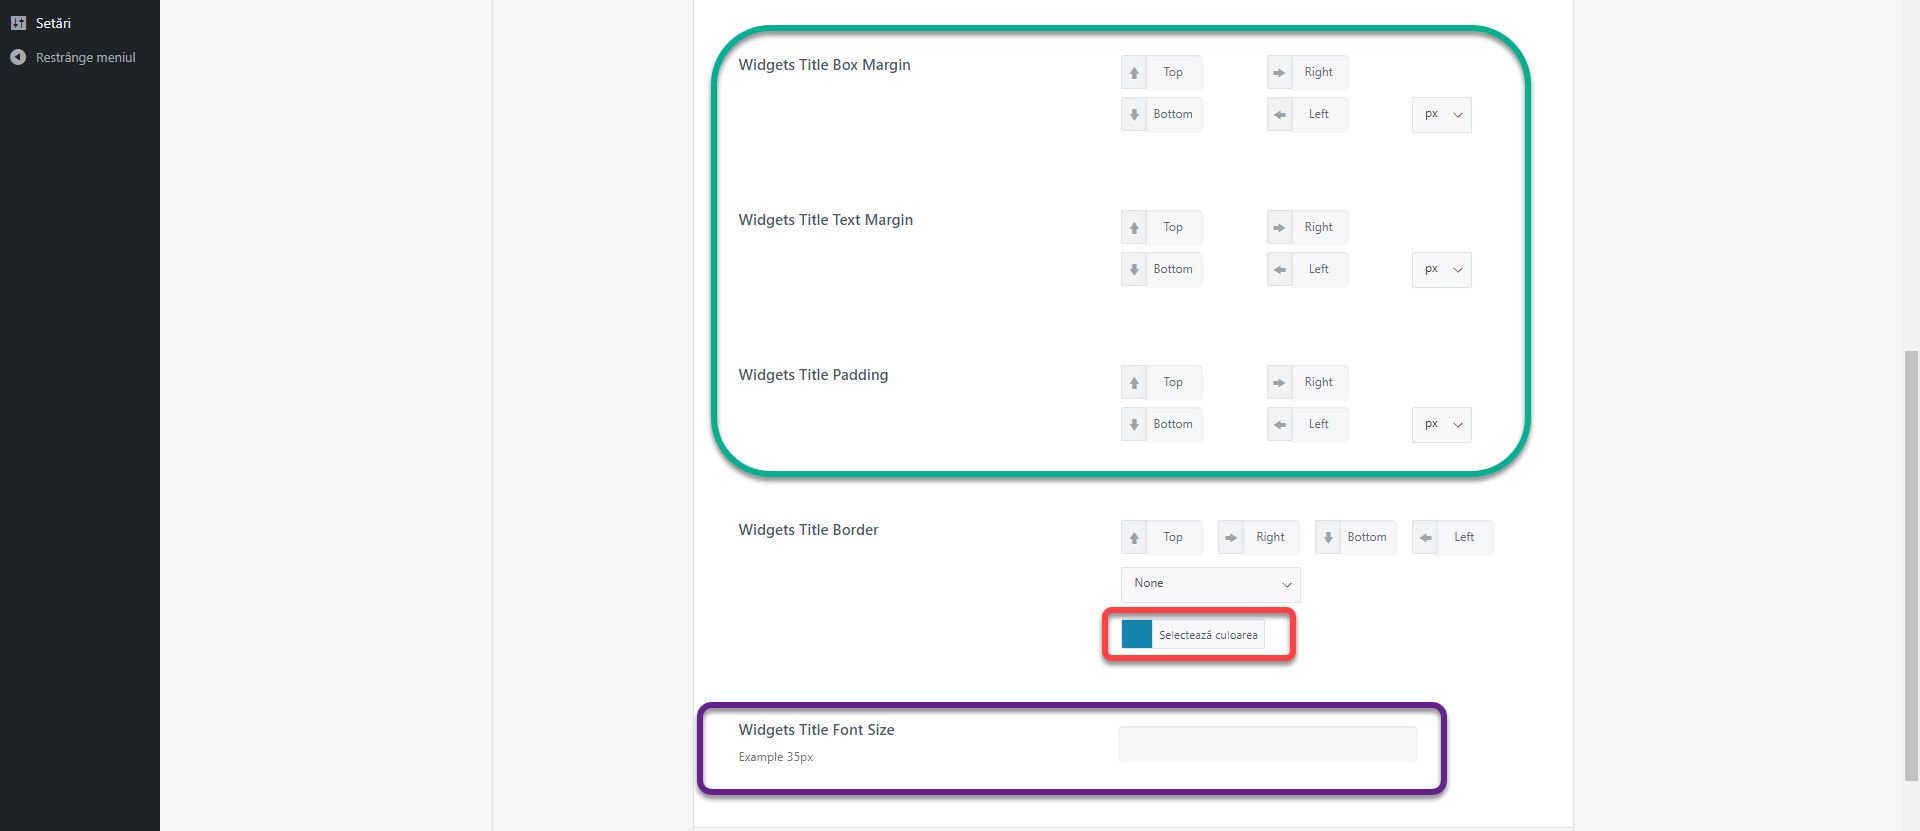
Widgets Title Box Margin Widgets, Title Text Margin, and Widgets Title Padding control the margins of the widget title. Using Widgets Title Border you can customize the chosen decoration in Title Shape. Change the color to #1584af, ie the main color. Widgets Title Font Size defines the title size in pixels.
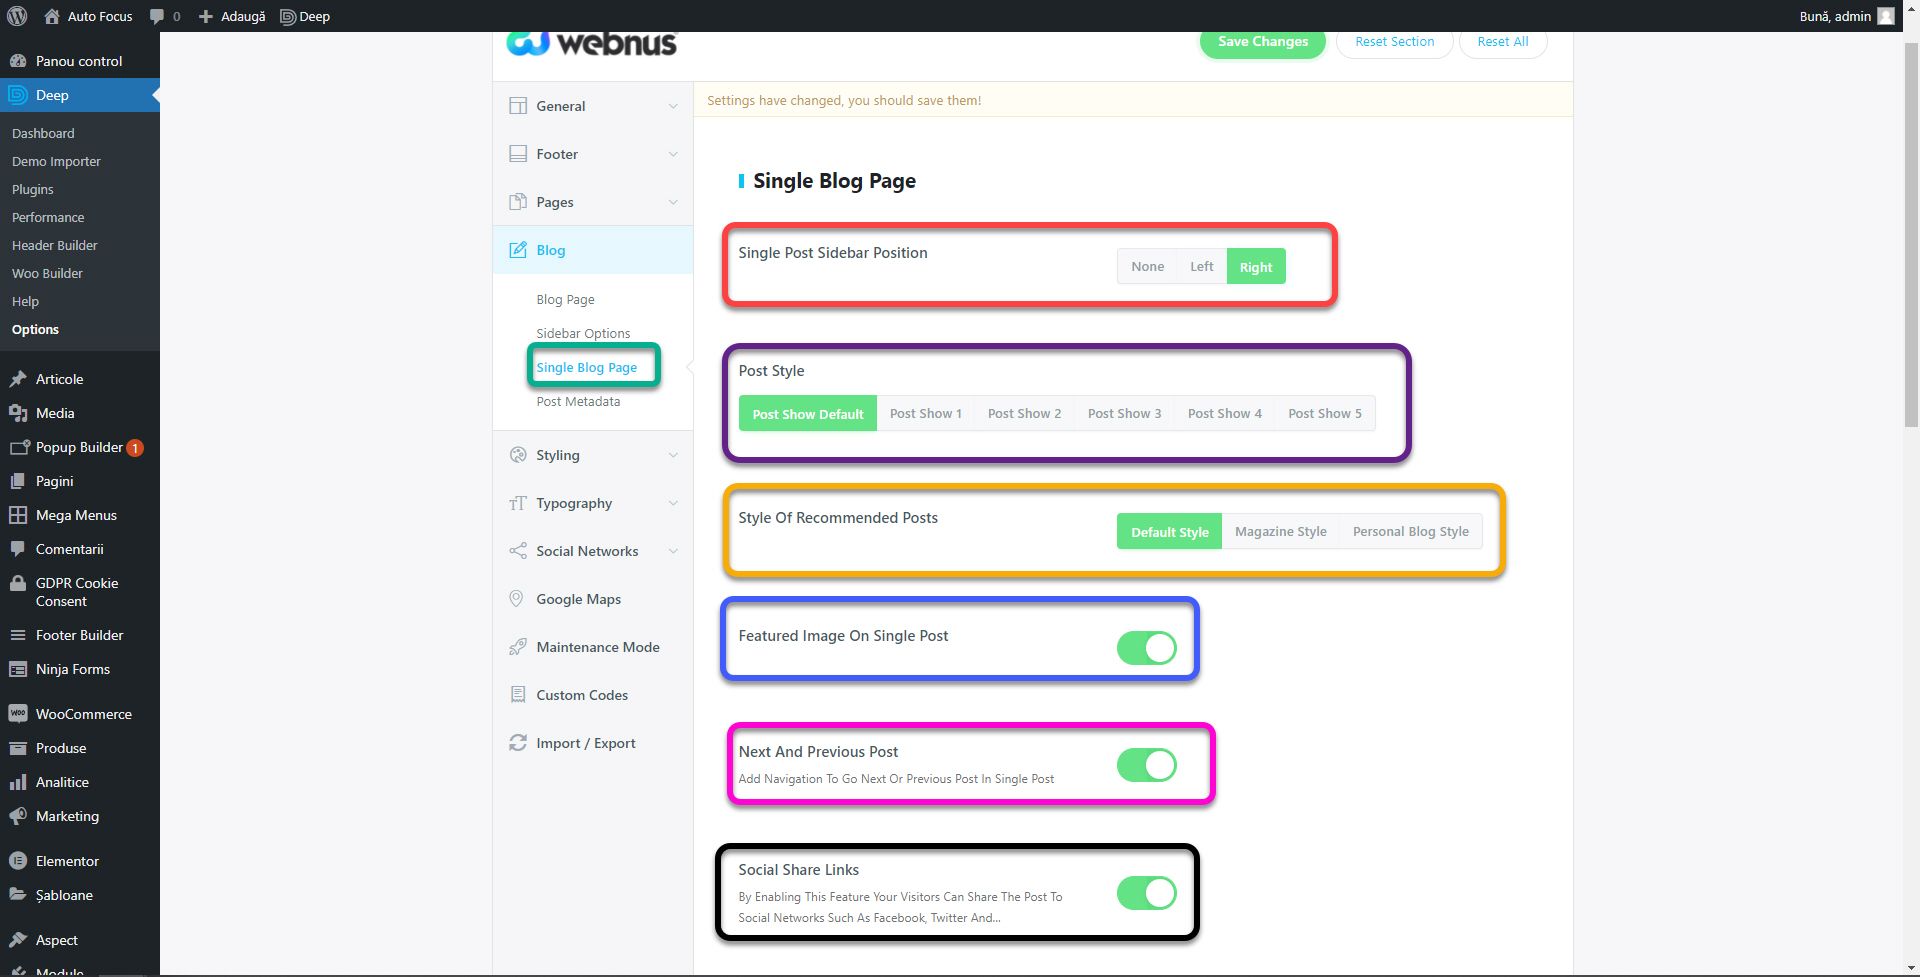
In the Single Blog Page subsection you have post display settings. Single Post Sidebar Position sets the position of the sidebar, which can be left, right, or hidden. Post Style defines the look of the item. Being a matter of taste, try them all and see which one suits you. Each post has at the end a series of recommendations of other posts in the same category. Style Of Recommended Posts defines their appearance. The Featured Image On Single Post check mark or hides the representative image at the beginning of the post. I recommend leaving it checked. Next And Previous Post are buttons to navigate from one post to another. They are useful when your readers want to go to the next post without returning to the Blog page. Social Share Links places post sharing buttons on social media.
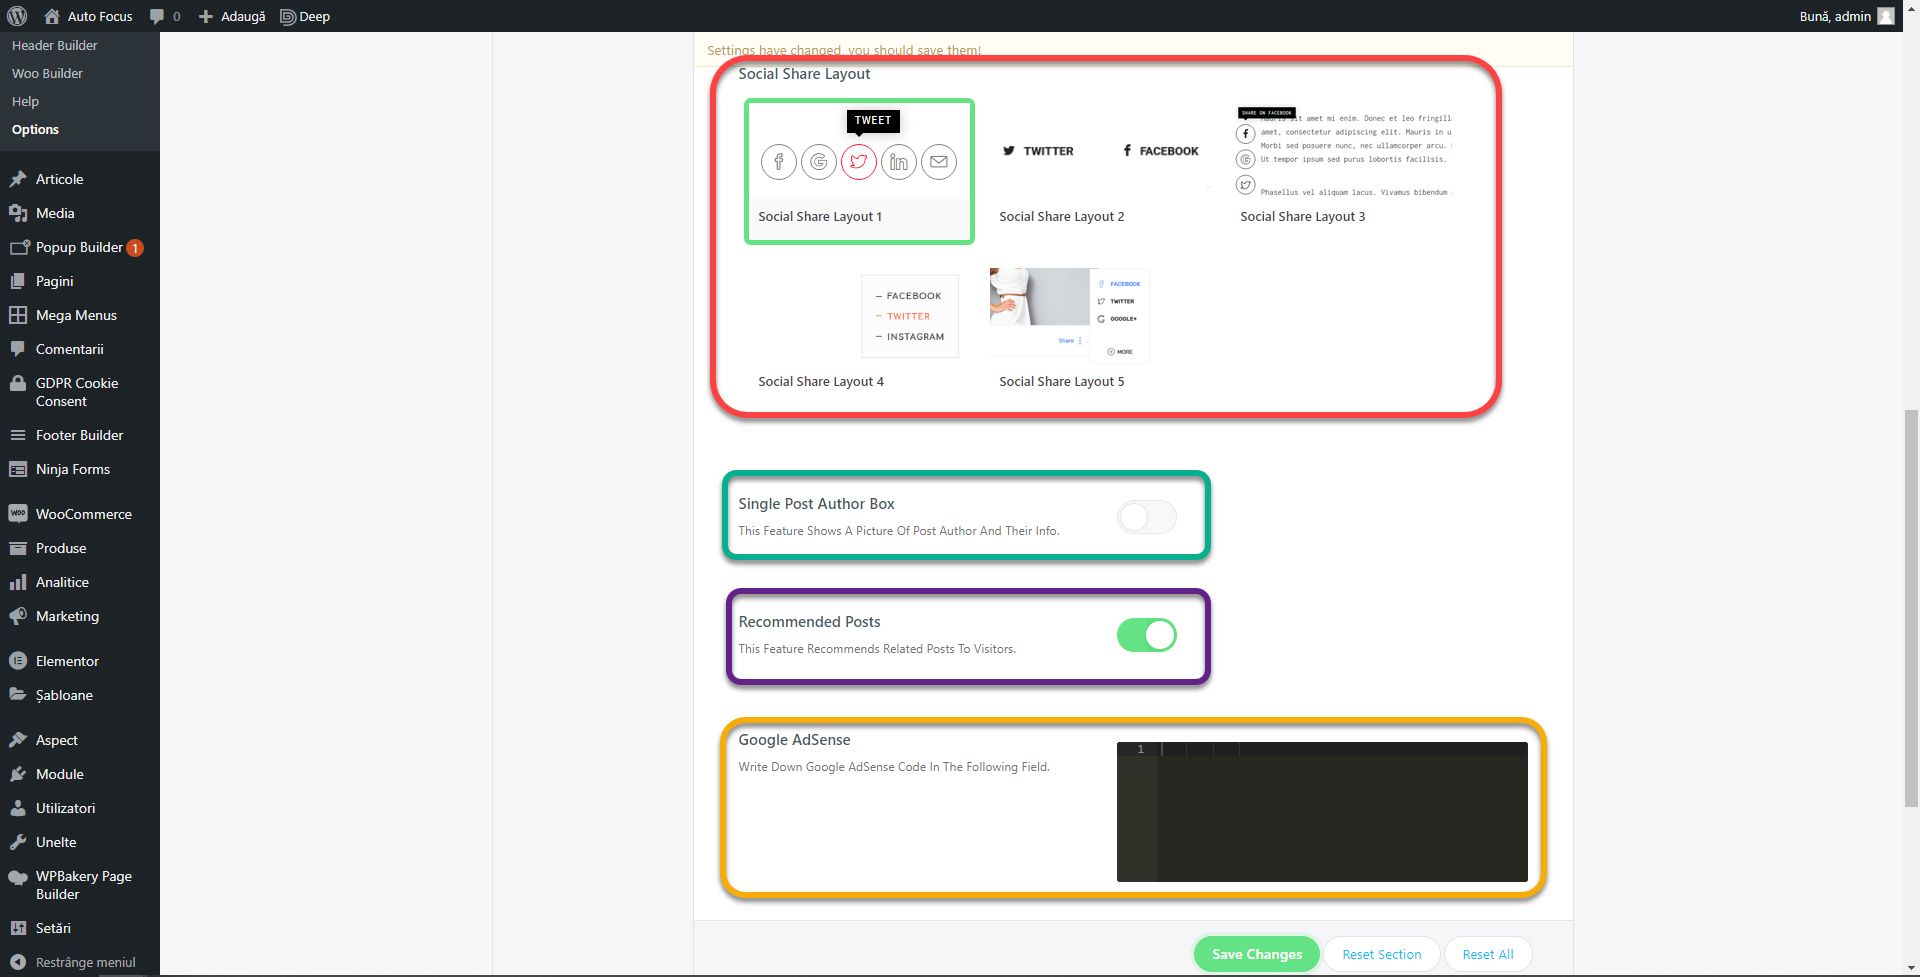
Social Share Layout controls how the share buttons will be displayed if Social Share Links is checked. Single Post Author Box displays at the end of the article a box with data about the author and his picture. If you check the option, you will be able to choose the appearance of this box. Recommended Posts shows or hides the recommended items explained above. In the Google AdSense field, you can enter the AdSense code to show ads inside articles. More About Monetization in Successful Web Design.
Show Adsense After Post displays the ads at the end of the article and Show AdSense Before Post at the beginning.

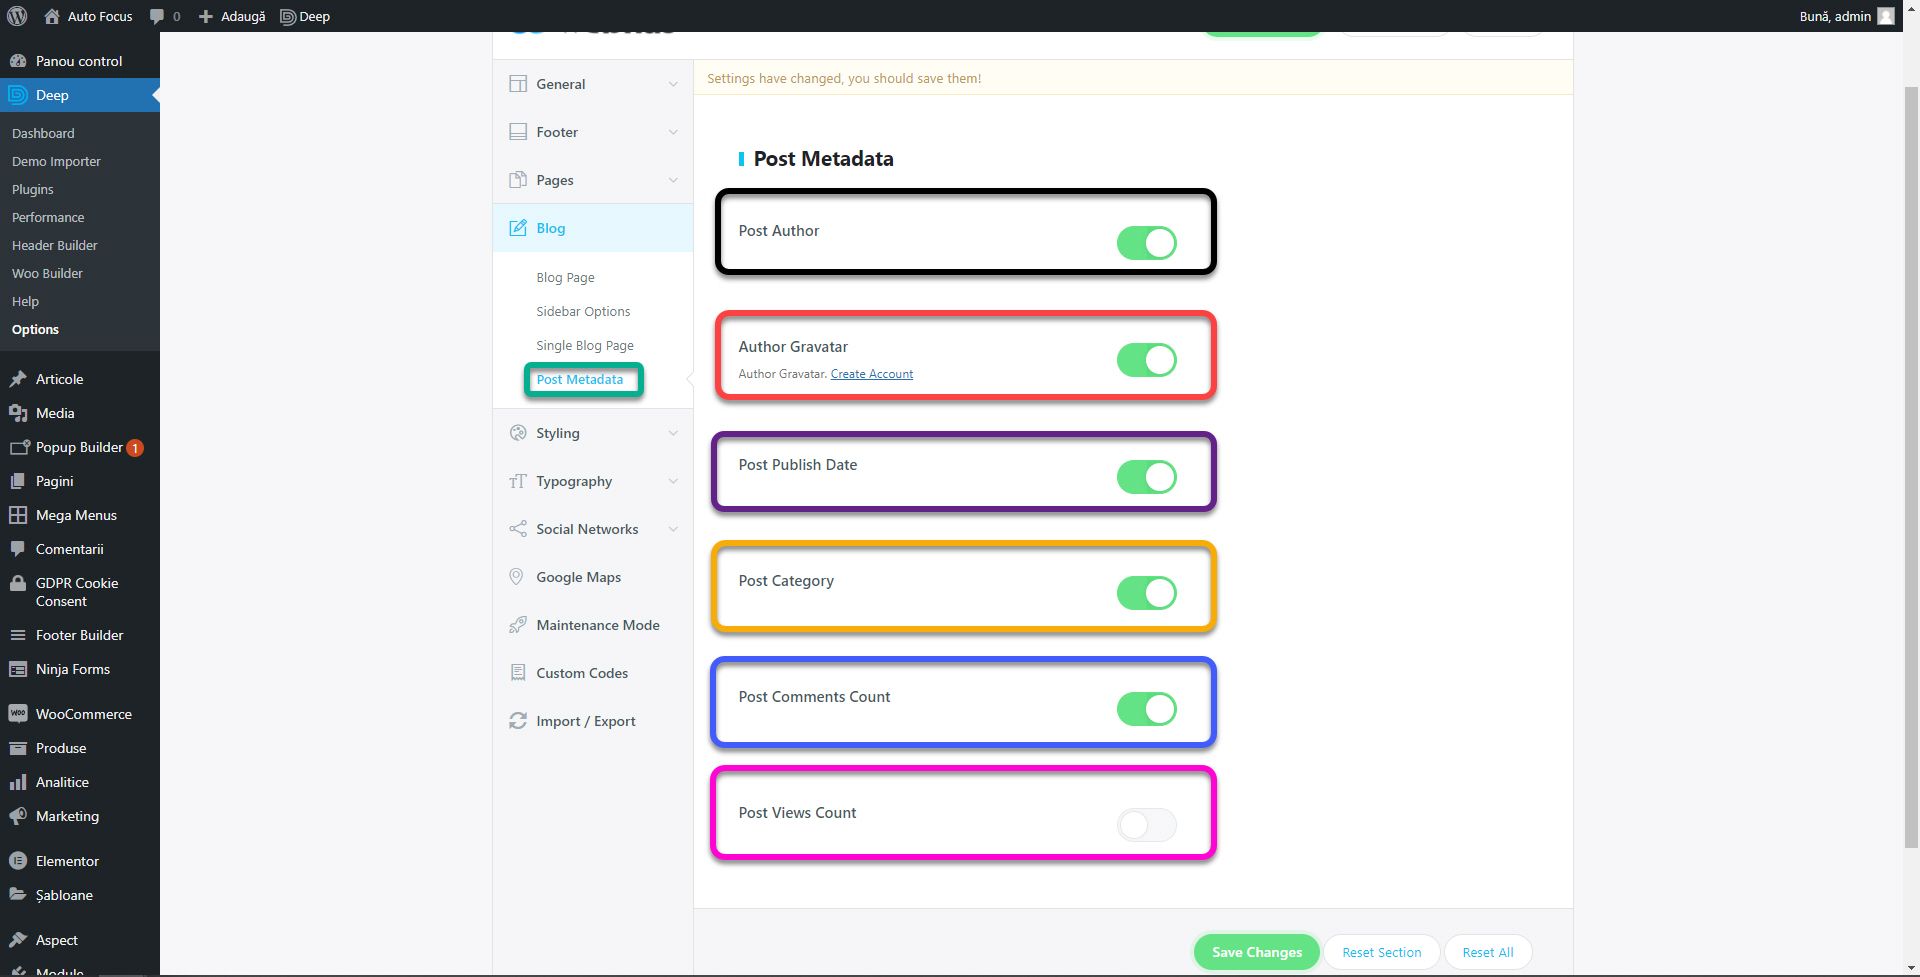
In the last subsection, called Post Metadata, you show or hide data on both the article page and the Blog page. Post Author displays the author’s name. Author Gravatar displays the author’s picture on the Gravatar platform if the service is connected. Post Publish Date, displays the date the article was published. Post Category displays article categories. Post Comments Count displays the number of comments and Post Views Count displays the number of views of the article.
Sidebar and menu
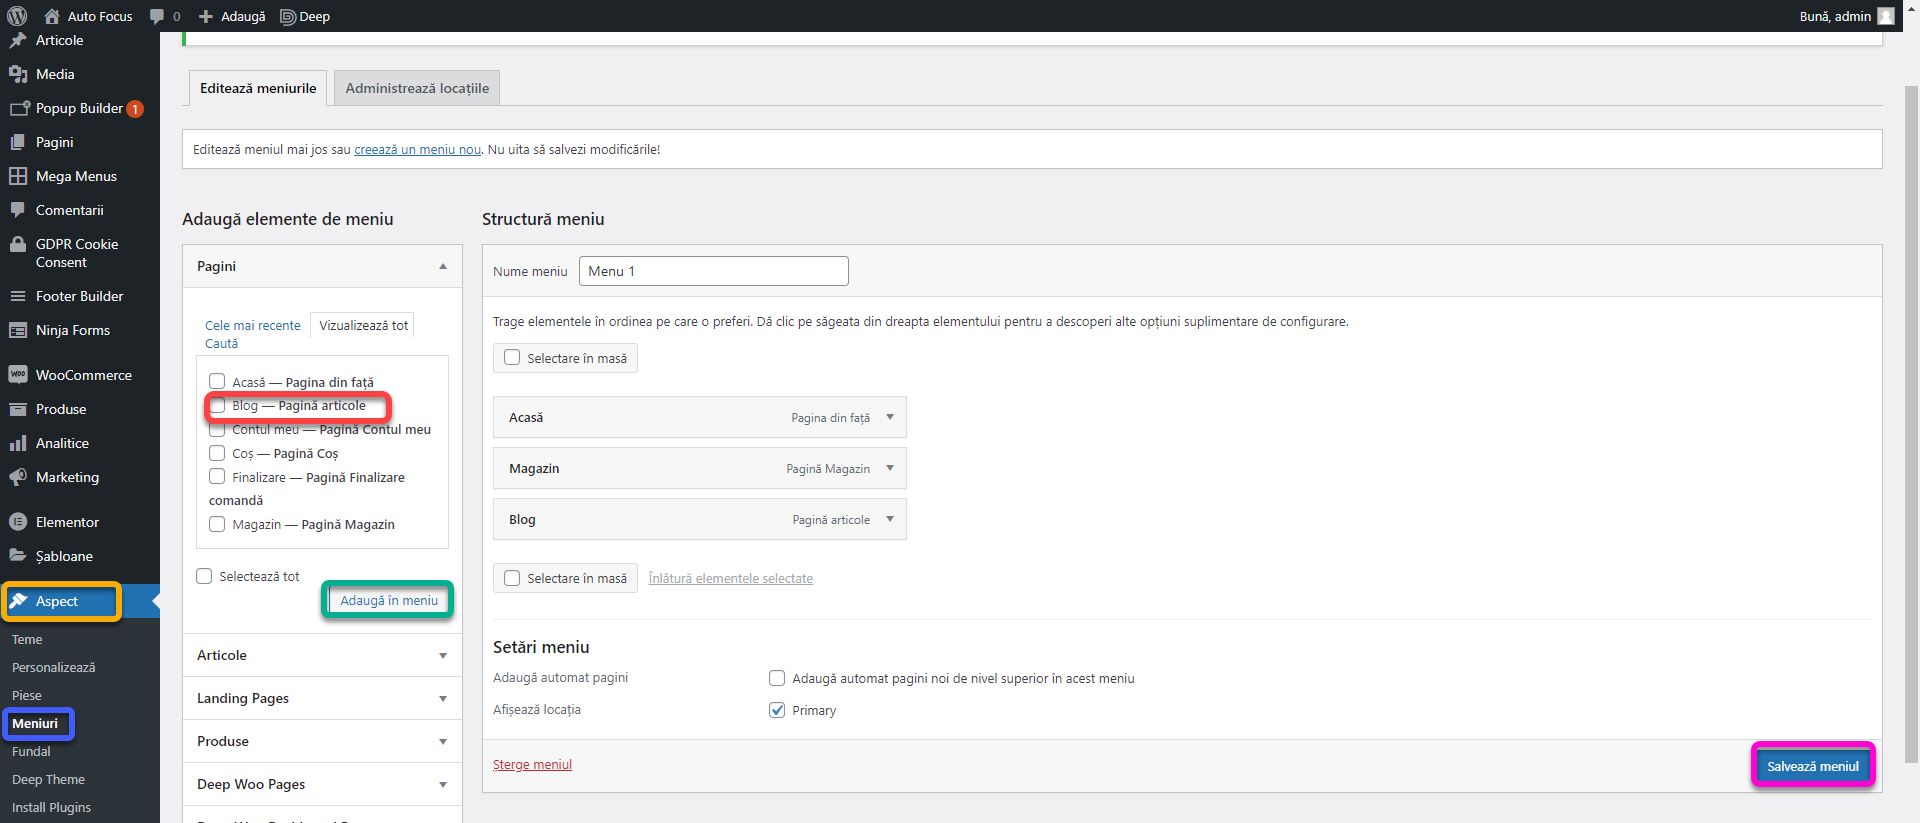
Create a page called Blog, if you haven’t done so in previous articles. Go to Settings – Display and make sure the Blog page is selected in the Blog page field.

Go to Appearance, Menus and add the Blog page, by checking the box next to the page and pressing the Add to menu button. Click Save Menu.
Also in the Appearance section, go to Widgets. To populate the sidebar of the blog you have the Left Sidebar and Right Sidebar sections. Depending on what settings you made in the previous steps, the left bar or the right bar will be displayed.
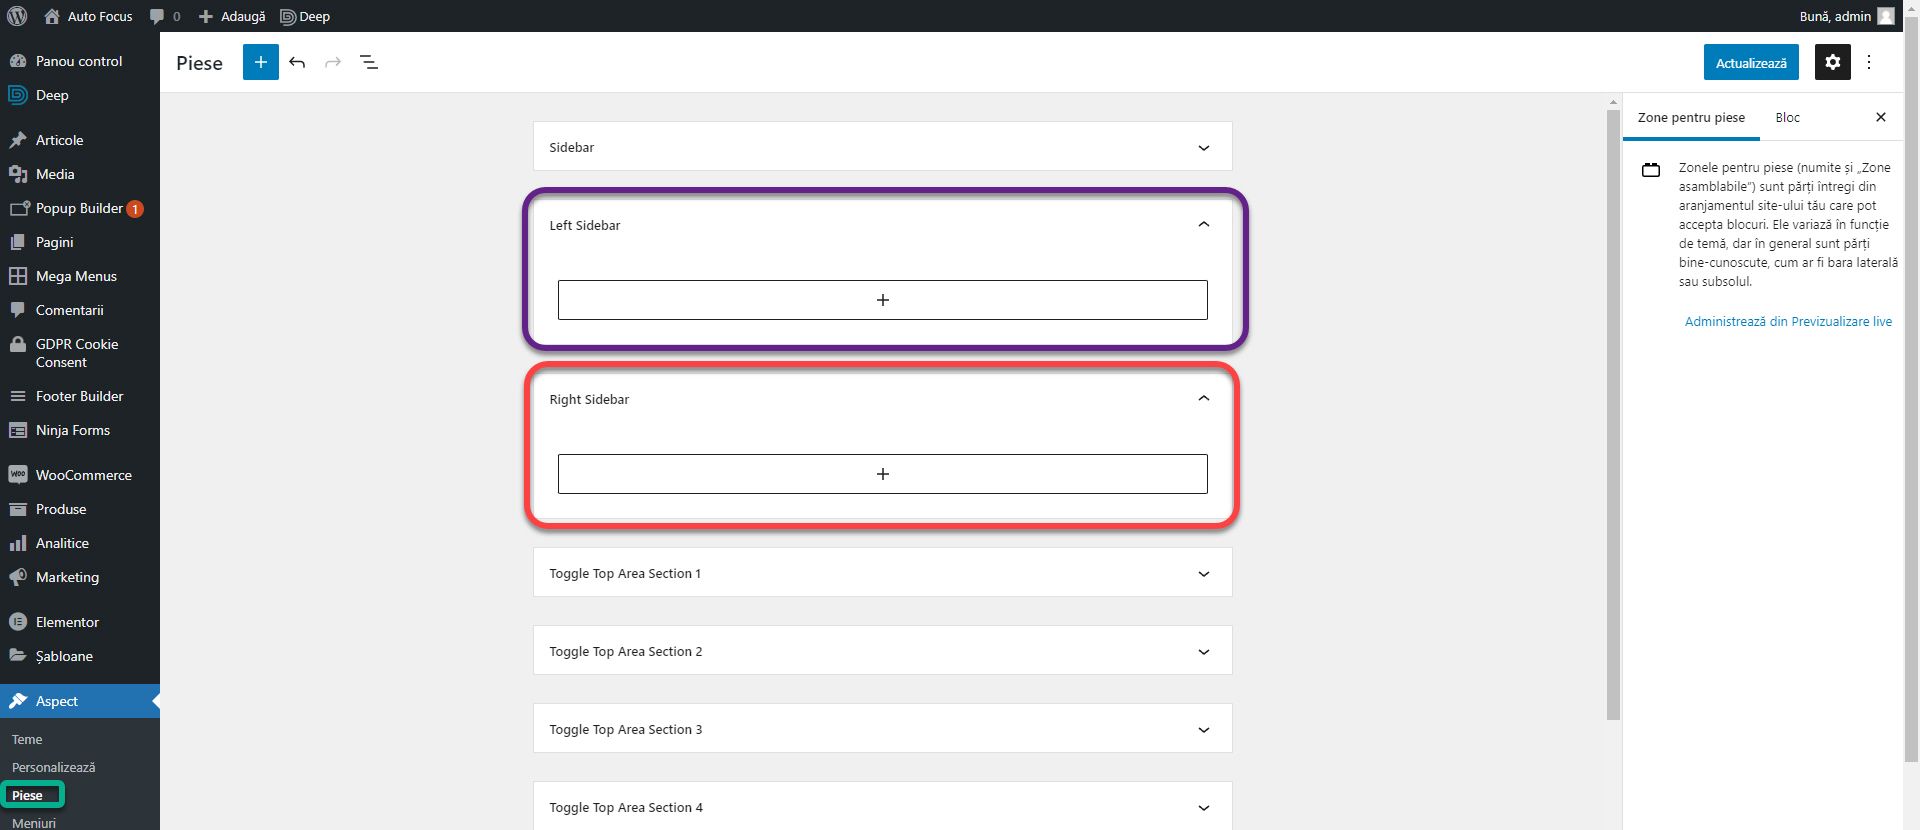
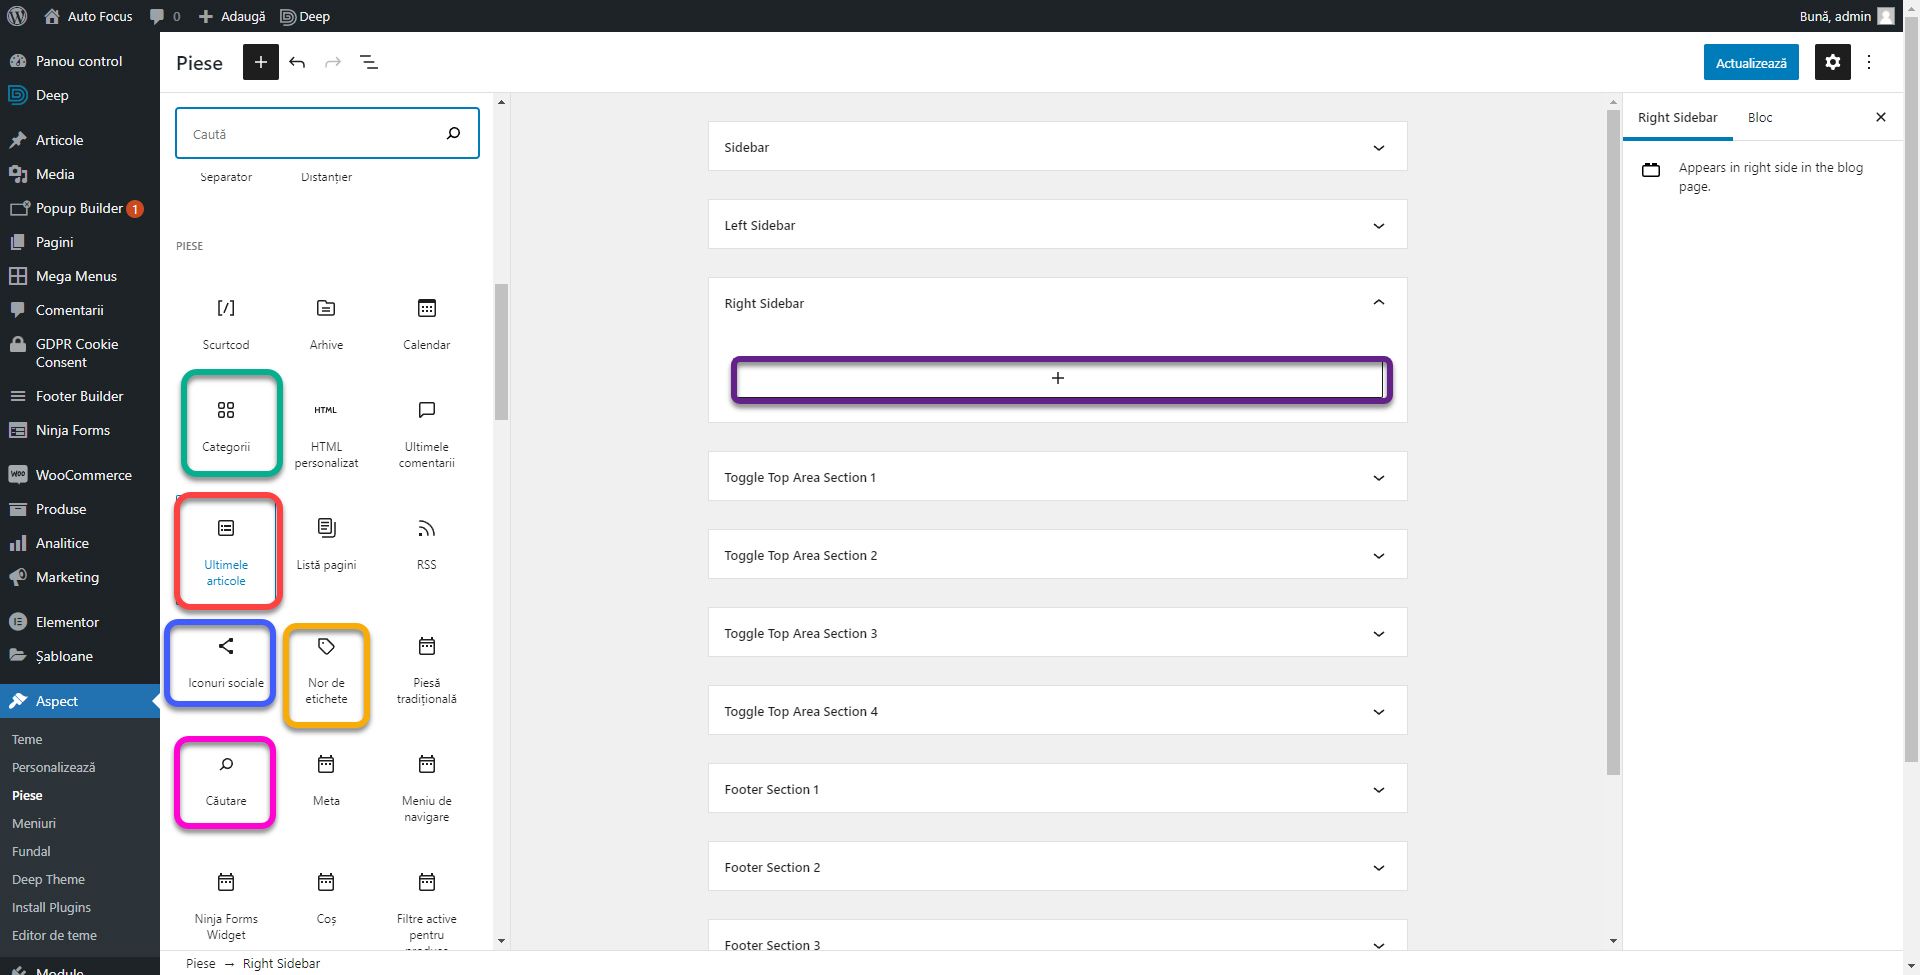
In the selected sidebar, press plus to add blocks. Click Browse All, and add the following blocks:
- Search. Adds the website search function to the sidebar.
- Categories. Automatically adds a list of categories created for posts.
- Latest posts. Automatically add the latest published posts.
- Tag cloud. Automatically add all the tags.
- Social icons. You can set up a list of social networks.
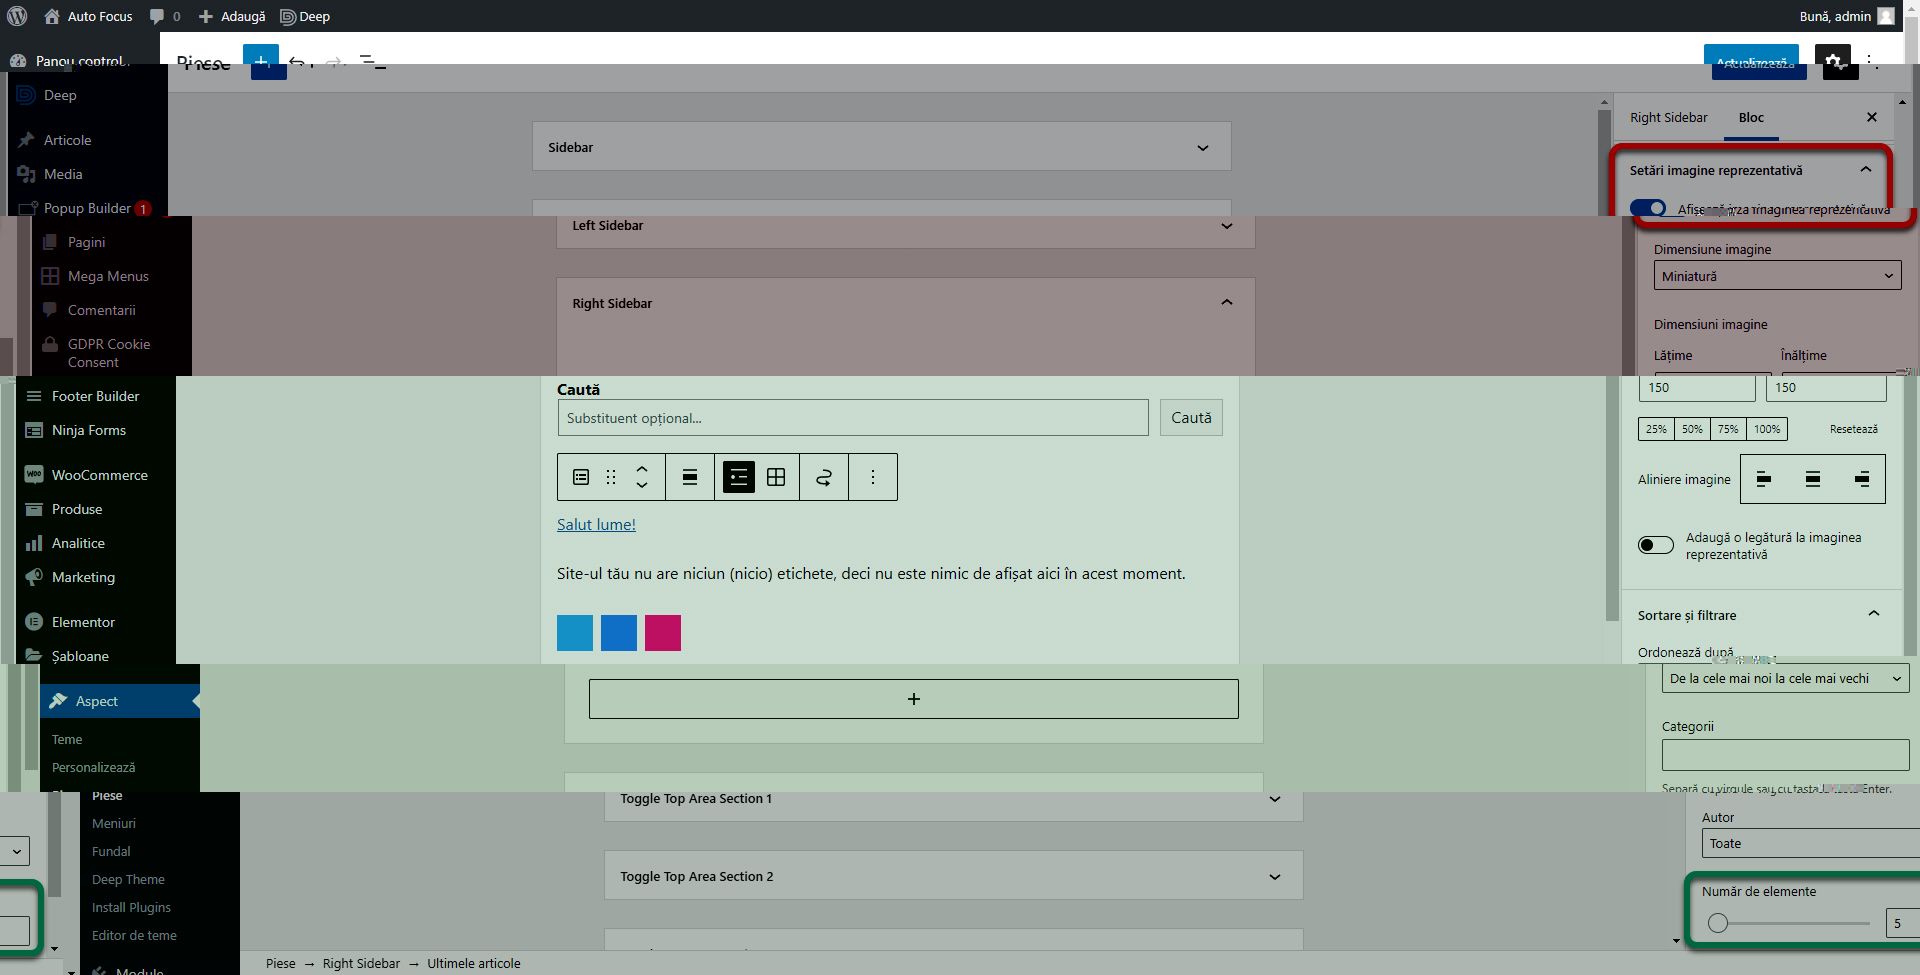
Each widget has a set of settings. I will explain the most important ones. Click on the Latest posts block and check Display featured image to display the images in the sidebar as well. In the Number of items field you can set how many items to appear.
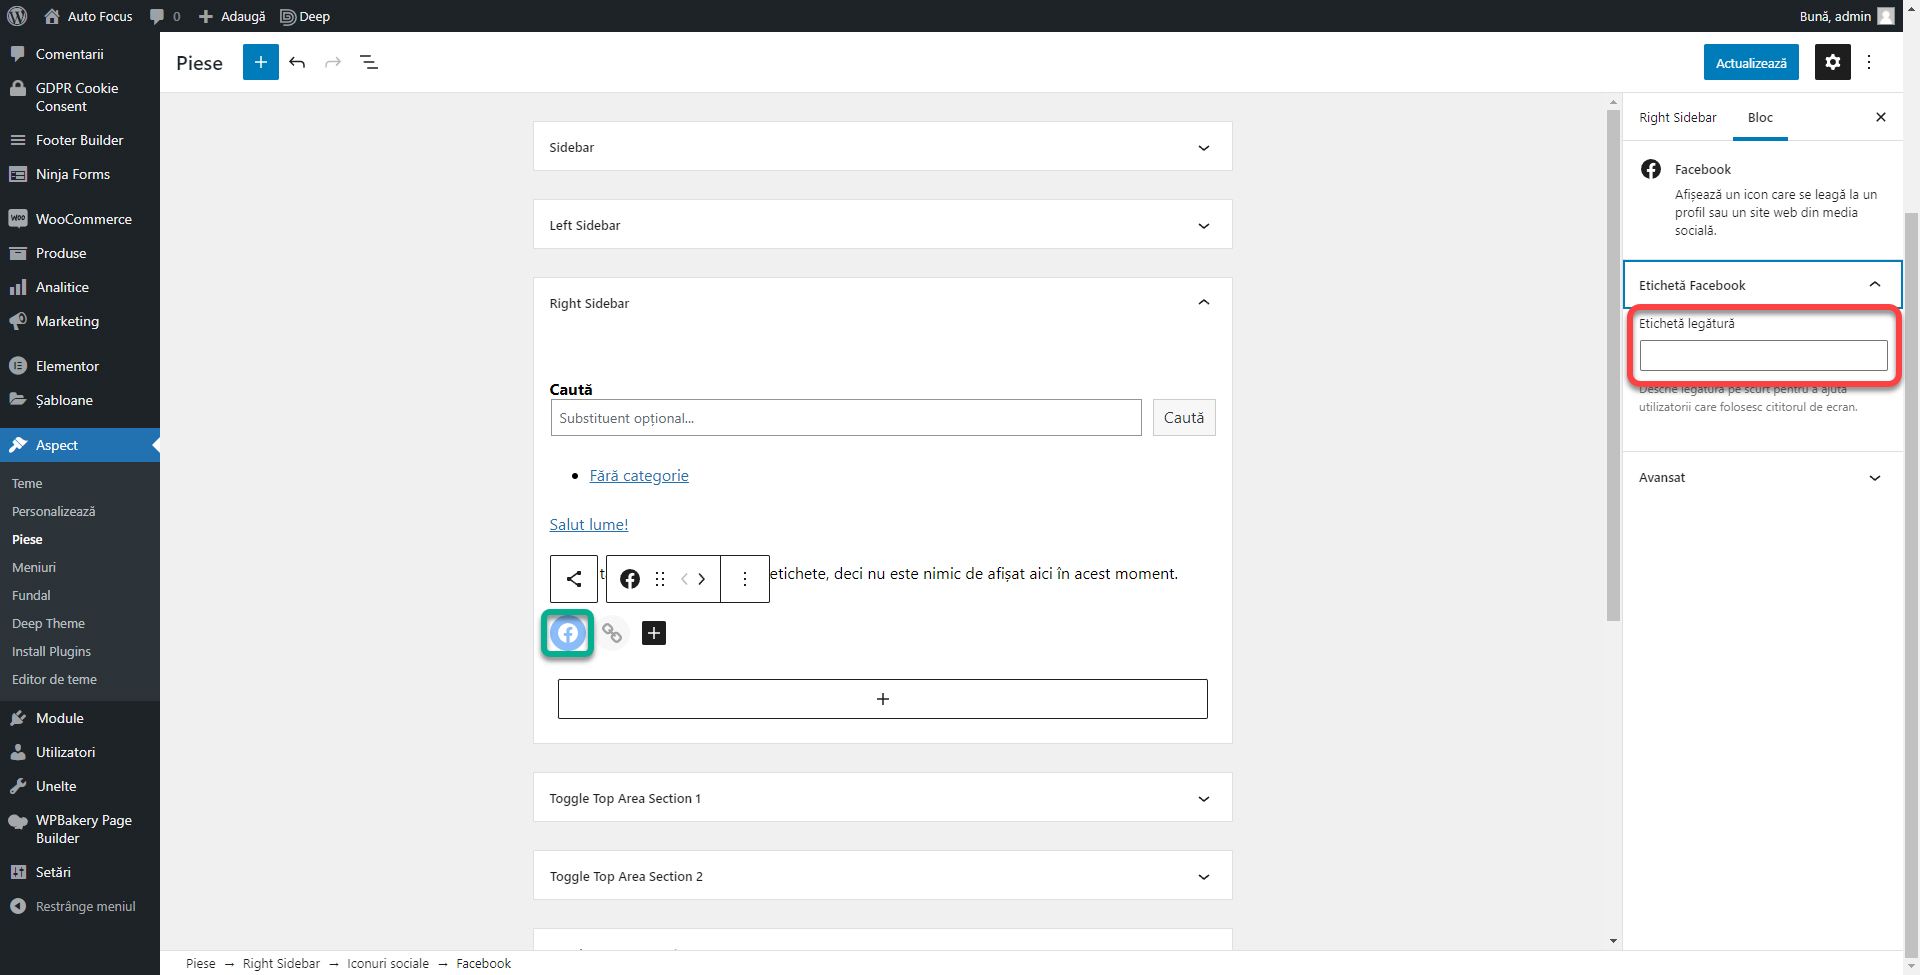
Click on the Social Icons block and click on plus to add a network. Click on Browse all and add Facebook and a few more networks from the side list. If a desired network is not in the list, you can add the Link block and insert it manually.
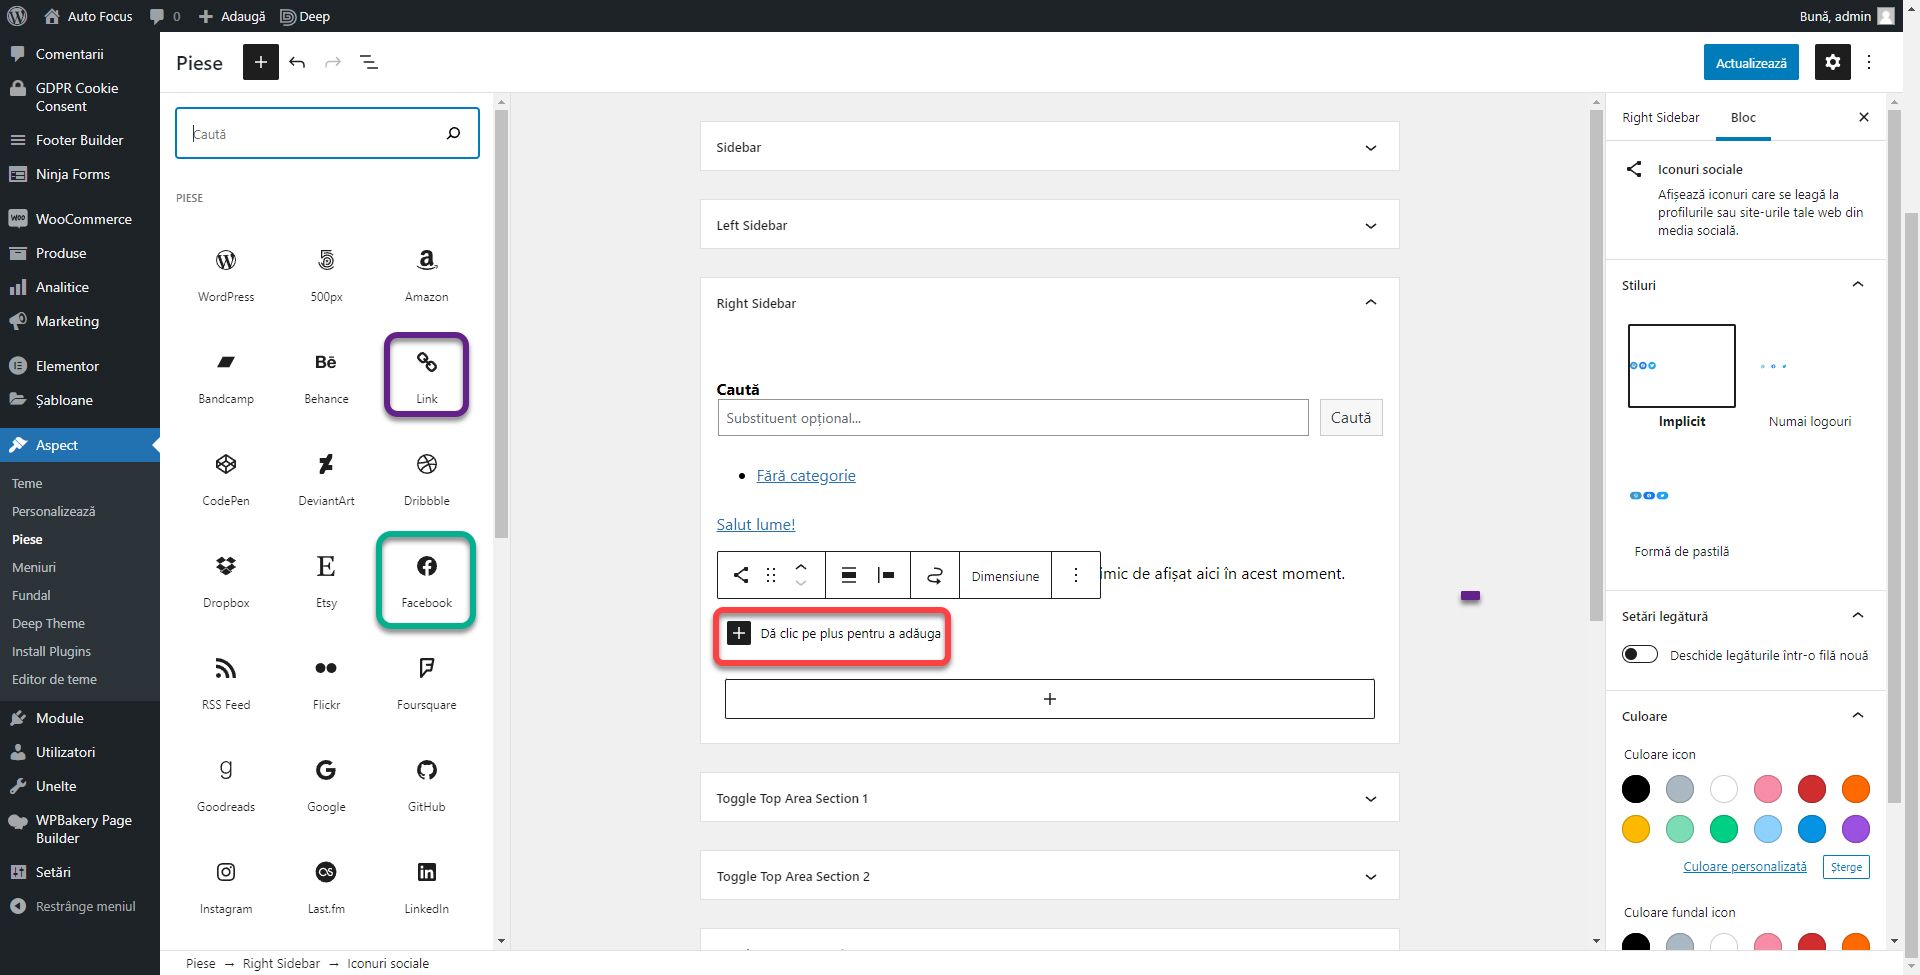
Click on each network icon and add the link in the Link Label field.
Don’t forget to click Publish before you leave the page.
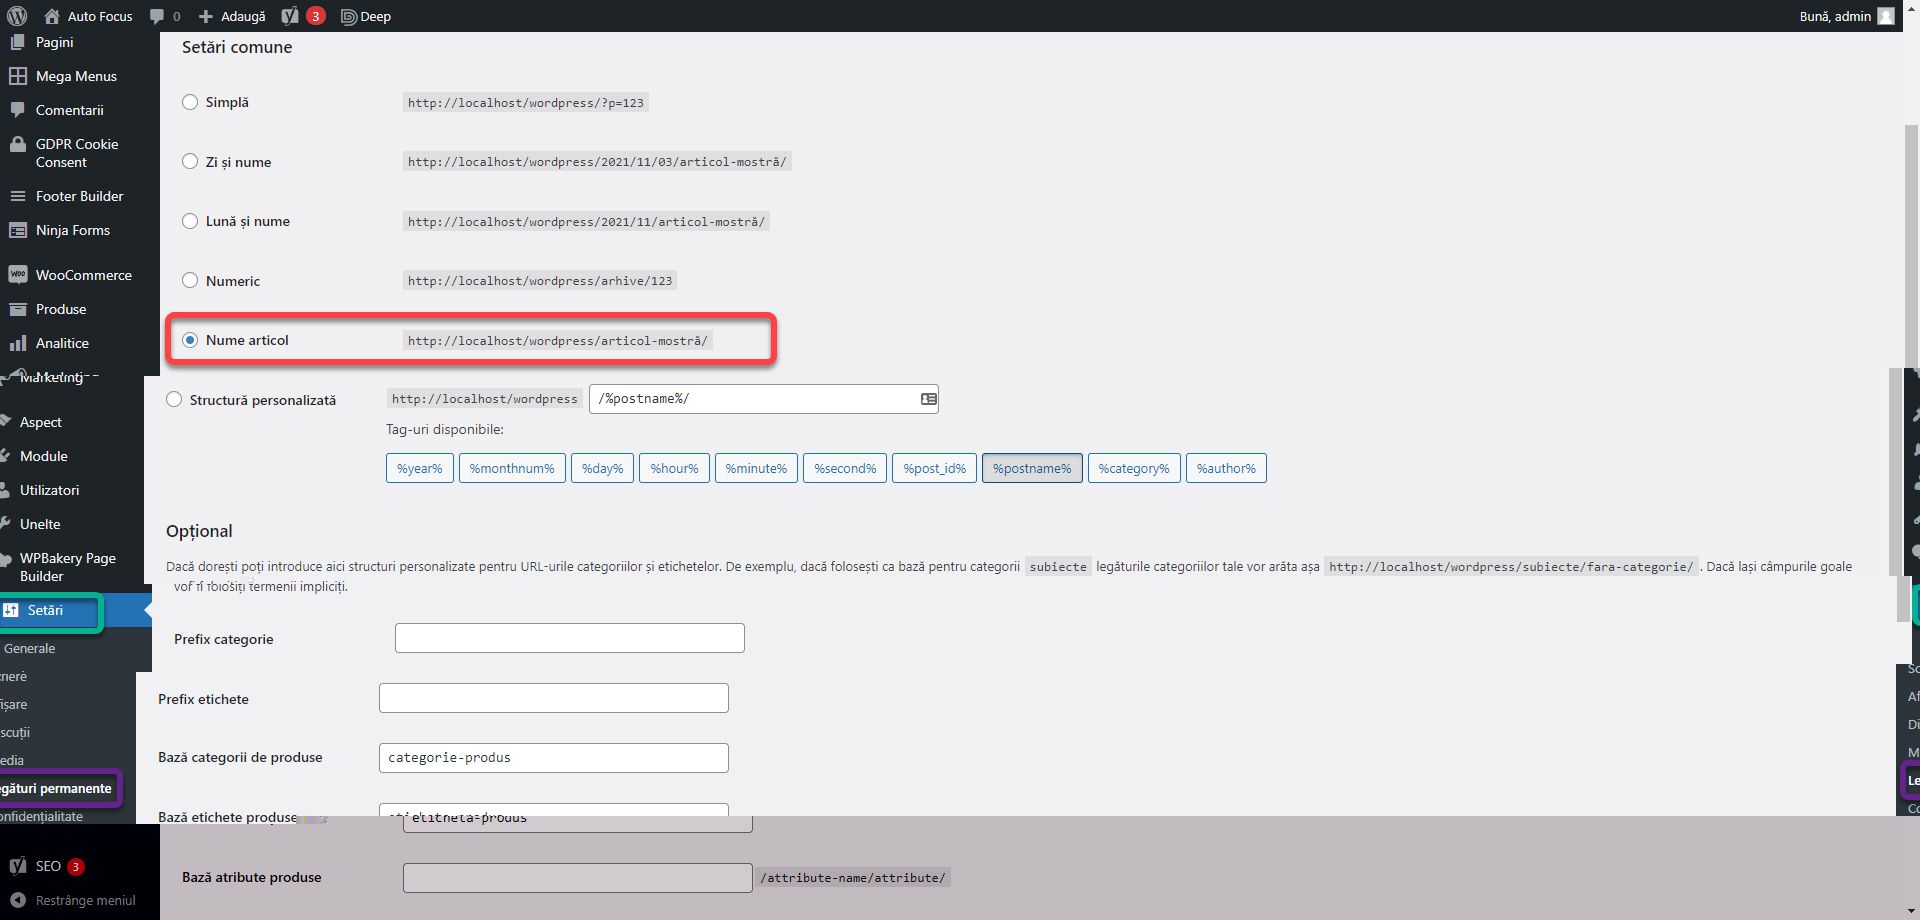
From the WordPress sidebar, go to Settings and then to Permalinks. Permanent links are links to website pages, posts and products, which are automatically generated by WordPress. They can take many forms. For SEO, the best setting is Post Name. Check the option and Save Changes.
User management
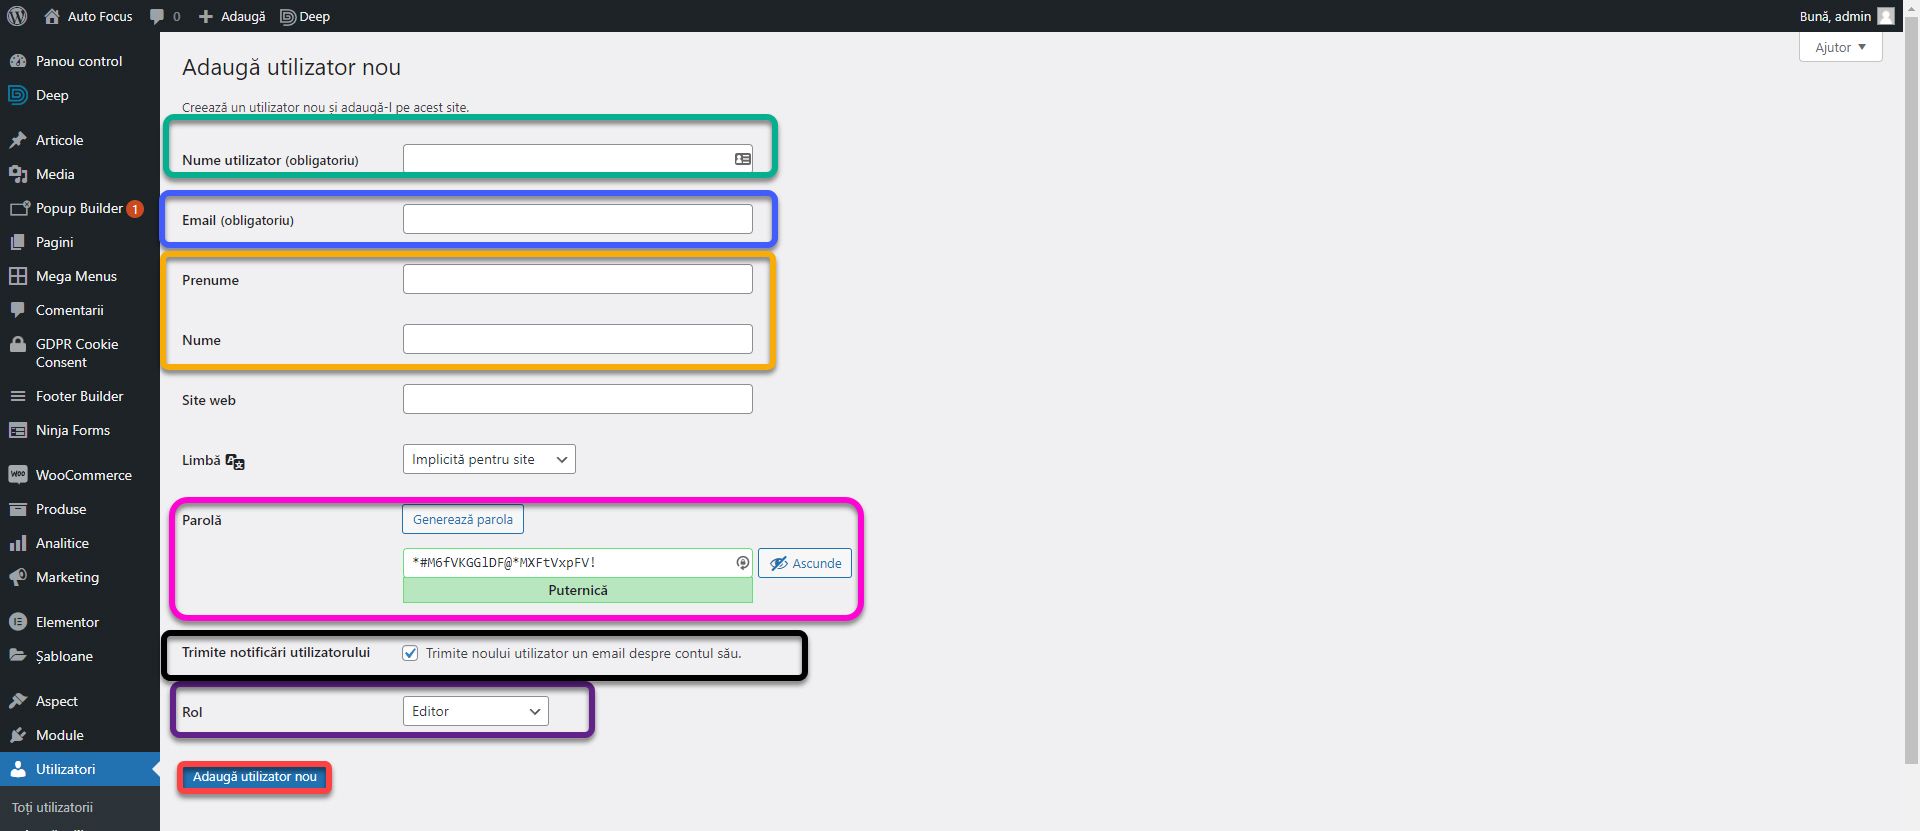
In WordPress, you have the option to have multiple users registered with different rights. Thus, some users deal with design, others with the store, others with blog articles. From the WordPress menu, click Users. Here you will find a standard list of users. From here you can edit or delete users. Click Add User.

Here you fill in some fields related to the user profile. Username is the unique name with which you will connect to the website. Email is used to recover the password and receive the authentication data. First Name and Last Name are optional, but may appear in the data sections about the author of the article if you activated them in the previous steps. The Password field is generated automatically. You can change the generated password if you wish. You can generate another by pressing the Generate Password button. If you choose a weak password, for example password123, a new check mark will appear in which you will have to confirm the use of a weak password. Tick Send notifications to the user sends the authentication data to the defined address.
In the Role field, select what permissions the new user will have on the website:
- Subscriber: can only read the content and edit their profile data.
- Contributor: can write or edit their own articles but cannot publish them.
- Author: can write, edit and publish their own articles.
- Editor: can edit and publish any article.
- Administrator: Can change everything, such as pages, settings, modules, themes, etc.
- Store Manager: Appears only if you have Woocommerce installed. He can see the store side of the website. It has Editor capabilities.
- Client: appears only if you have Woocommerce installed. May just place orders.
Click Add New User.
Optionally, if you edit the user, you will be able to describe it in the Biographical Information field and a Profile Picture. These will be publicly visible in the author section if you have activated them in the previous steps.

You can see an example of the biographical data display at the end of this article.

Search Engine Optimization
We have reached the moment of SEO. All the content of this chapter applies to any type of WordPress entity: pages, articles, products or any other type appears by installing plugins.
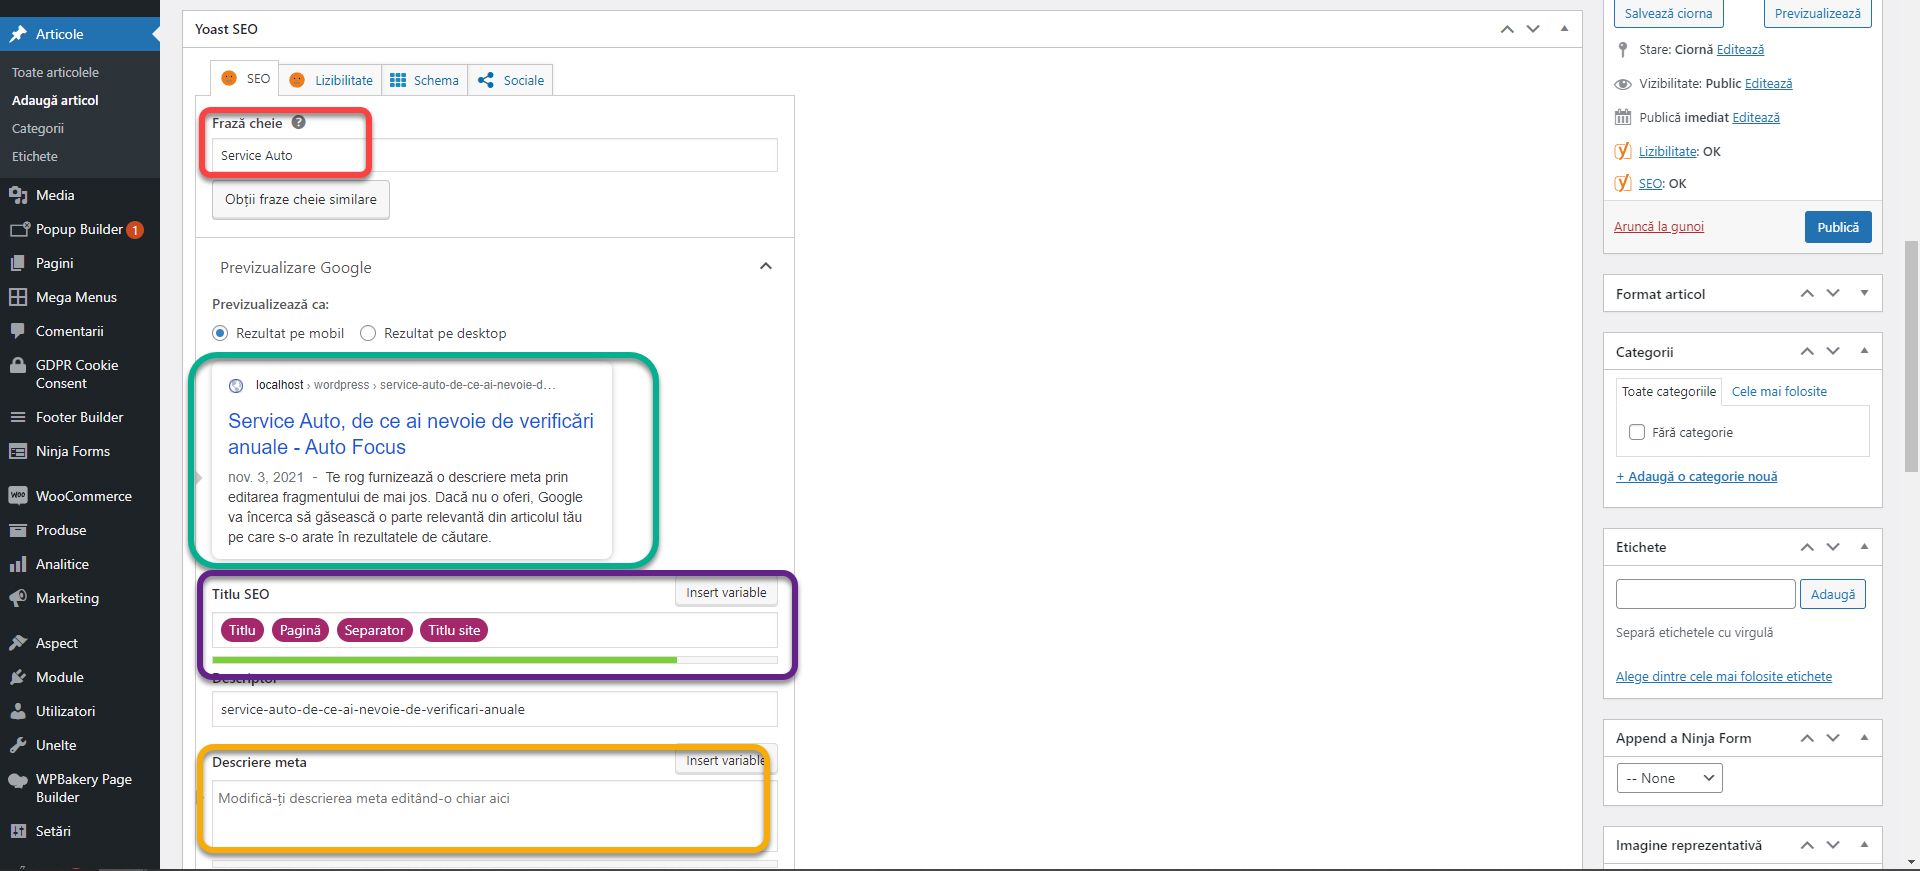
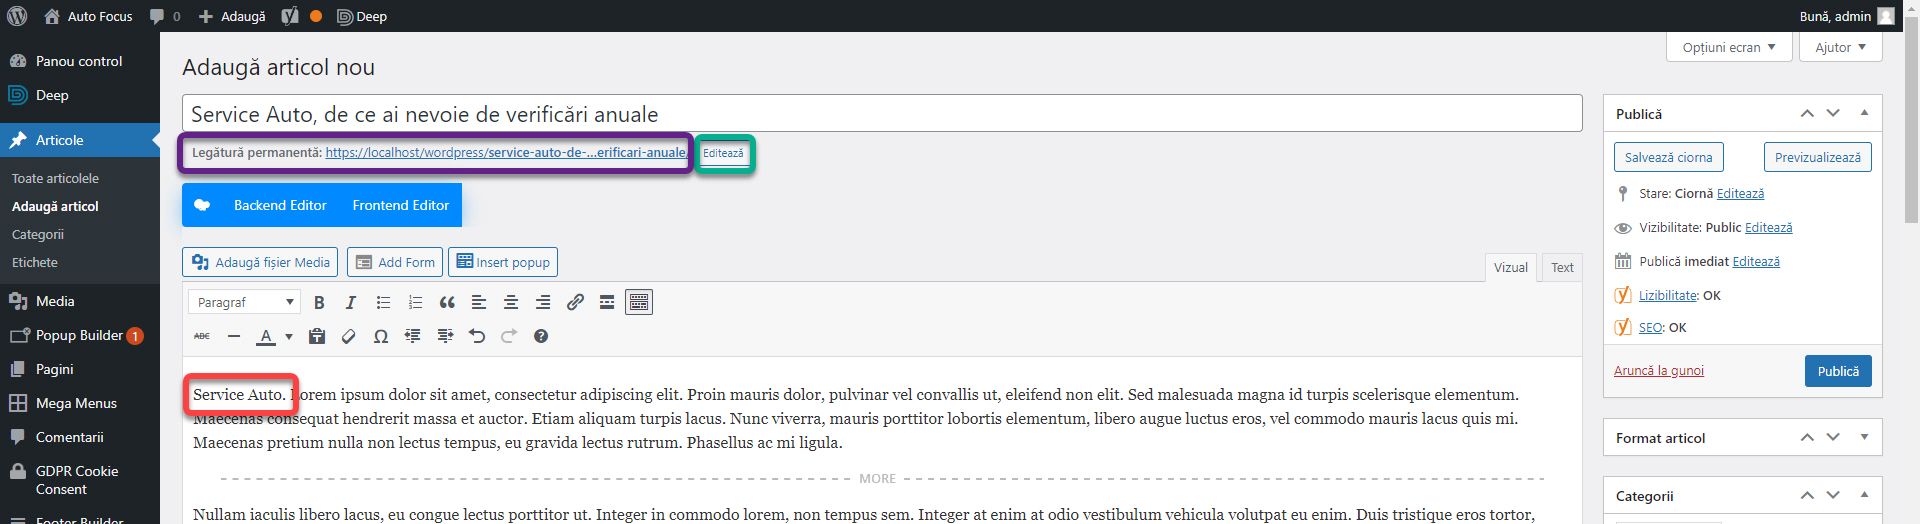
To optimize, we need the free Yoast SEO module. Yoast provides SEO optimization verification and monitoring tools. Install it, activate it and go to the Posts section. Add a new post. We will use a case study in which we will optimize for the Auto Service key phrase. In the Title field, enter the text: Auto Service, why you need annual checks. It is an ordinary text, but it is important to contain the key phrase as close to the beginning as possible. In the text area, enter 900 words generated using lipsom.com or any other text template.
Above the text area, you will find a toolbar. Here you have the standard options: bold, italic, lists, quotes, alignments, etc. Place the cursor after the first paragraph, and click on the Read more button (the penultimate in the toolbar). It will delimit the first paragraph as the maximum text that can be extracted from the article for the abstract. Regardless of the settings made in the Options section of the theme, the Read More button will set the maximum limit in the text.

Below the text, you will find a new section called Yoast SEO. Enter Auto Service in the Keyword field. Thus, Yoast knows for which sentence to do the checks in the text. Below you will find a preview (green box) of how the website is displayed on search engine pages such as Google. The SEO Title field defines the title and the Meta Description field the text below. The SEO title is automatically generated based on what we write in the Post Title, but we will change it manually.
Below you will find the results of the analysis. In red and orange are marked the steps you still have to follow and in green are the steps you followed. We will approach each red line in turn. The explanation of the steps already taken is:
- Keyword length: Our key phrase is Auto Service. If it was too long (more than 6 words), this step will turn orange and or red.
- Previously used keyword: Each page / post/ product must have a unique keyword phrase. If you’ve used it before, it will turn red.
- Text length: the text must have a minimum of 300 words to be considered and a minimum of 900 for the best results.
- Keyword in the title: the key phrase must be present in the title and be as close as possible to its beginning.
- SEO title length: The SEO title has a minimum and maximum length as we will see soon.
- Keyword in the descriptor: the descriptor is the URL of the page I will explain soon.
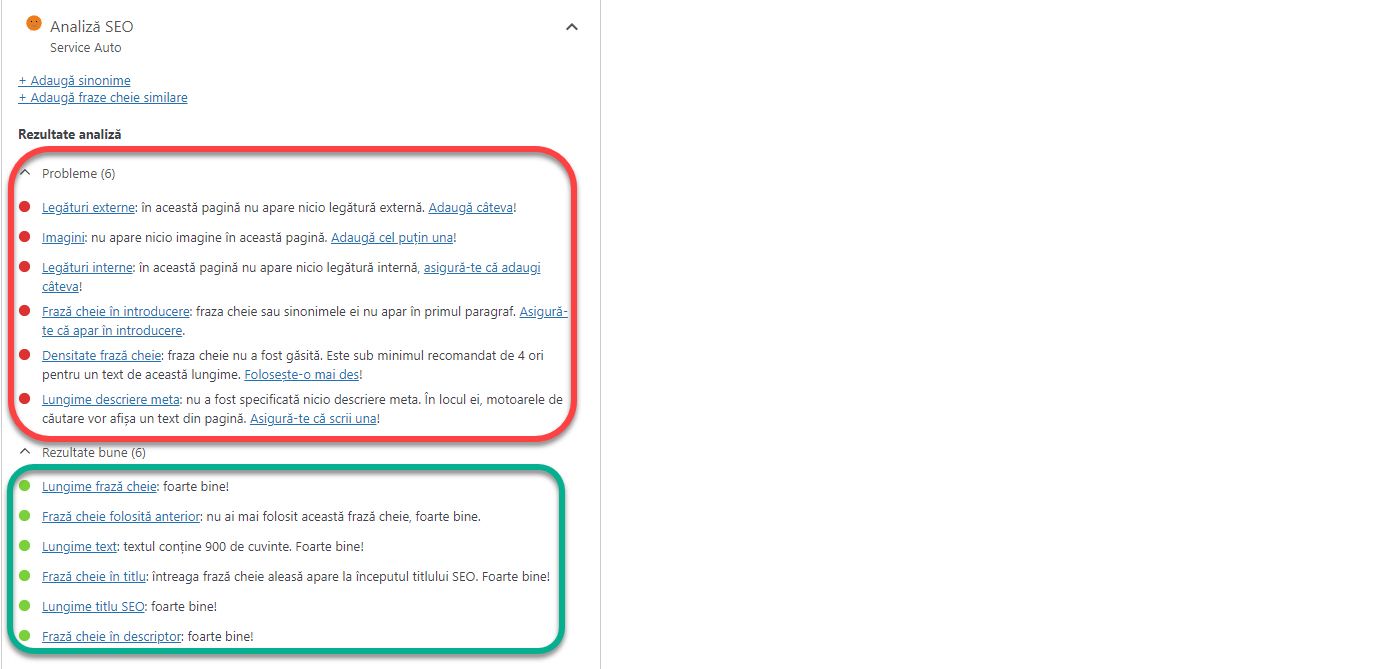
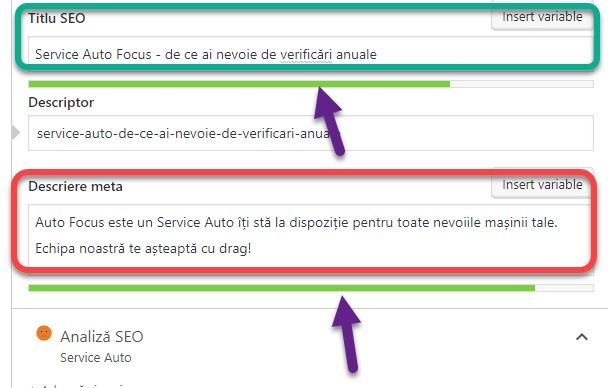
We have the indication: Meta description length: no meta description specified. Which appears in red. Return to the Meta Description field and enter the text: “Auto Focus is an Auto Service is at your disposal for all the needs of your car. Our team is waiting for you!“. In the SEO Title field enter the text: “Auto Focus Service – why you need annual checks“. Note that under both fields, there is a bar that moves and changes color as you enter text. If the bar is red, you don’t have enough text in the field, or you have too much. If the bar is green, everything is fine.
Keyword in the introduction: The key phrase or its synonyms do not appear in the first paragraph. Add the key phrase at the beginning of the first paragraph. In a real case, the text must have a logic and a meaning. We have a hypothetical case in which the logic of the text does not matter. Under the title of the article, you will find the Permalink field also called descriptor in Yoast. It is automatically generated when the page is saved, but you can edit it using the Edit button. It is very important not to change the URL of the page after it has been indexed in search engines (1-2 days after publication). Changing its address will be considered a new page and all efforts to ensure a better position will be reset.
Keyword density: The key phrase was found only once. When you see this warning, it means that the key phrase is not present often enough in the text, relative to the number of words. You can’t add it 4-5 times in the same paragraph. It must be evenly distributed, otherwise you will receive a new warning. I leave it to you to choose where to place the key phrase in the text and notice how this changes the warnings. If you do not notice any changes, press Save Draft to prompt the plugin to reanalyze the text.
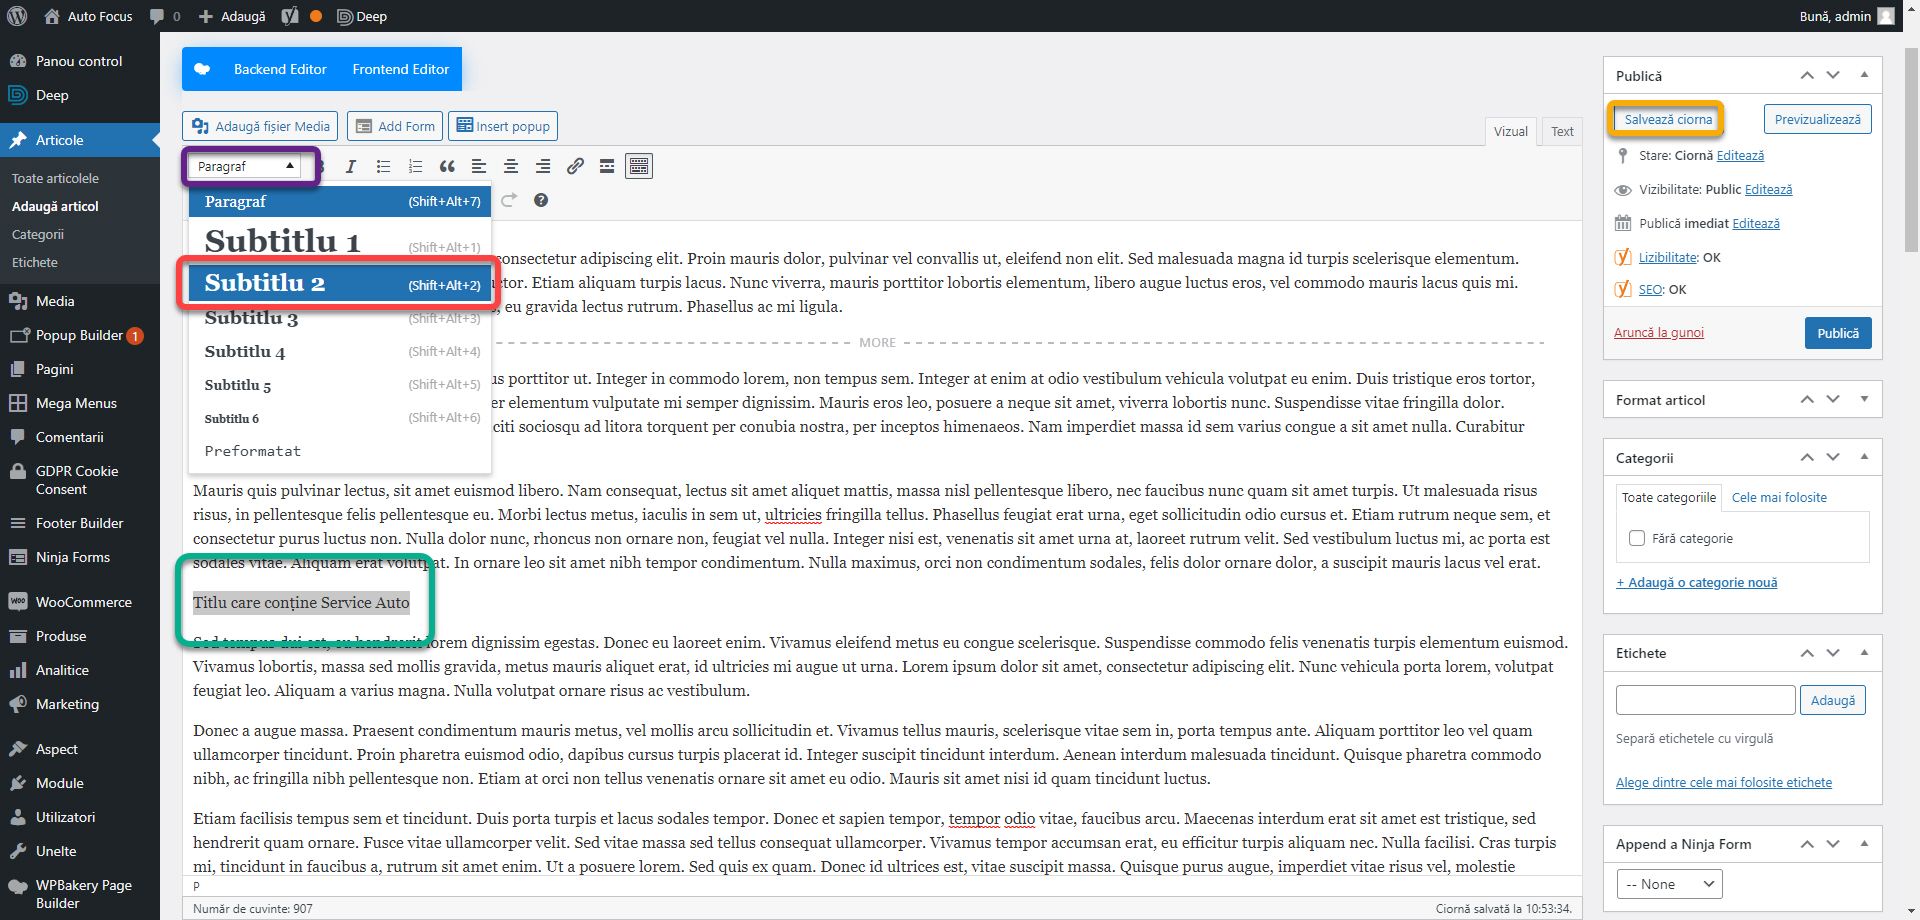
Each article must contain several subtitles. A maximum of 70% of these must include the key phrase. Yoast will display appropriate warnings if too many or too few subtitles contain the key phrase. After the 3rd paragraph, add the text: Subtitle containing Auto Service. Select it, and from the toolbar, click on the first drop-down list. Choose Heading 2. This is how you add subtitles in WordPress. These are actually the HTML tags <h1>, <h2> … <h6> that you will find mentioned in all SEO materials. After the 6th paragraph, add the text: Subtitle that does not contain Auto Service, type Heading 2.
Images: No images appear on this page. Each article must have a representative image and preferably another image. Tap where in the text you want to insert the image, and then tap the Add Media File button. The standard WordPress gallery will appear. Once you’ve inserted an image, the alert will change to Image Keyword: The images on this page have no other attributes that reflect the subject of the text.

To change the other attribute of an image, tap it and press the edit button with the pencil icon.

A new window will open. In the Alternate text field, enter the text Auto Service. In the Associated Text field, you can enter text that will appear below the image as an explanation. You can change the Image Alignment, Size, or Link behind it. If you press Replace, you will be able to change the image while retaining its position. Click Update.

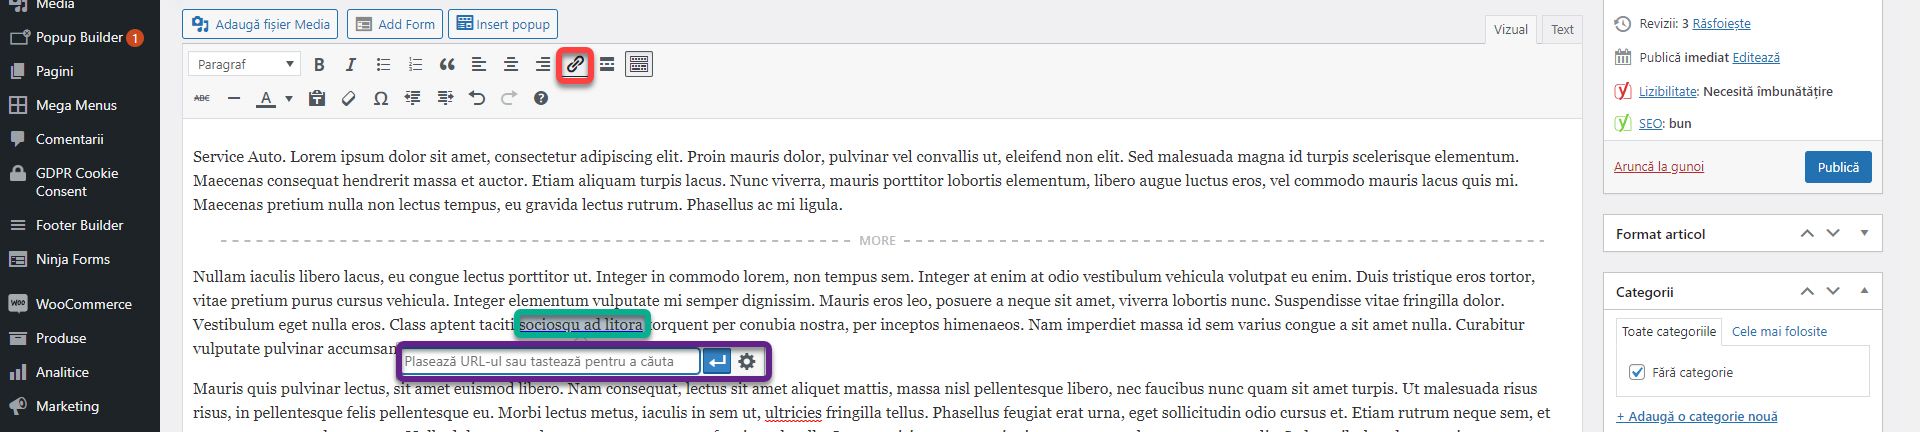
We have 2 more warnings: External links, which are links to other websites, and Internal links, which are links to pages on your website. The presence of links on the page ensures that the search engine will index as much as possible from the website. That is, if you enter this article because it is optimized for Auto Service, you will want to link to as many related pages (related topics) to follow. For example: now we could put links to pages optimized for car parts, engine services, overhauls, etc. External links in SEO are optional. It doesn’t help, but it does help those you link to. Yoast recommends them in principle.
To add a link, select the piece of text you want to put it behind. Click on the link button in the toolbar. A window will appear below the selected text in which you can enter the link. Press enter or the blue button.
So much for blogging and SEO optimization. I recommend that you tick Yoast directions as much as possible (except for external links). If the analysis shows you a green face, then you can publish the article. In the case of any other color, you still have to optimize.

As before, if you have any questions or need help, I’m waiting for you on the SenDesign Community Facebook group!


