How to create a website #11: Popup windows
19/11/2021
How to Create a Website #13: Blog and SEO
03/12/2021
How to create a website #11: Popup windows
19/11/2021
How to Create a Website #13: Blog and SEO
03/12/2021How to create a website #12: Setting up an online shop
The online store is the next level where you can take your website. WordPress is very versatile, so switching to ecommerce is easy.
Shop configuration
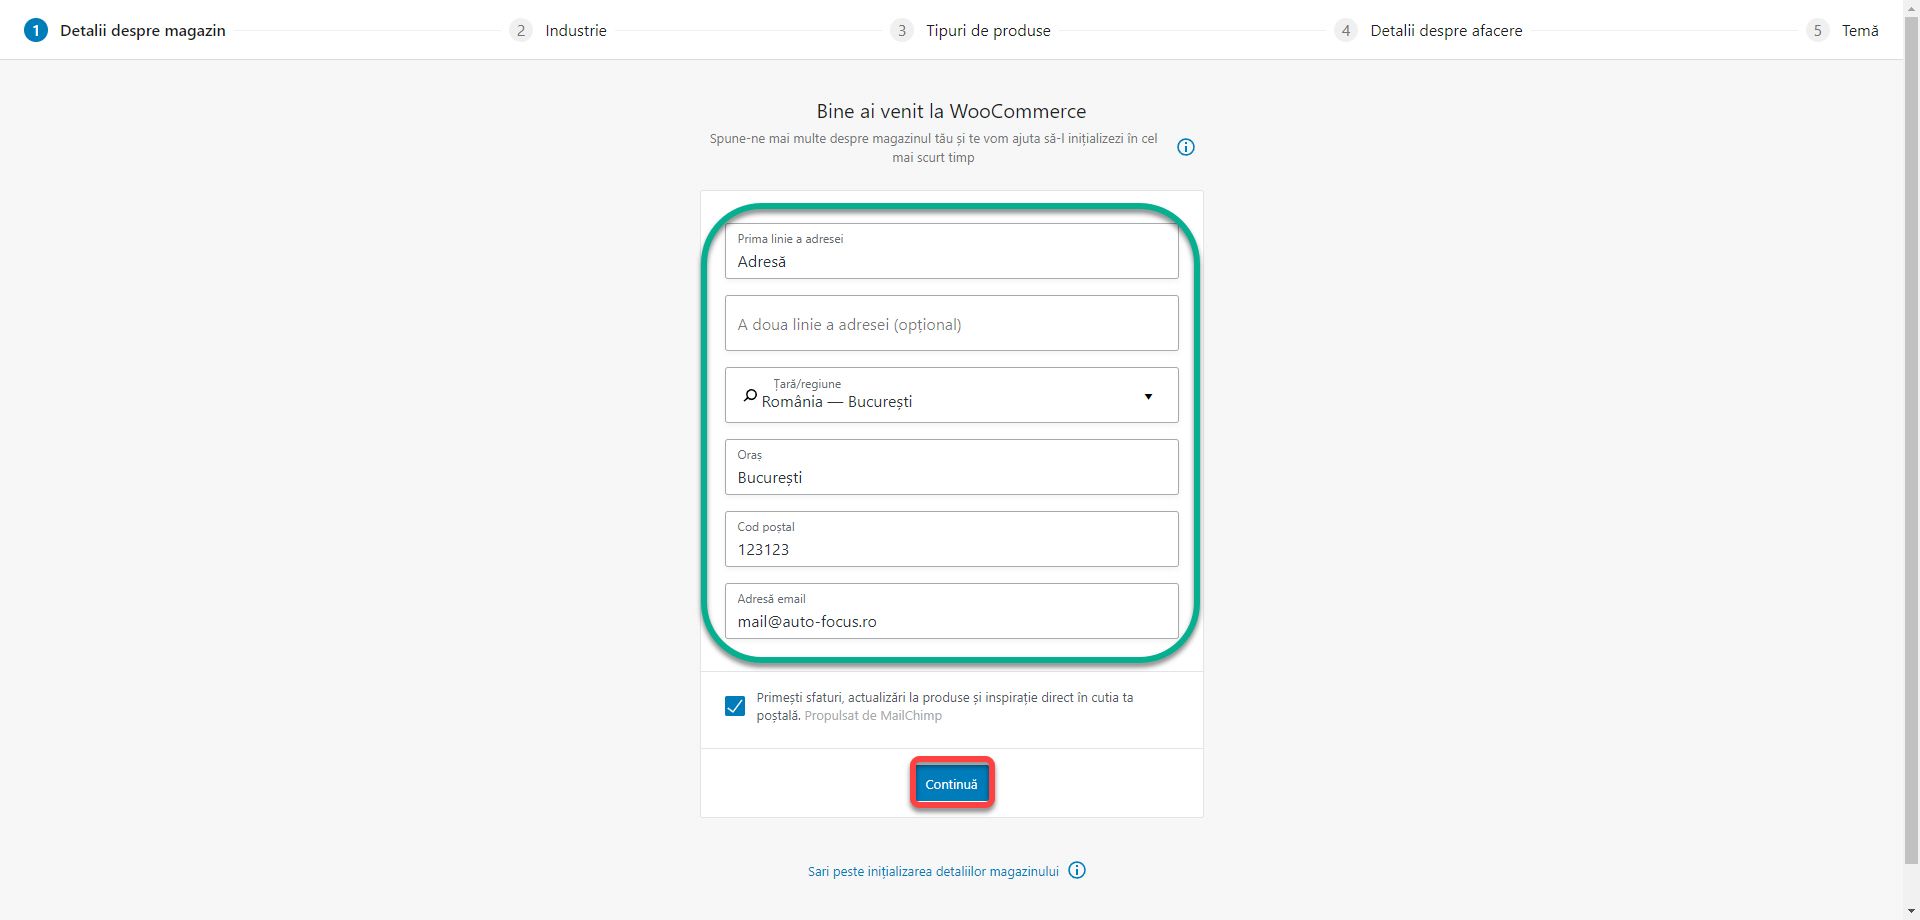
To create an online shop inside a website, we need the free Woocommerce plugin. Install and activate the module. A window with the initial configurations will open automatically. Enter the full store address and click Continue.
A window may appear asking if you agree to share certain data. Click No thanks.
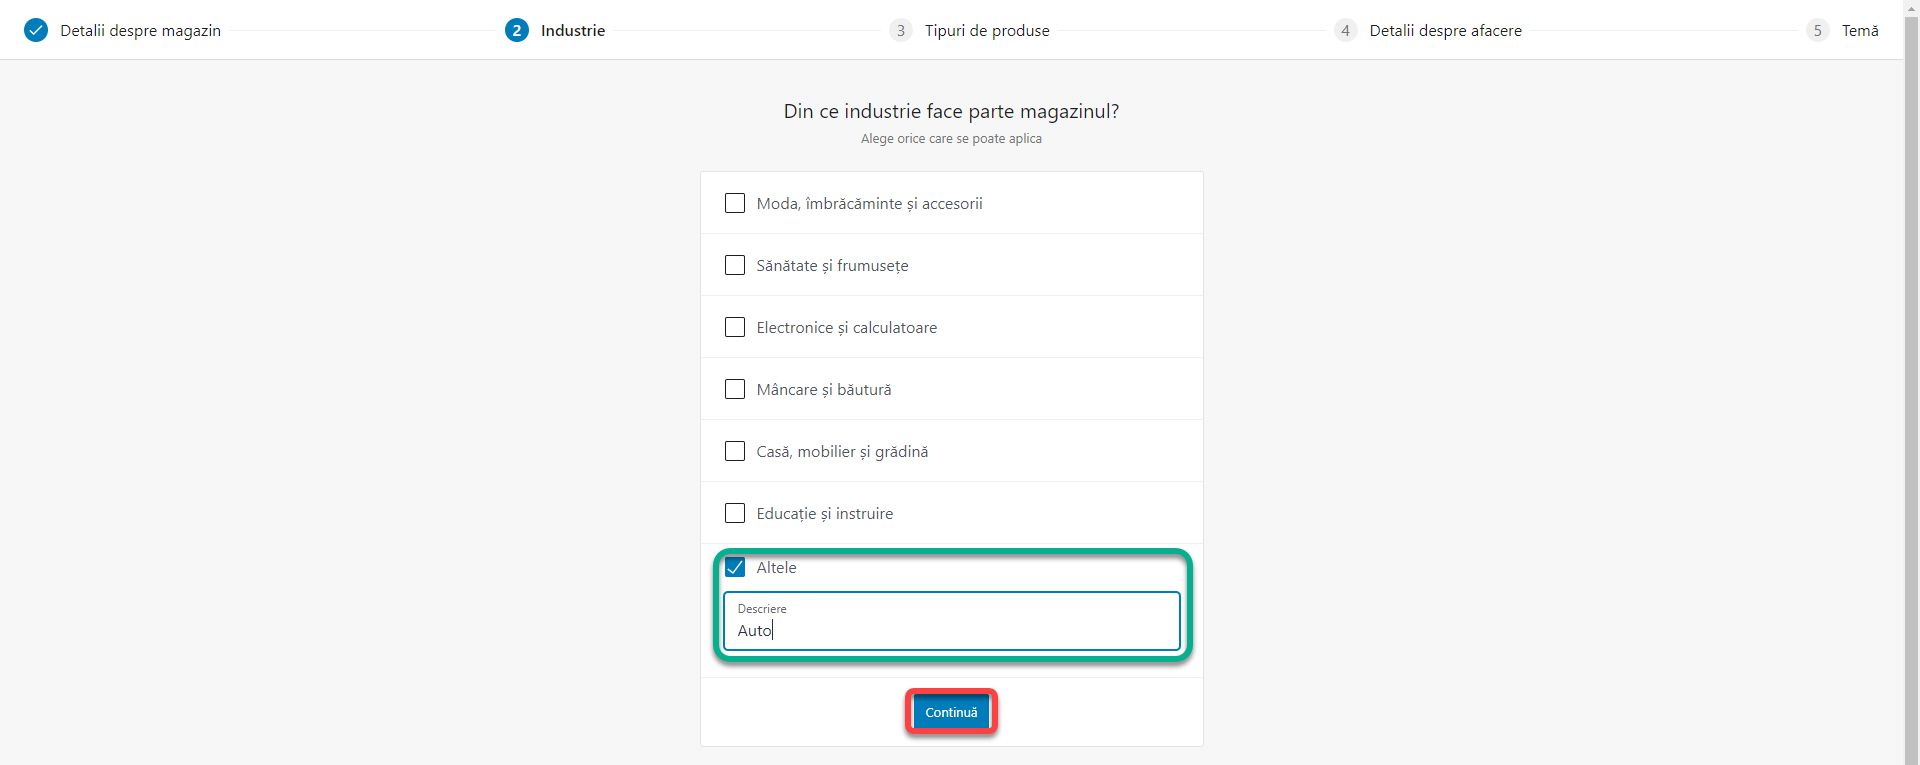
At the next step you have to choose the industry to which the store belongs. For Auto Focus, tap Other and enter Auto text. It will have no effect on your store. Click Continue.
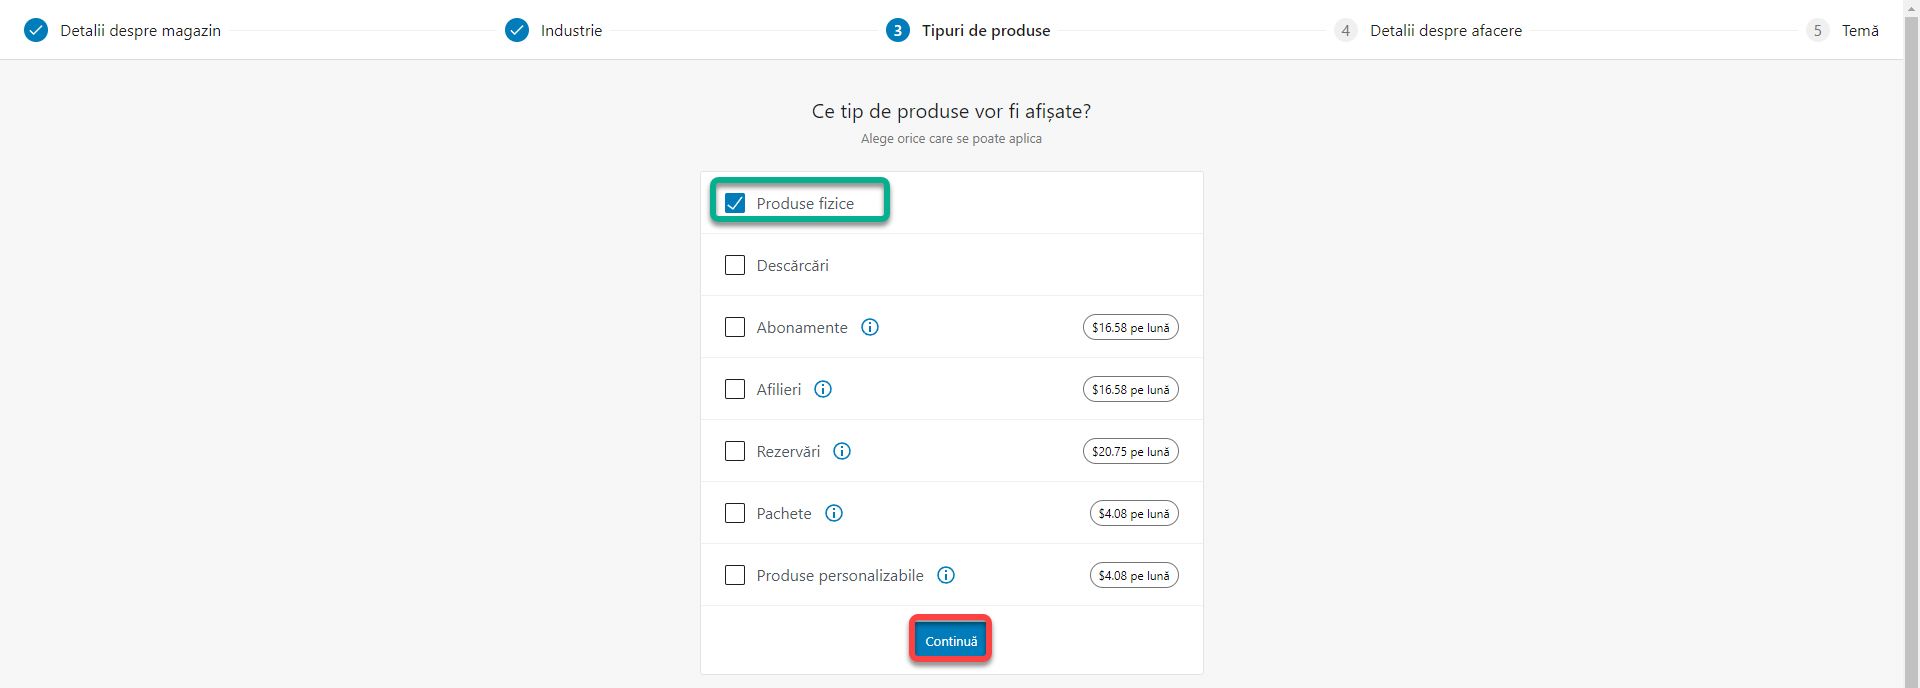
In the next step, you need to choose what types of products you will sell. Check Physical Products and click Continue. Certain types of products require extensions that involve a monthly cost but there are also free plugins that can replace these features.
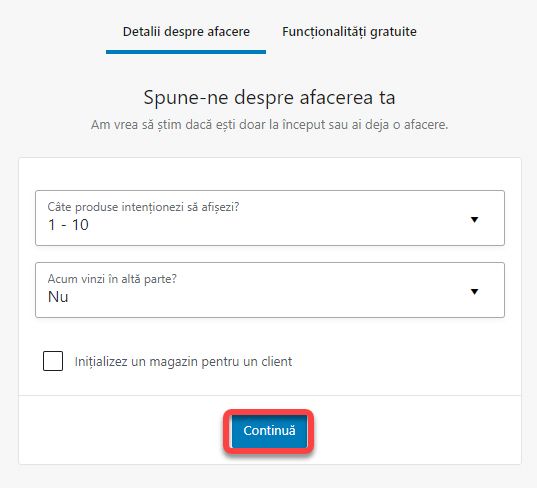
The next window has a strictly statistical role. You can choose any options without affecting the store in any way. Click Continue.
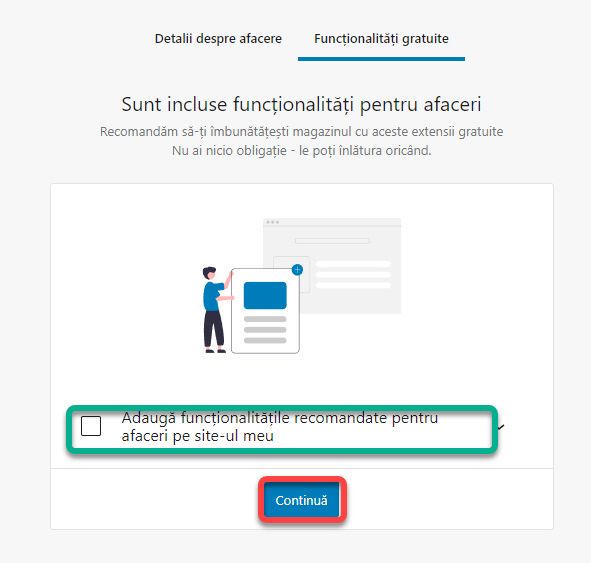
Uncheck the “Add recommended business features to my site” option. Is only installs additional plugins you don’t need. Click Continue.
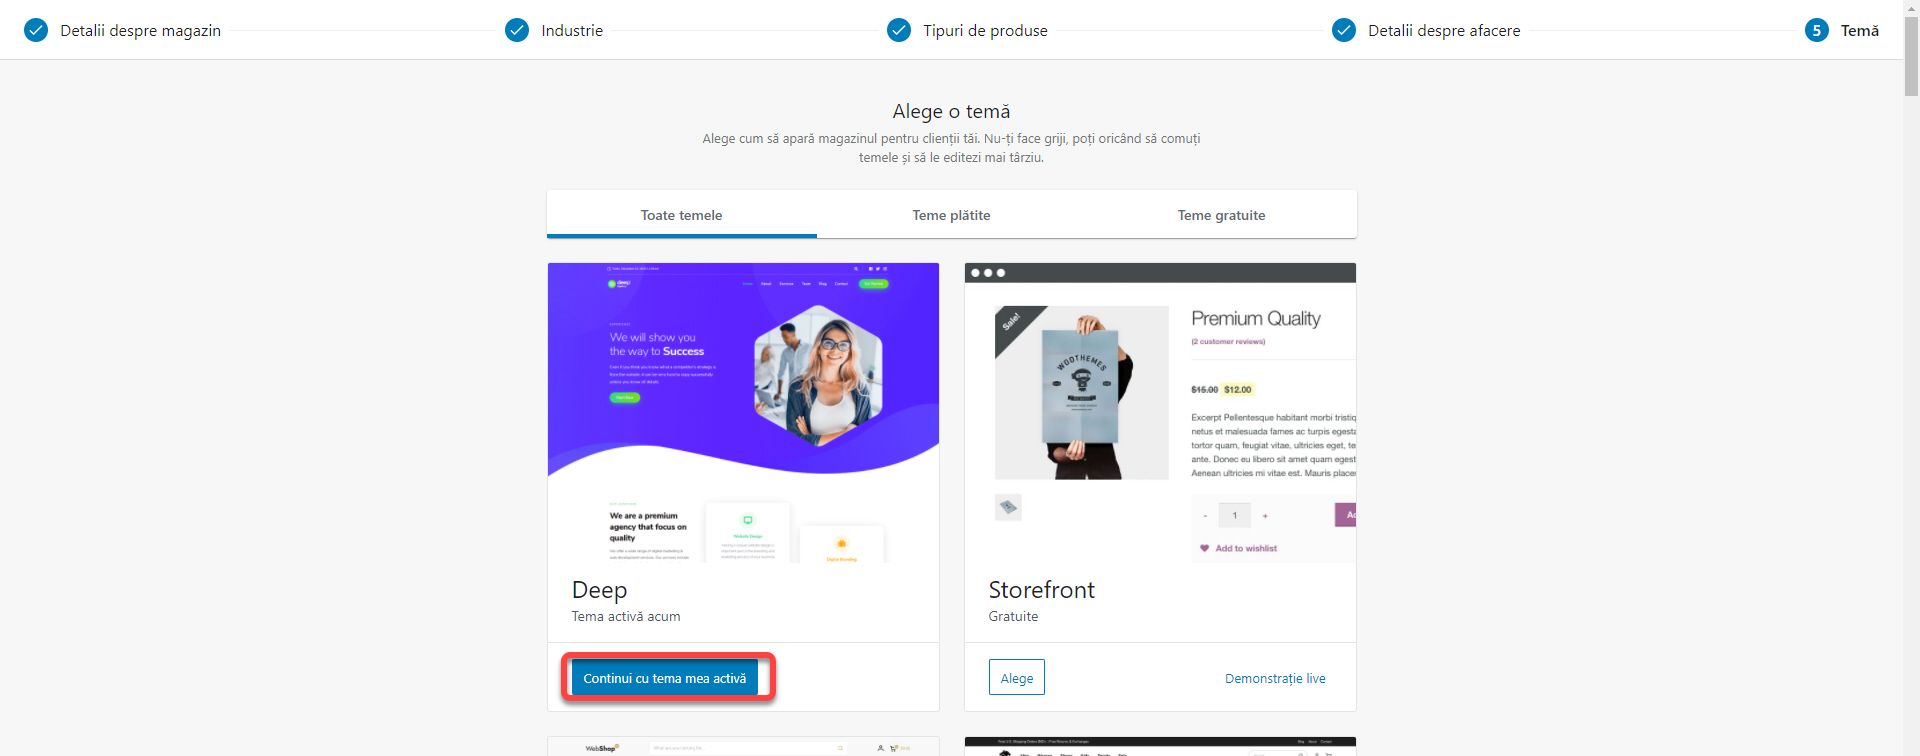
In the last window click on Continue with my active theme. Otherwise it will install a new theme for you.
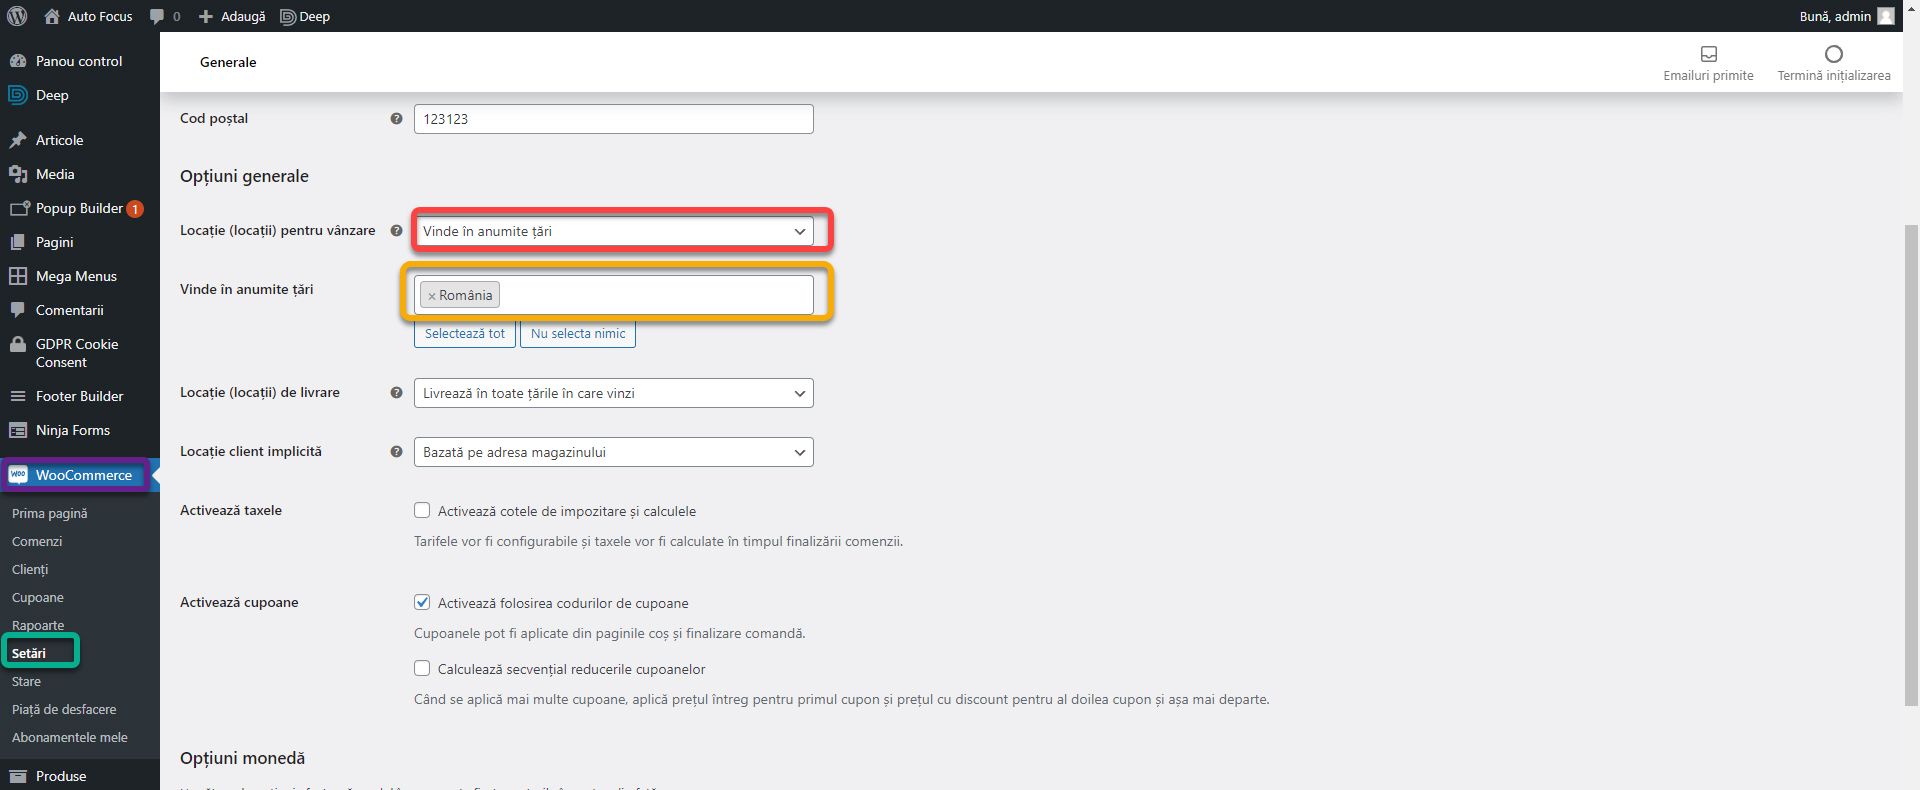
As with the other plugins, a new button called WooCommerce will appear in the side menu. Press it and go to the Settings section. Here you have access to all plugin settings. We configured some of them in the previous steps. Next to General Options, from the drop-down menu Selling location(s), choose Sell to specific countries. A new field will appear below. Add Romania. You can skip this step if you want to sell in all countries. But for Auto Focus, we only deliver locally.
In the Currency Options subsection, the Currency field, you can choose a currency other than the leu and change the position of the word LEU next to the price or the position of the separators. Click Save Changes.
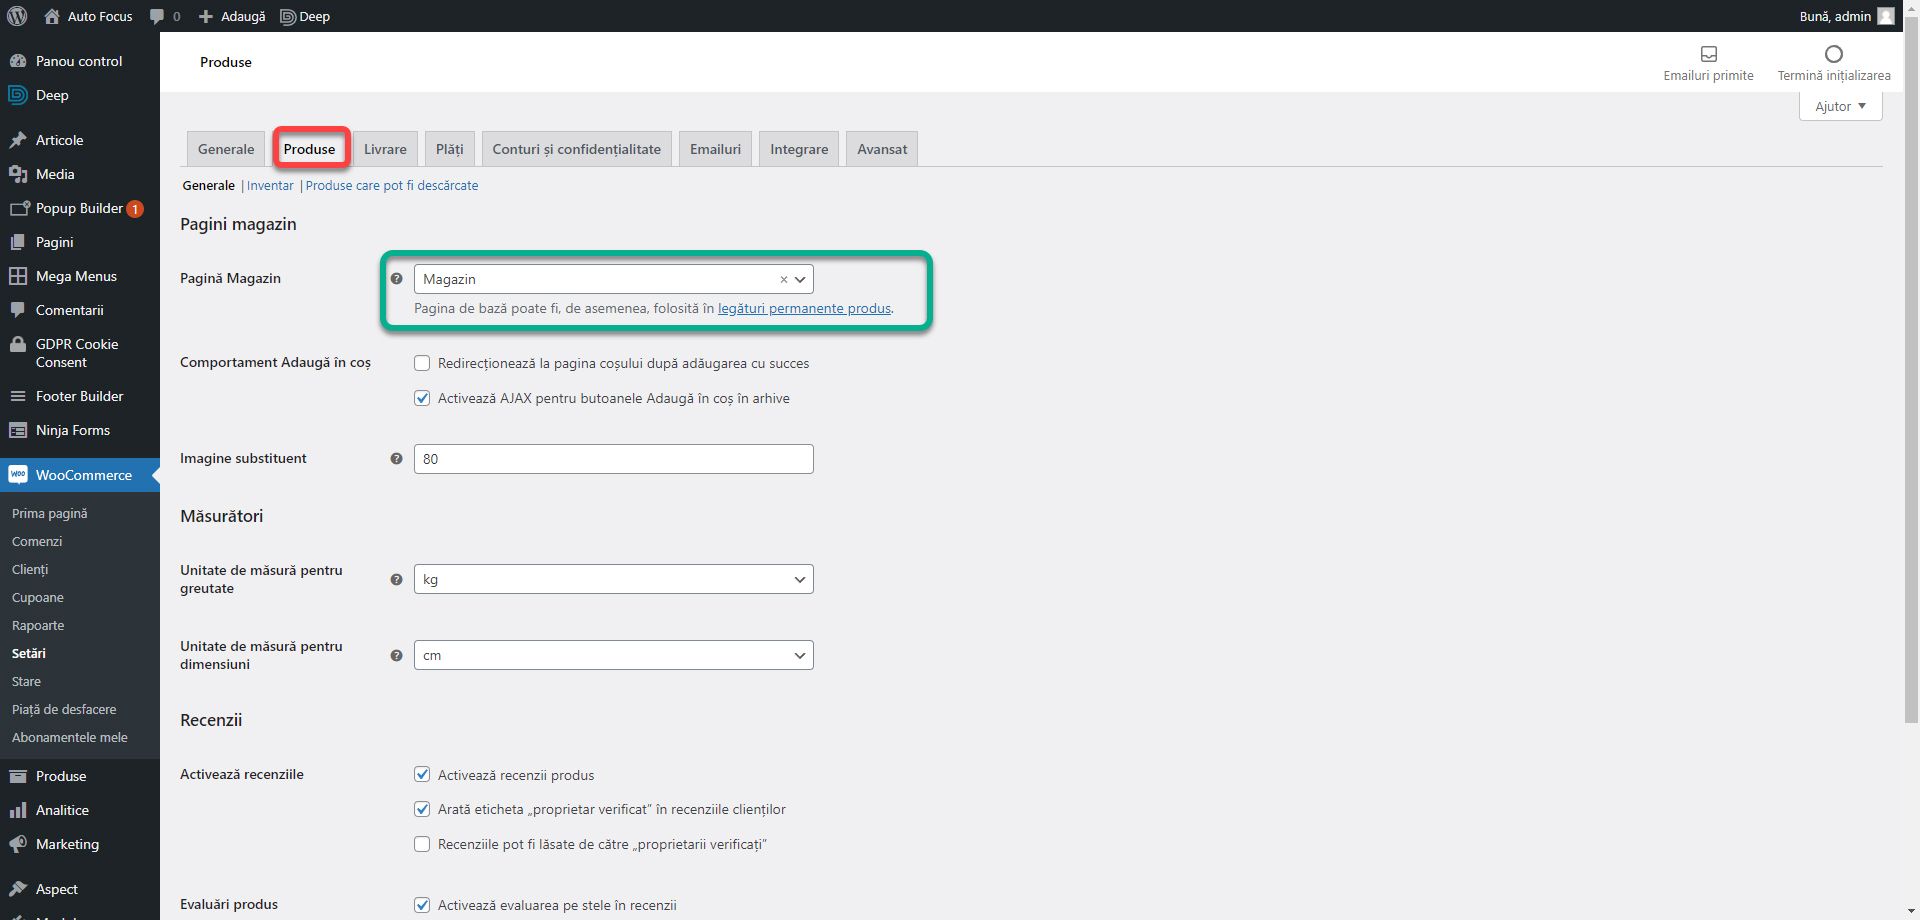
Go to the Products tab at the top. Here you can change the units of measure and enable or disable product reviews. All the pages you need were created automatically when the plugin was activated. From the Shop Page setting you can change the page where all products will be added automatically. For this example we will leave all the settings as they are.
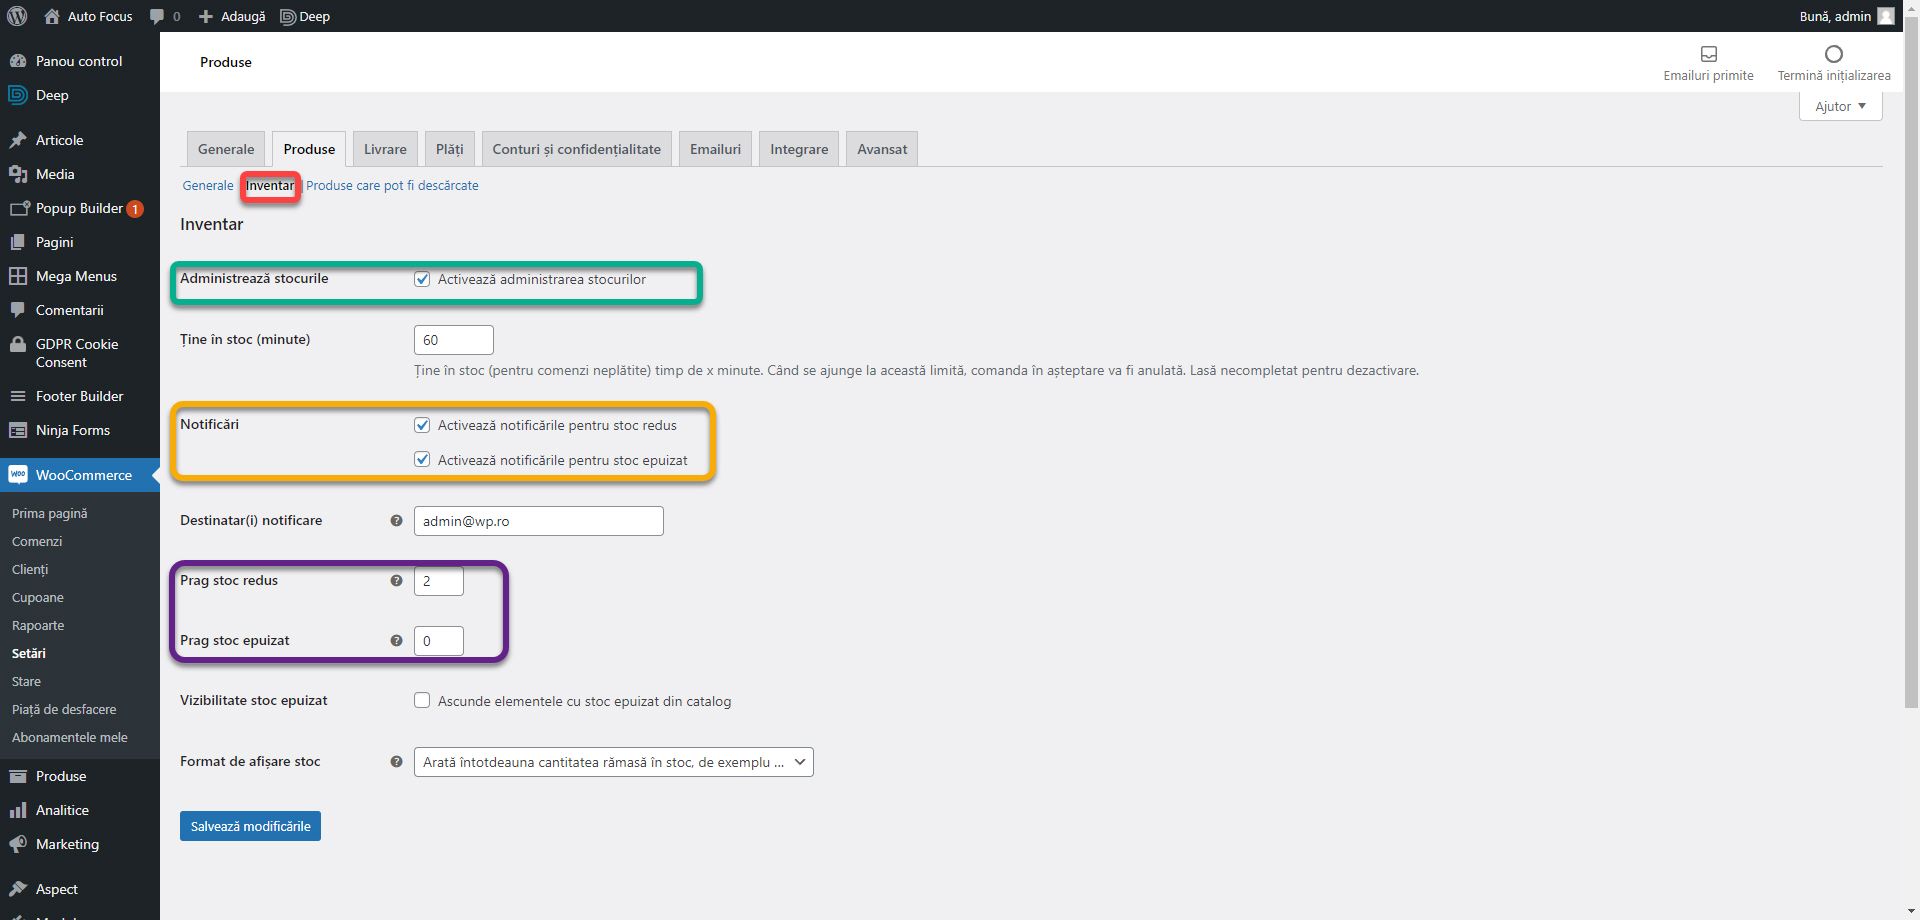
In the Inventory section you can configure inventory management. You can enable or disable inventory using the Manage stoc option. You can enable notifications for low or depleted stocks. These will be emailed to you at the address set up in the previous steps. You can configure values for low or out of stock thresholds.
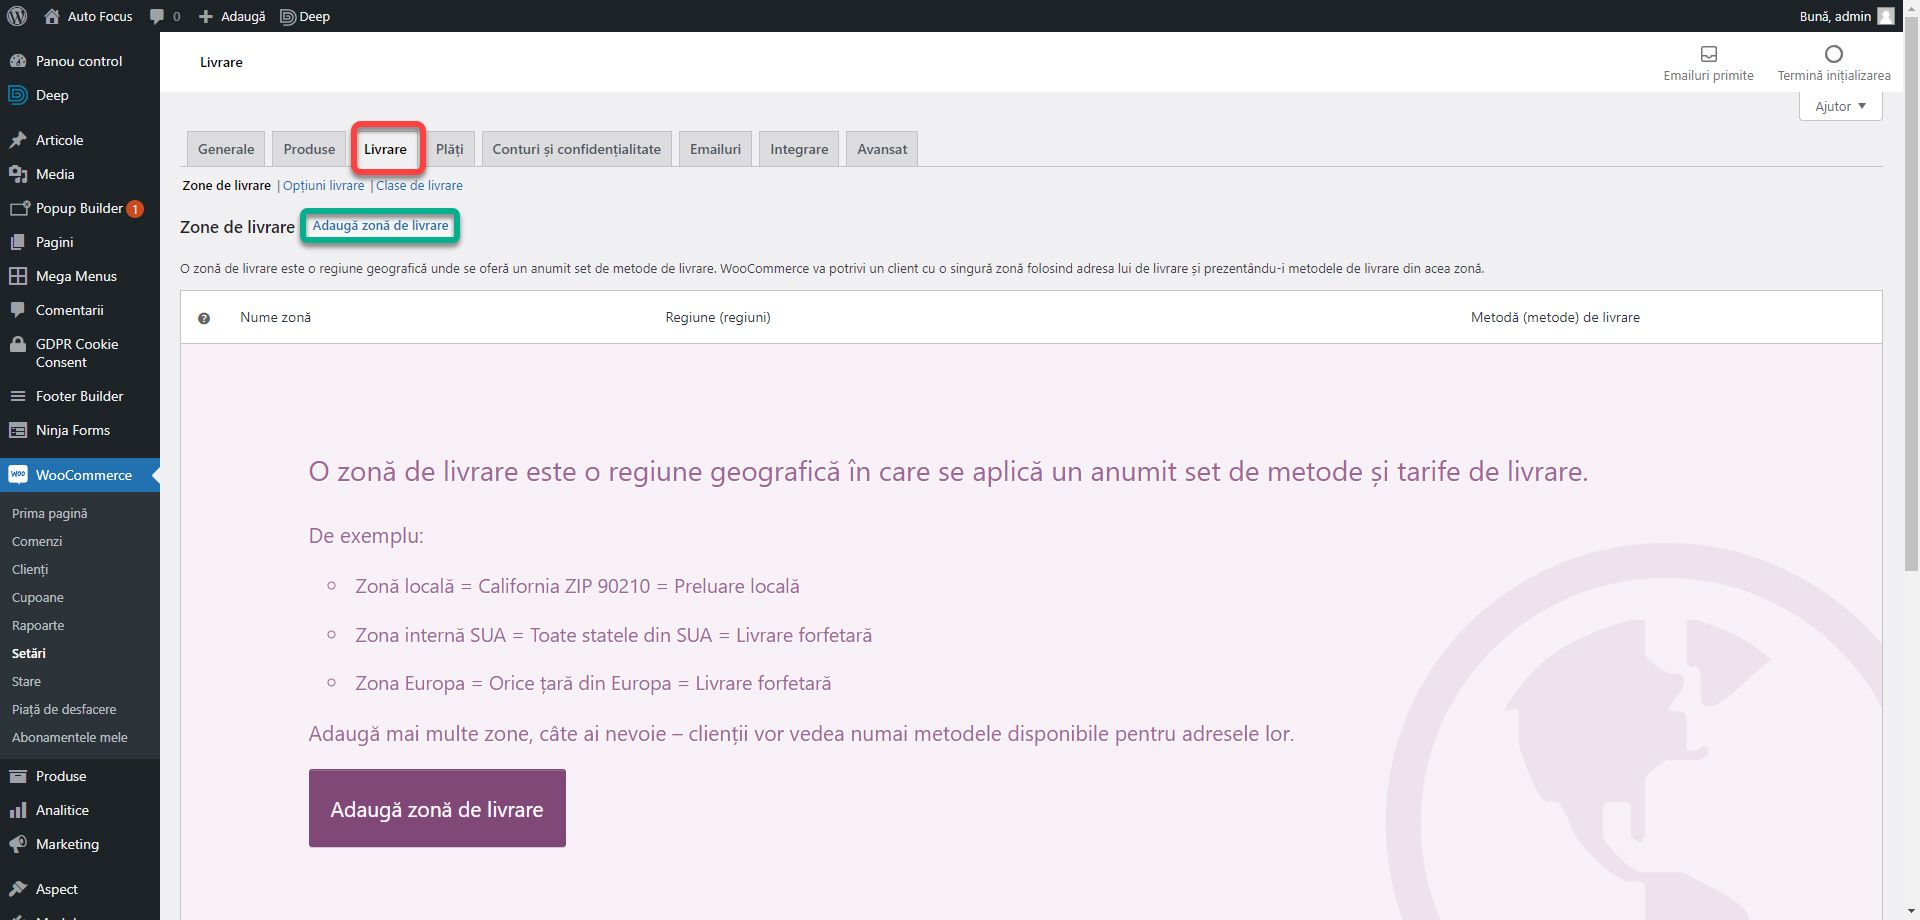
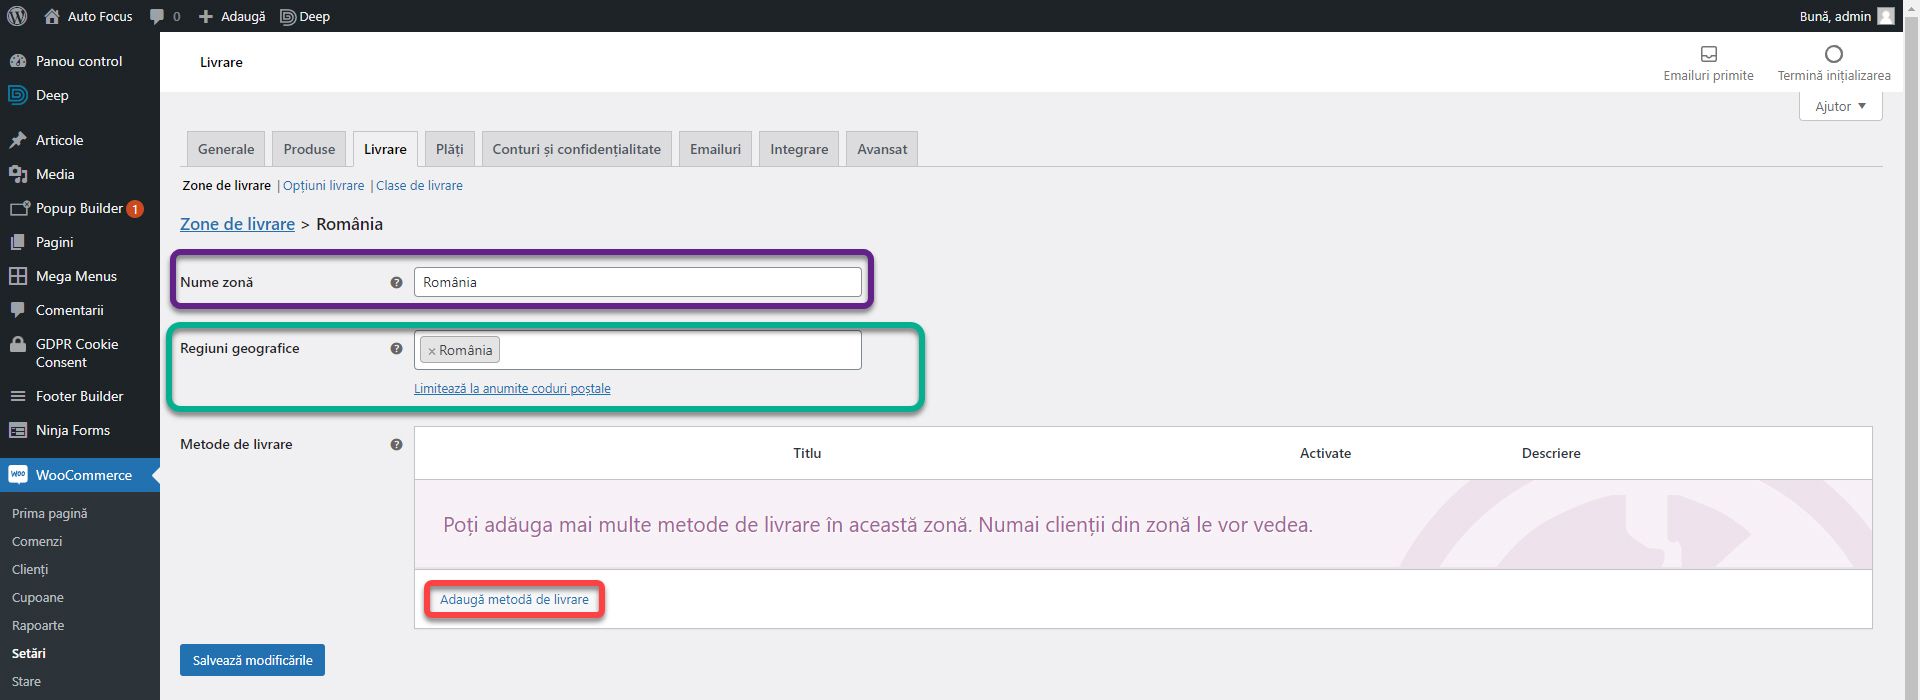
Now we need to configure in which areas you deliver the products and what the delivery costs are. From the Shipping tab, click Add shipping zone.
Through these areas you define where you deliver the products and what type of delivery applies. Enter a name for the delivery area in the Zone Name field, and in the Zone Regions field you can define the regions where the delivery area applies. You can choose one or more counties. For this example I chose Romania. Click Add shipping method.
From the drop-down list, you can choose from 3 delivery methods. Flat rate, which means with payment on delivery. Local pickup means that the customer personally picks up the product from the physical address of the shop. Free shipping means no delivery costs. Choose a method and click Add shipping method.
The new method will appear in the list. You can add multiple methods for a delivery area. Using the check mark on the Enabled column, you can enable or disable a method. To delete it, you can press the Delete button. Click Edit.
In the Method Title field, rename the method from Flat Rate to Cash on delivery. Enter the cost in the selected currency in the Cost field and click Save Changes. For example, delivery with cash on delivery costs 20 lei. You must have at least one method and a delivery area in order to receive orders.
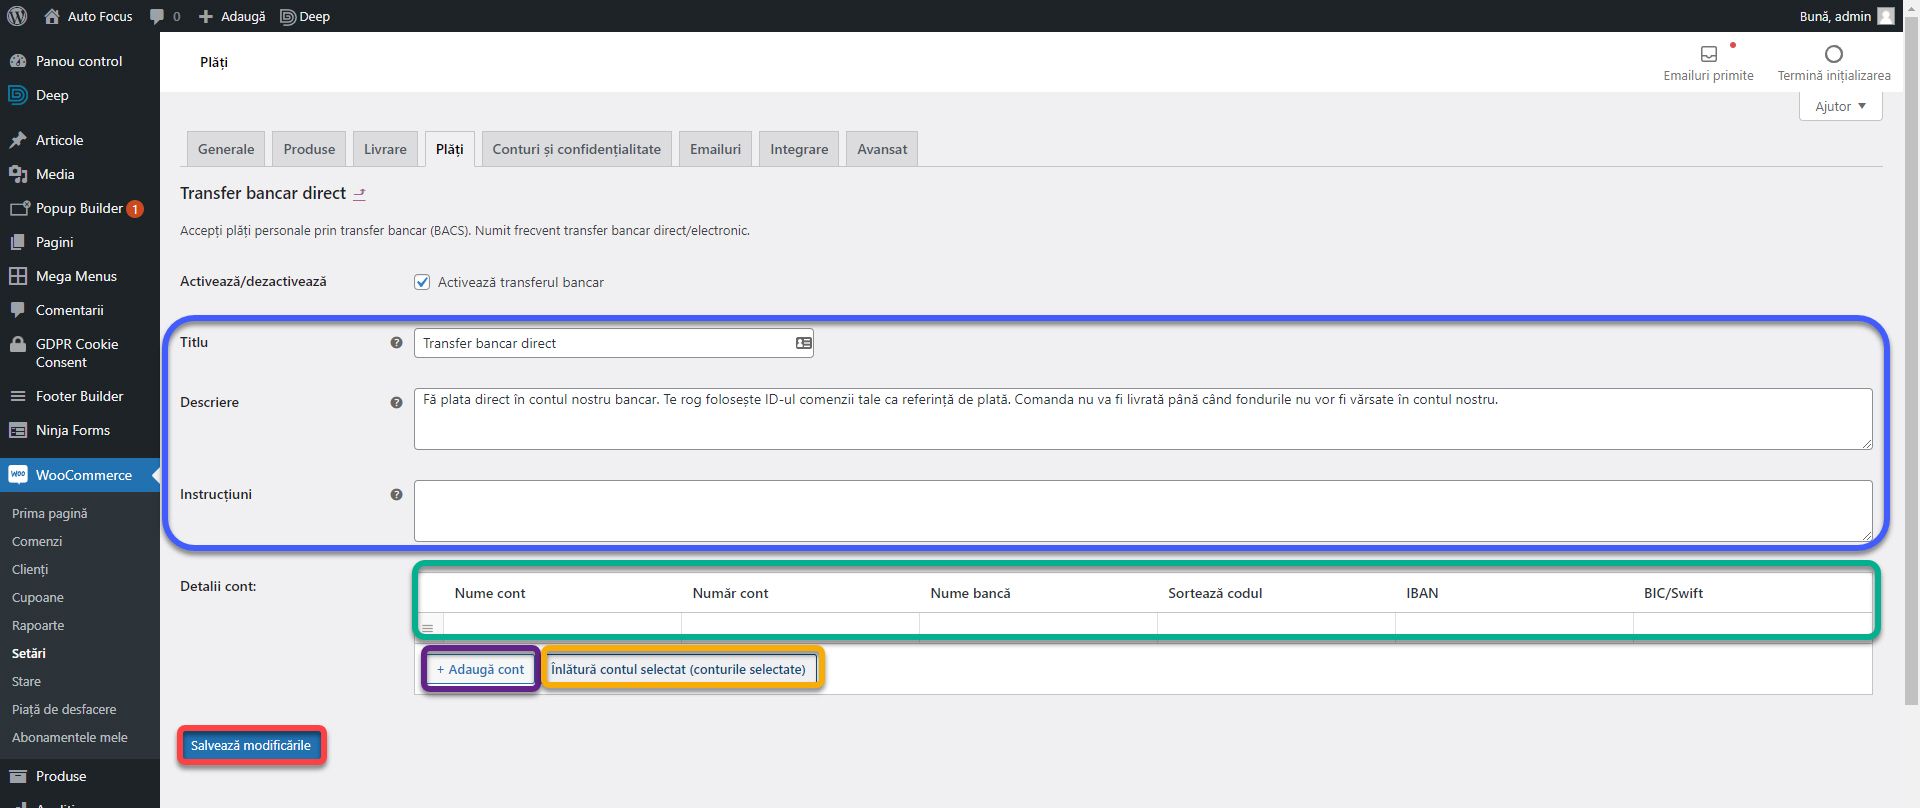
You need at least one payment method configured to receive orders. Go to the Payments tab. Using the Enabled column, enable the Direct Bank Transfer and Cash on Delivery payment methods. Click the Setup / Manage button in the Bank Transfer option.
Here you can change the Title, Description and Instructions. In the Account Details add the bank account data. To add more bank accounts, tap Add account and to delete, tap the desired row and then click Remove selected account. At the end, click Save changes.
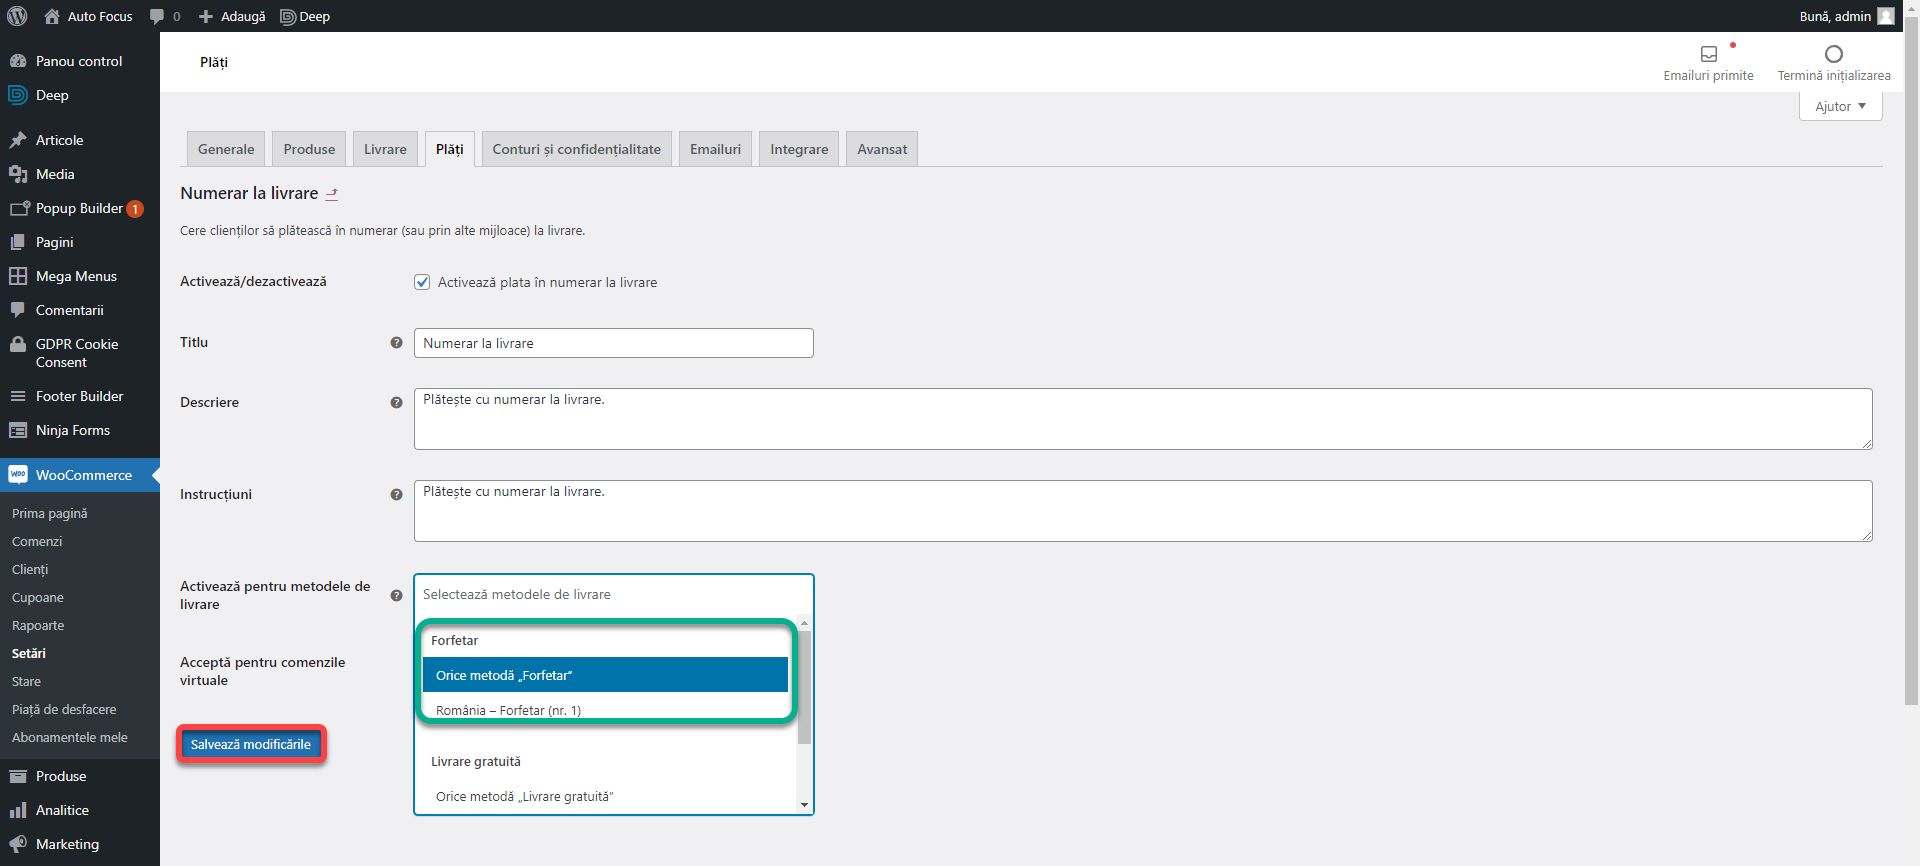
Click the Manage button next to the Cash on Delivery payment type. Here is a page similar to the previous one. Instead of the bank account, the option Enable for shipping methods, from where you can choose one or more of the shipping methods defined in the previous steps. If you want to select them all, choose the Any Flat Rate method option. Click Save Changes.
Updating the Header
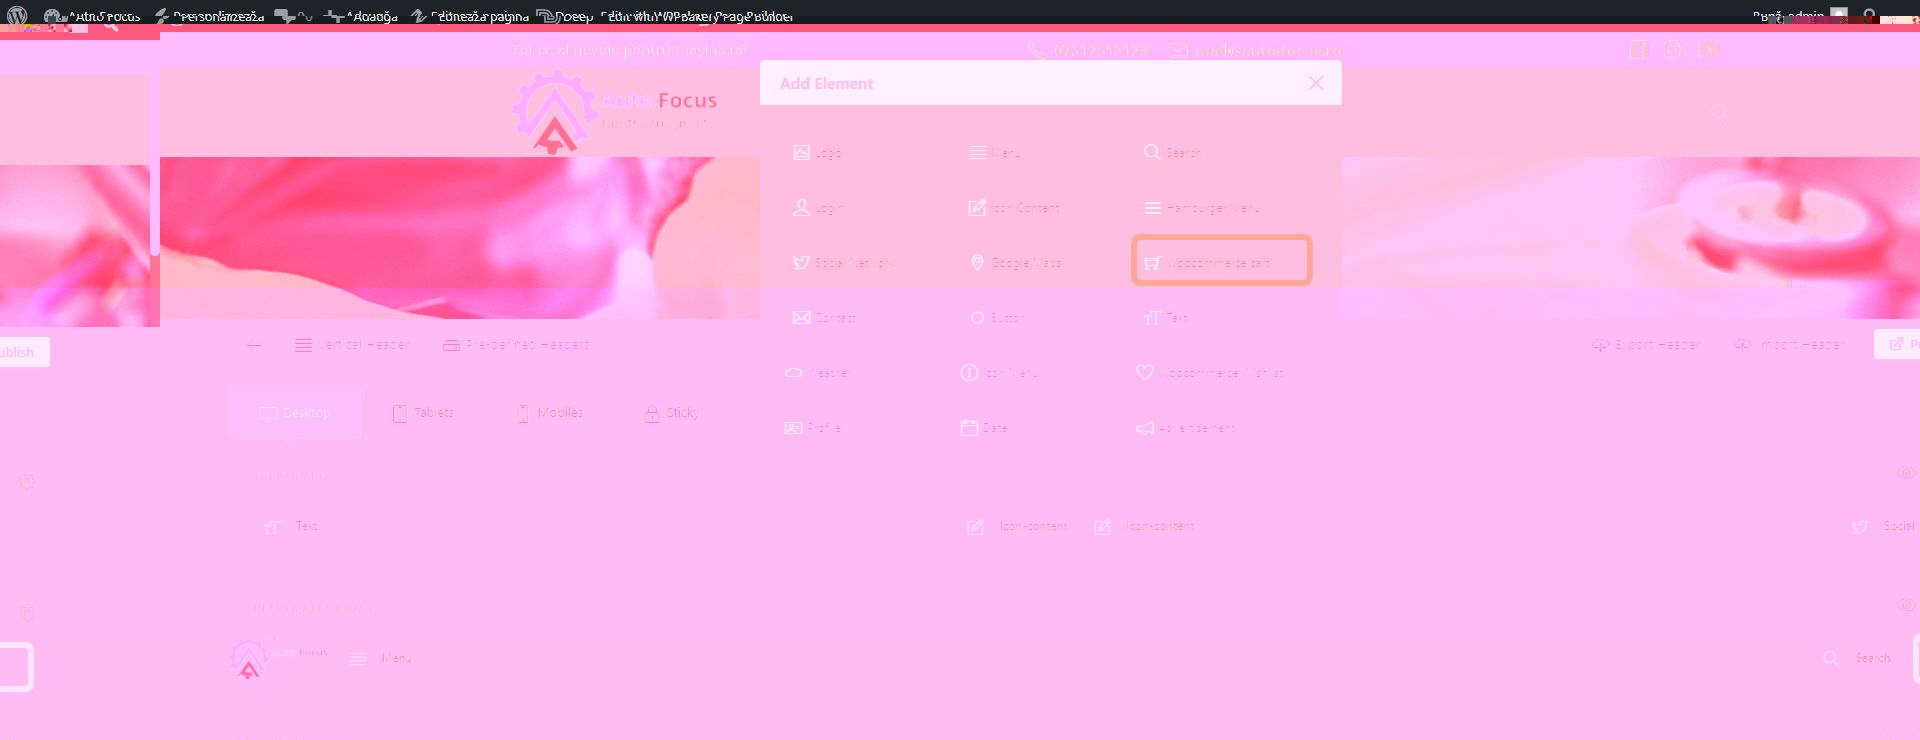
We need to add the cart button to the header. Most themes do this automatically when you activate Woocommerce mode. For the Deep theme, go to the Header Builder page. In Header Area Row 1, the last column add the Woocommerce Cart block. The block looks pretty good, so we won’t change the settings. Click Publish to save.
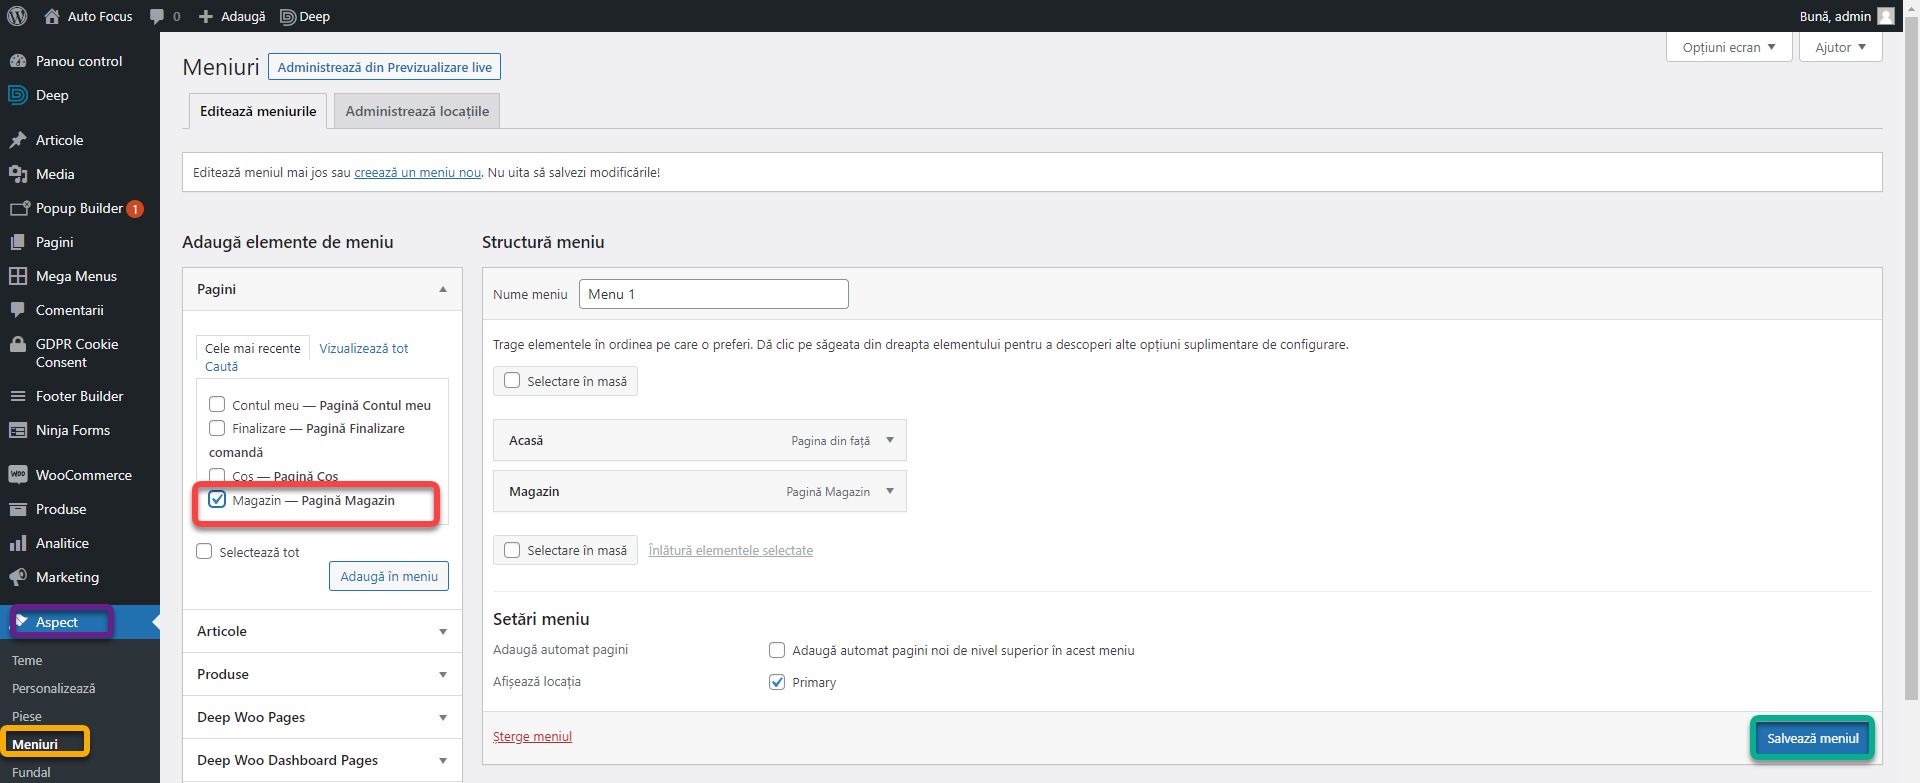
From the WordPress side menu, go to Appearance, Menus and add the Store page to the menu after the Home button. Click Save menu.
Adding Products
From the WordPress side menu, click Products. With no products, the product list is not displayed. Click Create a product.
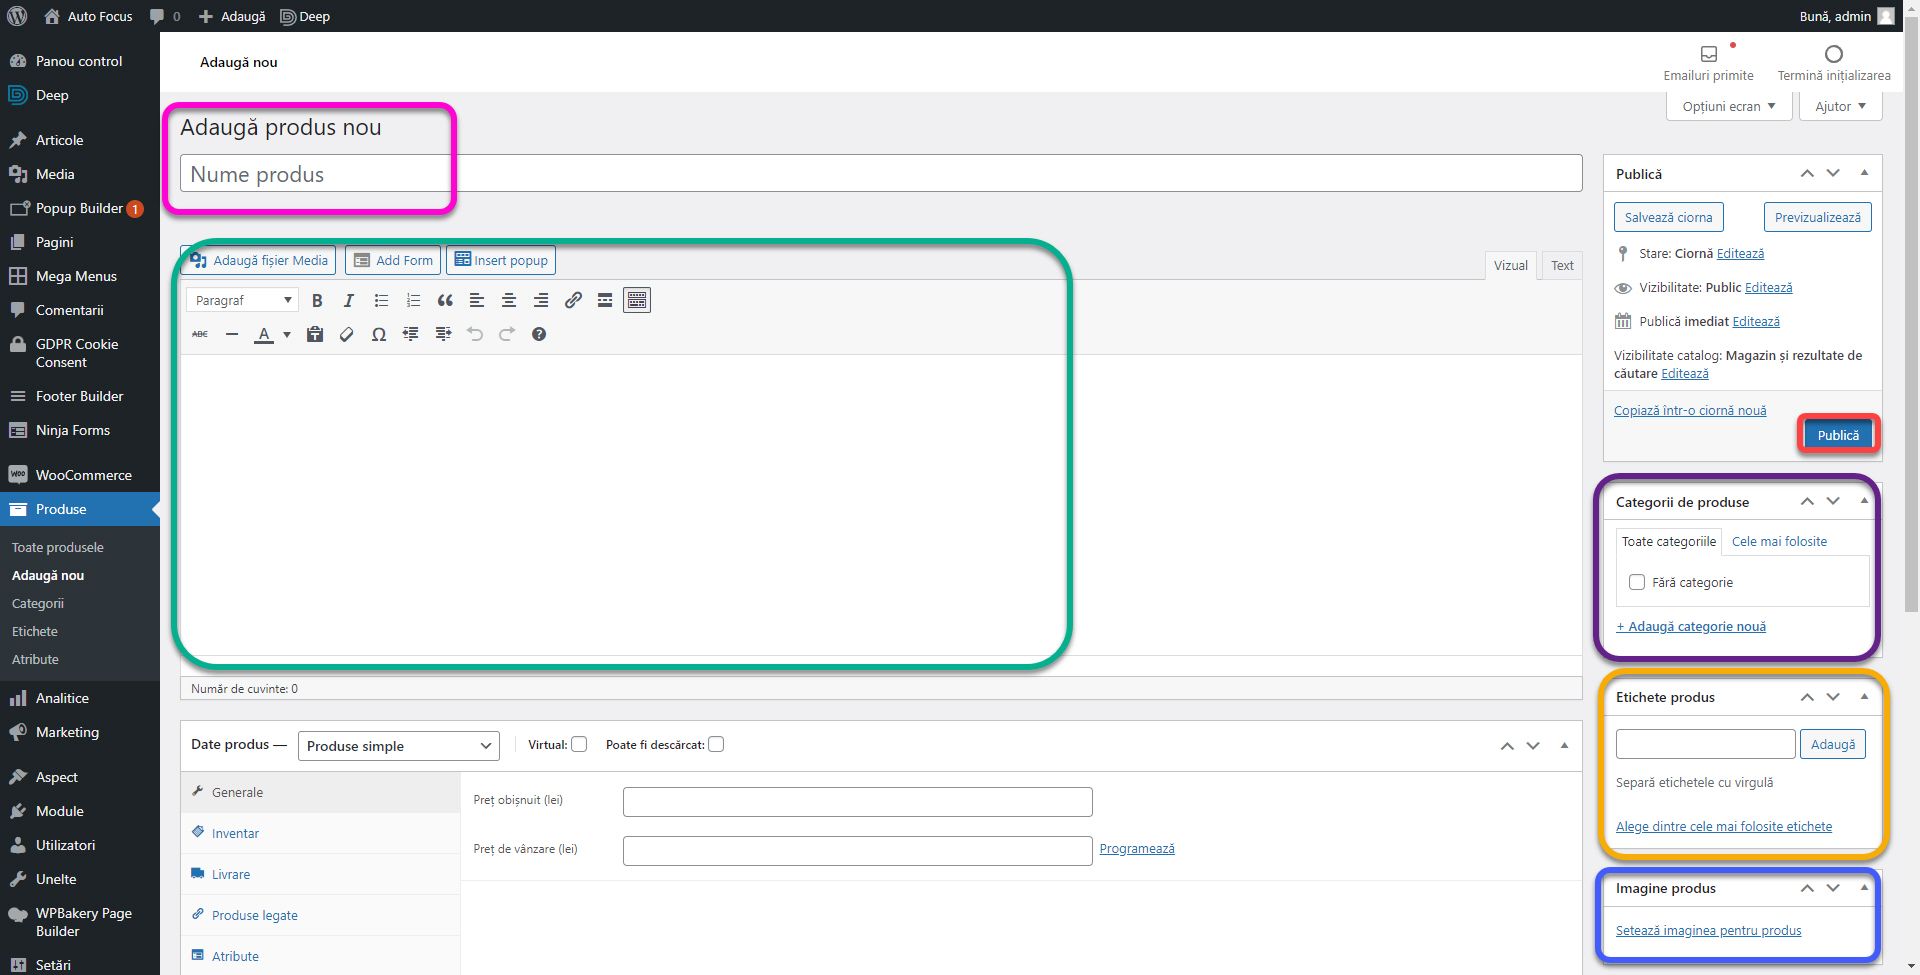
Just like a post (explained here), a product has a Title, Description, Categories, Tags, a featured image and the Publish / Save button.
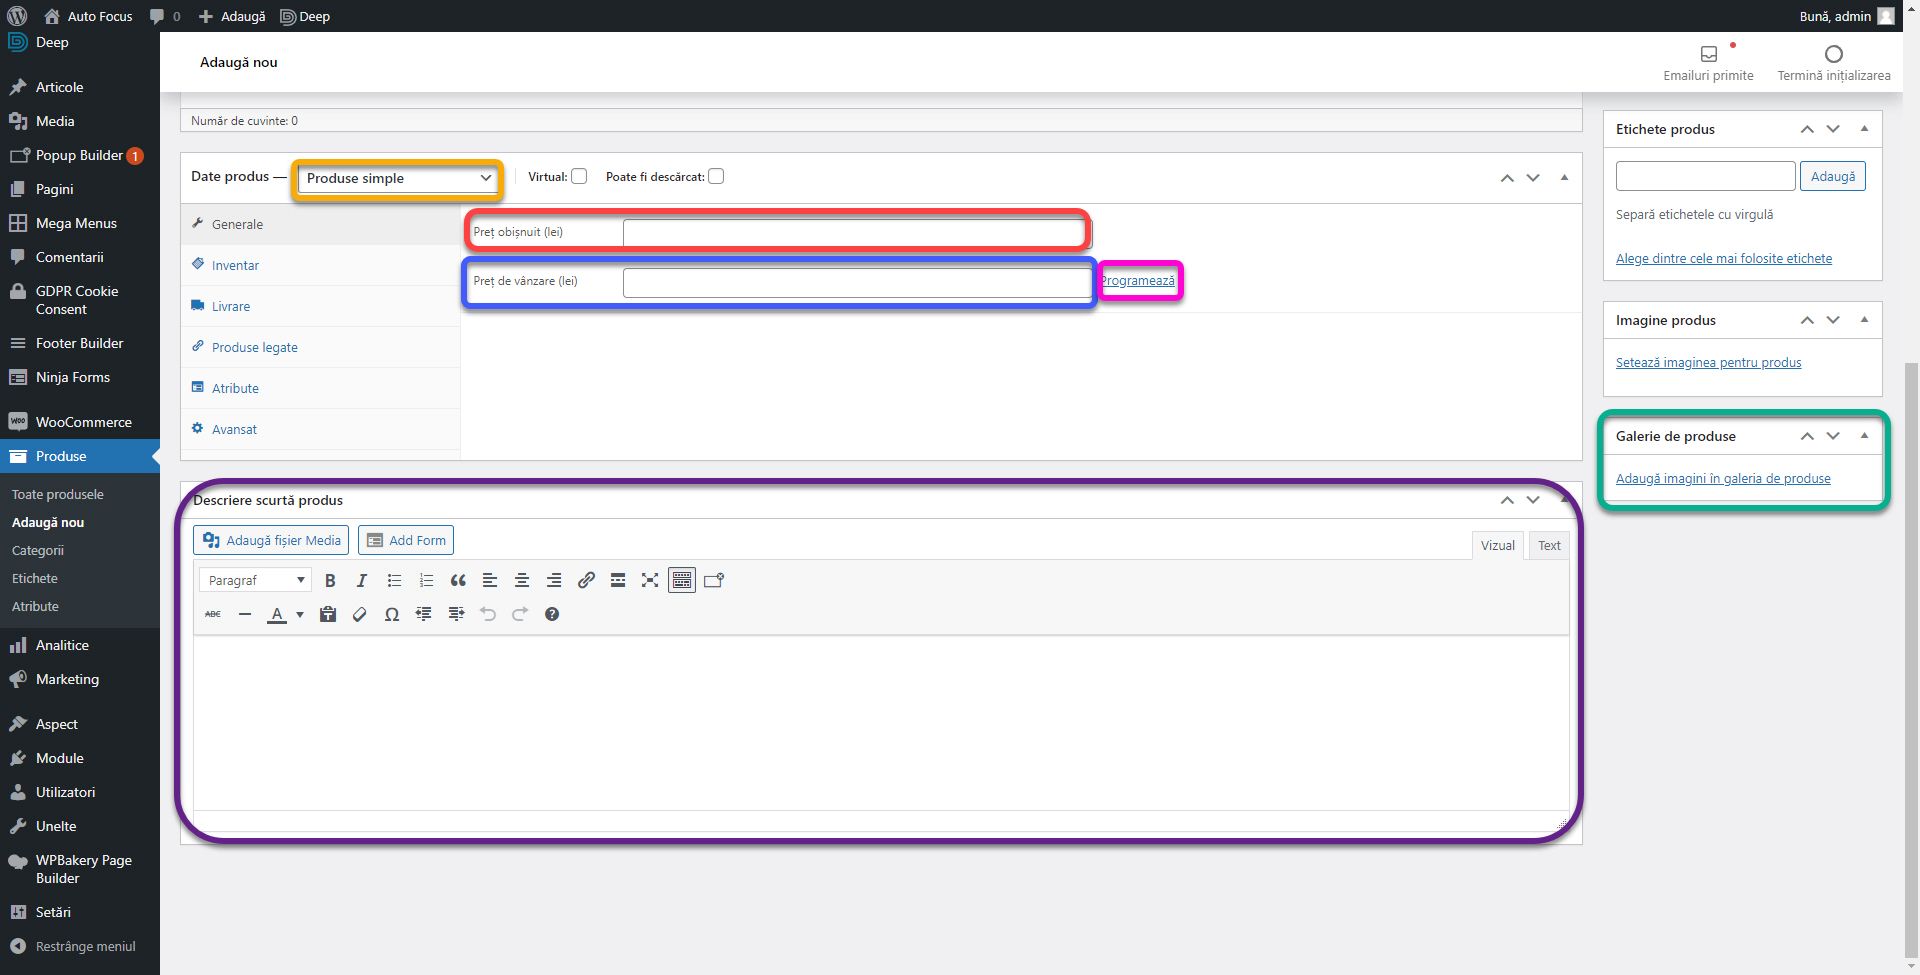
In addition to a post, a product has an image gallery called a Product Gallery and a Short Description. This appears first next to the product image. The “long” description is positioned at the bottom of the page. A product can be:
- Simple: standard product type.
- Grouped: several simple products grouped in a single product. From here the customer can choose which products to order.
- External / Affiliate: which is ordered from another website. The add to cart button is replaced with a button leading to the bidder’s website.
- Variable: the price changes depending on the selected attributes such as size, color, etc.
From the Product Data drop-down list, change the product type. For now, we leave it in the simple product. In the Regular price field, add the price. In the Sale price field, add a price only if it is different from the regular price. It is used to create discounts. If you press the Schedule button, you will be able to set a discount start date and an end date.
From the Inventory tab you control the inventory management by product. Enter the unique product identifier code in the SKU field if it has one. If you check the Manage stocks check box, 3 new fields will appear. In the Stock quantity enter the quantity you want for the product. Products with 0 stock cannot be ordered. With each order, the stock decreases automatically. If a product reaches 0, you can enable pre-orders in the Allow backorders field. Thus, the products can be pre-ordered, to be delivered when they reach stock. In the Low stock threshold field, set the quantity from which the stock will be considered low. If you do not enter a value, it will be taken from the Woocommerce settings. The Sold Individually checkbox restricts the customer to order only one product of this type per order.
If you do not enable Manage stocks, you will have a drop-down list from which you can choose the status of the product: In Stock, Out of Stock or Backorder.
In the Shipping tab, you can set the Product Weight and Dimensions. These will be displayed as attributes on the product page and can be used later if you want to integrate a module of a courier company.
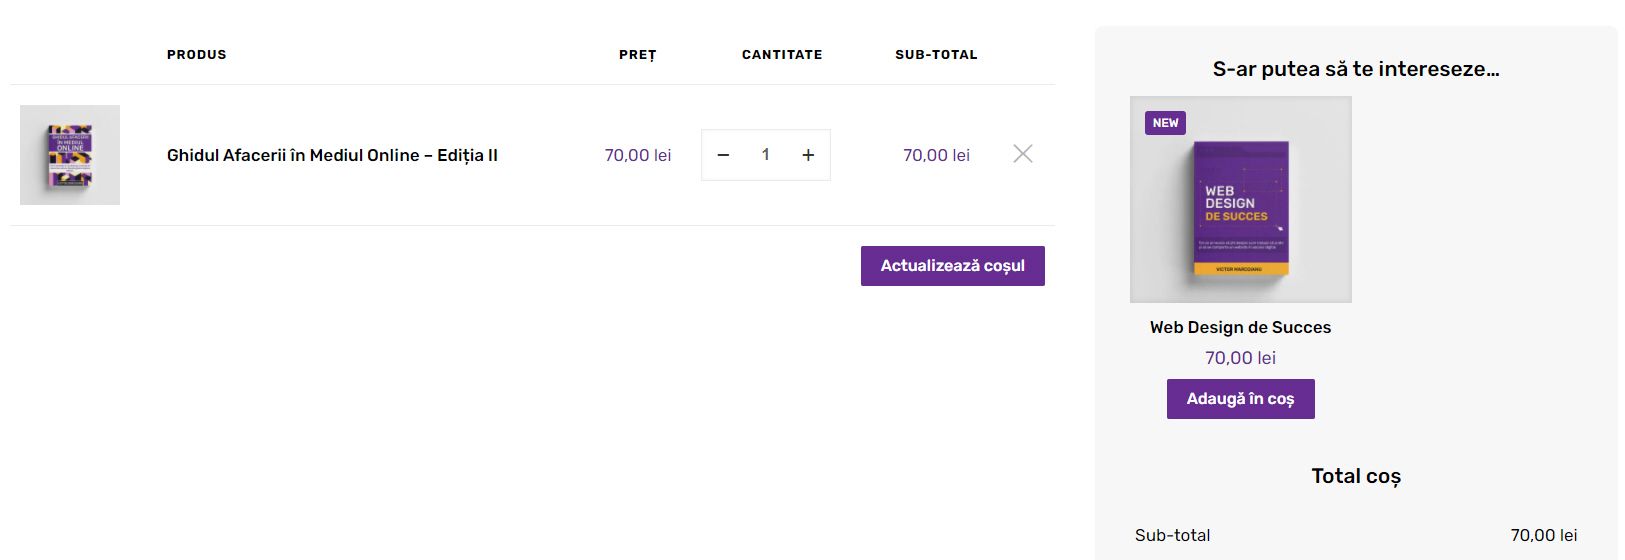
In the Linked Products tab, you can connect multiple products together. It appears as a suggestion when a product is added to the cart. Upsells are the products you recommend instead of the product added to the cart. Cross-sells are the products you recommend along with the product in the basket. To add a product to one of the two lists, type its name and select it from the drop-down list once it appears. It works like a search engine. As you type, your product list is queried.
In the image below you can see an example of cross-selling from the SenDesign store.
In the Attributes tab, add the product specifications. Click the Add button to add a new set of attributes. Two new fields will appear. In the Name field, add the name of the specification, and in the Value fields add one or more values separated by |. For example Weight with the value 1.5Kg or Color with the values White | Black | Blue. For variable products these attributes may be priced differently. The Visible on product page check mark allows or does not allow the attribute to be displayed in the Additional Information field on the product page. Click Save attributes after you’re done. These are saved without the need to save the product.
The image below is an example of the attributes of the book Successful Web Design in the SenDesign Store.
In the Advanced tab, you can set a Purchase Note that will be displayed to the customer when ordering the product. The Menu order controls the order in which the products will be displayed on the Shop page. Using the Enable reviews check box you can enable / disable per product, the possibility for buyers to leave a review.
For Grouped Products, the settings are automatically taken from each individual product. In the Linked Products tab, in the Grouped Products field, add the simple products that you want to be part of the group.
External / affiliated products have two fields in addition to the simple product: Product URL which represents the address where the product can be ordered and Button text which represents the text of the button. External products have no stock or delivery settings.
For Variable Products, you must add at least one attribute in the Attributes tab. Check Used for variations and click Save attributes.
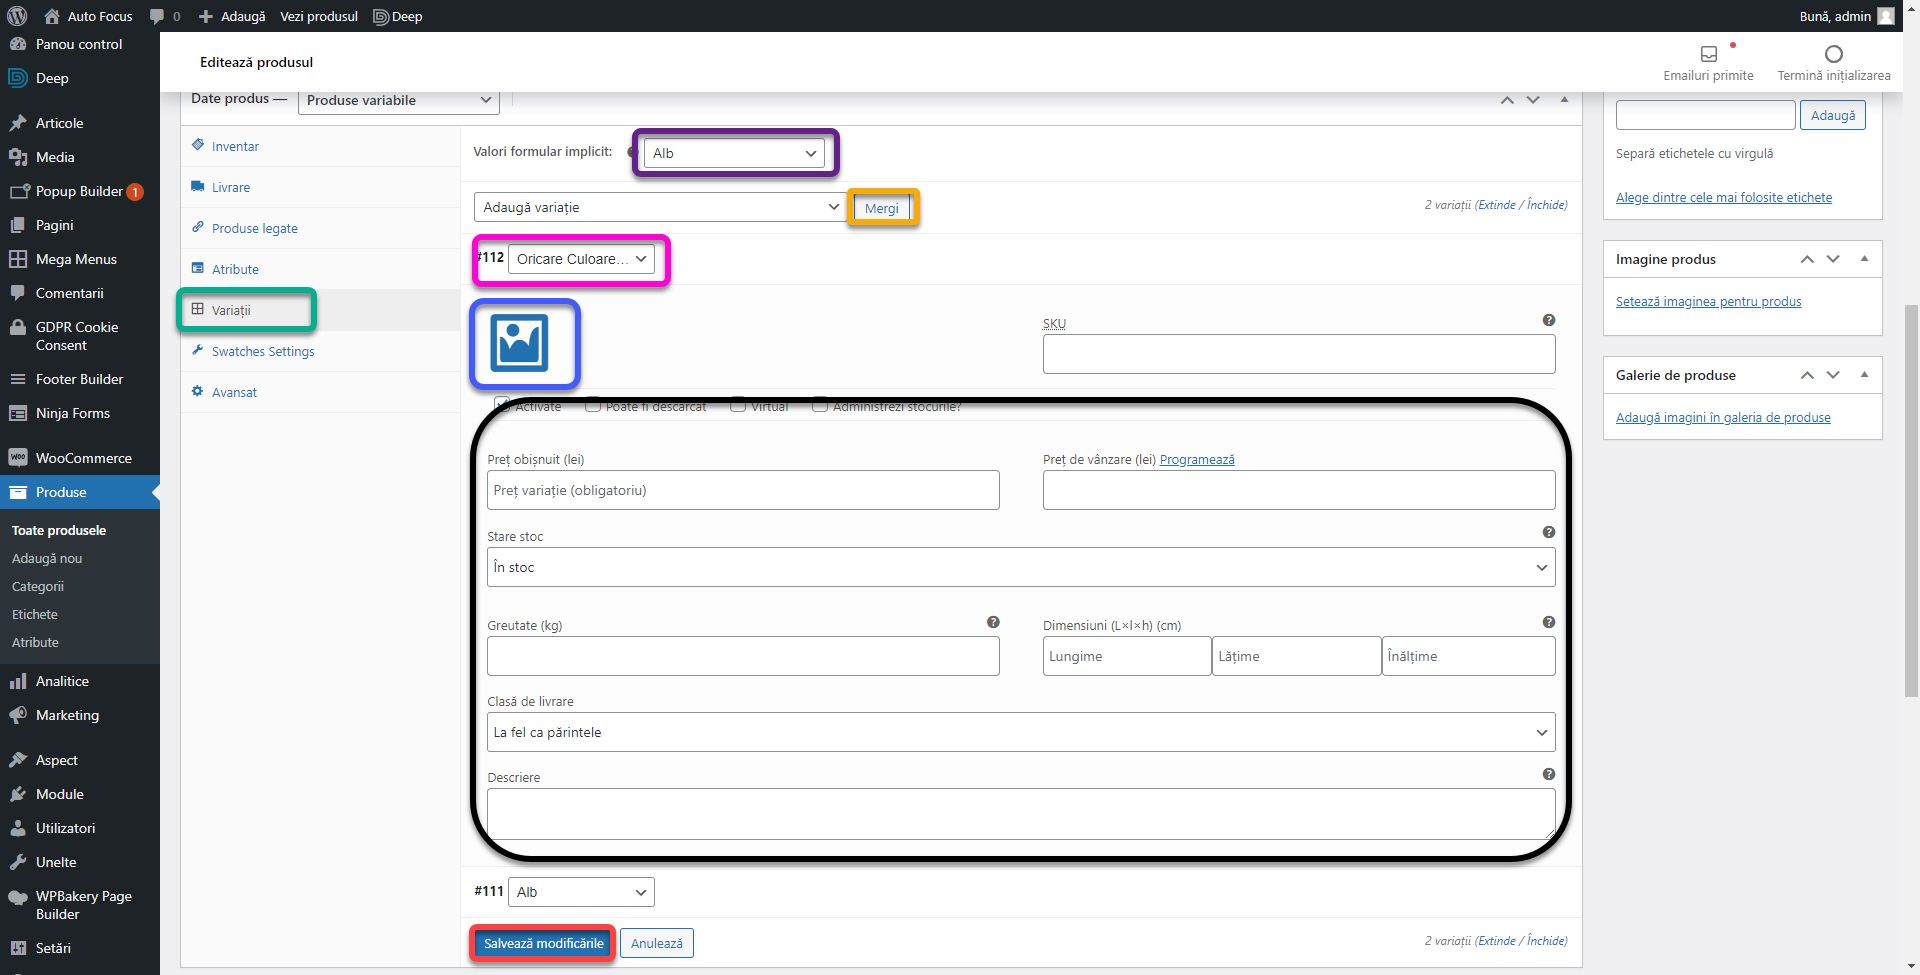
Go to the Variations tab. Next to the Add Variation field, click Go. A new variation will be created. It has all the settings that a simple product has (black box). Each variation can have its own featured image. When a variation is selected, the image changes to that of the variation. For example, if you select a white color for a dress product, the picture of the white dress will be displayed. Initially, the settings affect all variations. Click on the field called Any followed by the name of the attribute you chose, in my case, Any Color and select one of the values created. In my case, White. Thus the settings made will apply only to the color white. Repeats the procedure for all attribute values. In the Default Form Values field above, you can set which attribute to select by default. That is, when the product is open, the white color should already be selected. At the end, click Save changes.
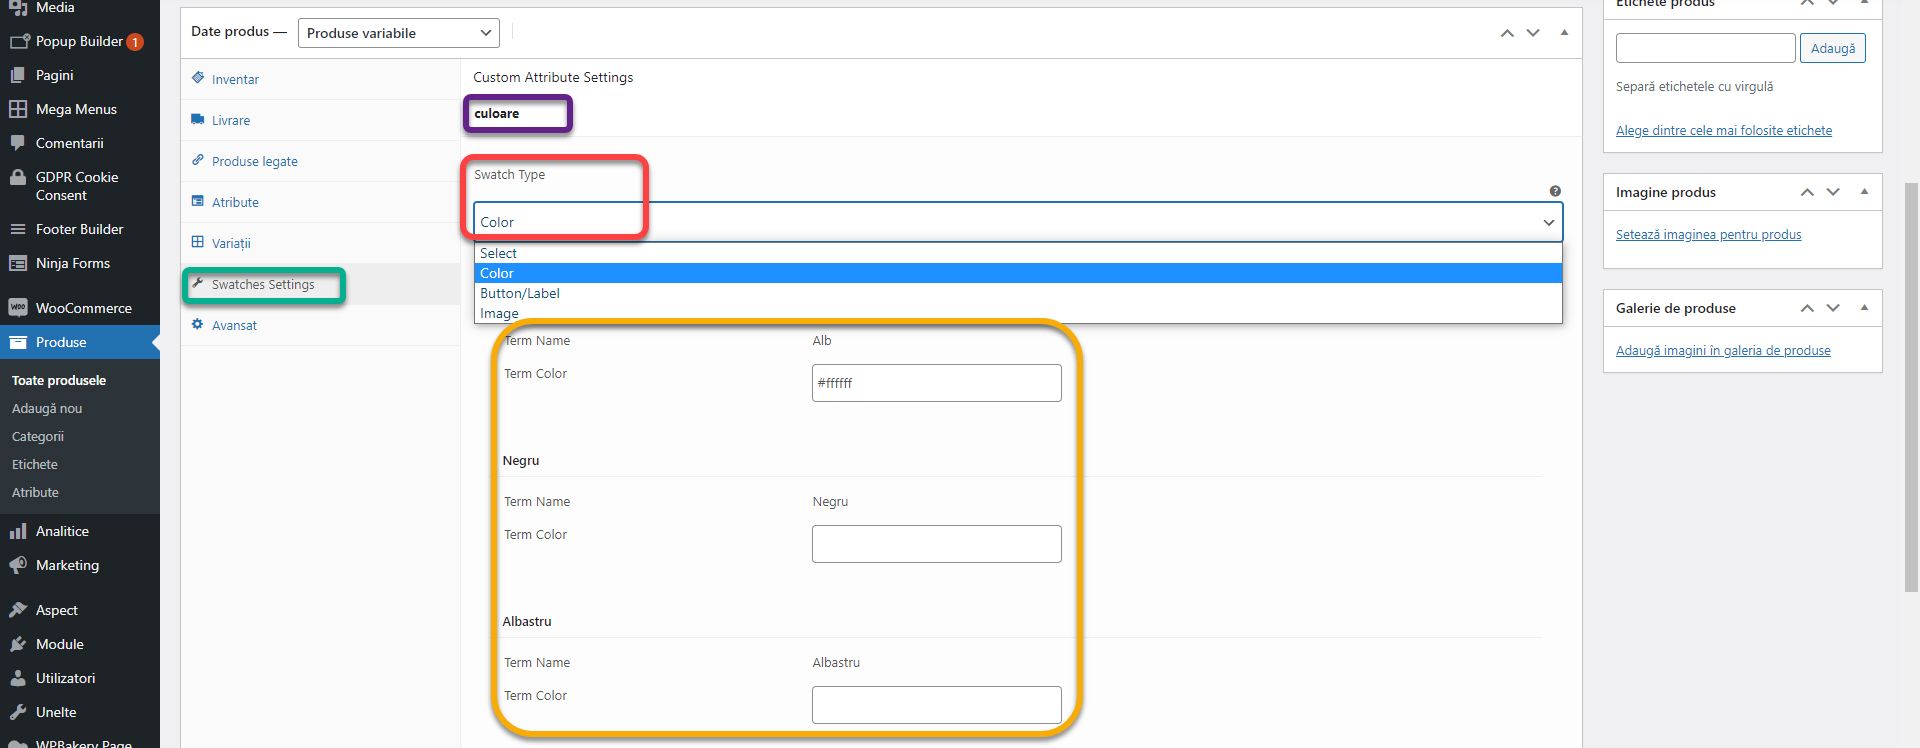
The Deep theme provides the option to edit the type of buttons that select variations in the Swatches Settings tab. For each attribute (purple box) set a button type in the Swatch Type field. These can be Color, Button / Label or Image. Depending on what you select, set each value below (orange box). For colors you set the color code, for buttons you insert the text and for the image you upload the image.
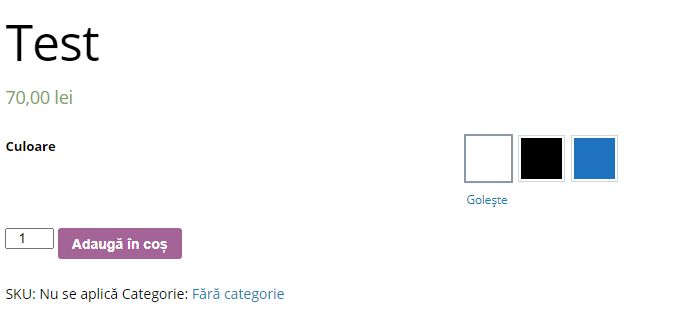
In the image below, you can see the variations of the product for the color example.
After adding the first product, the product page will display their list with the same options as for pages or items.
Order Management
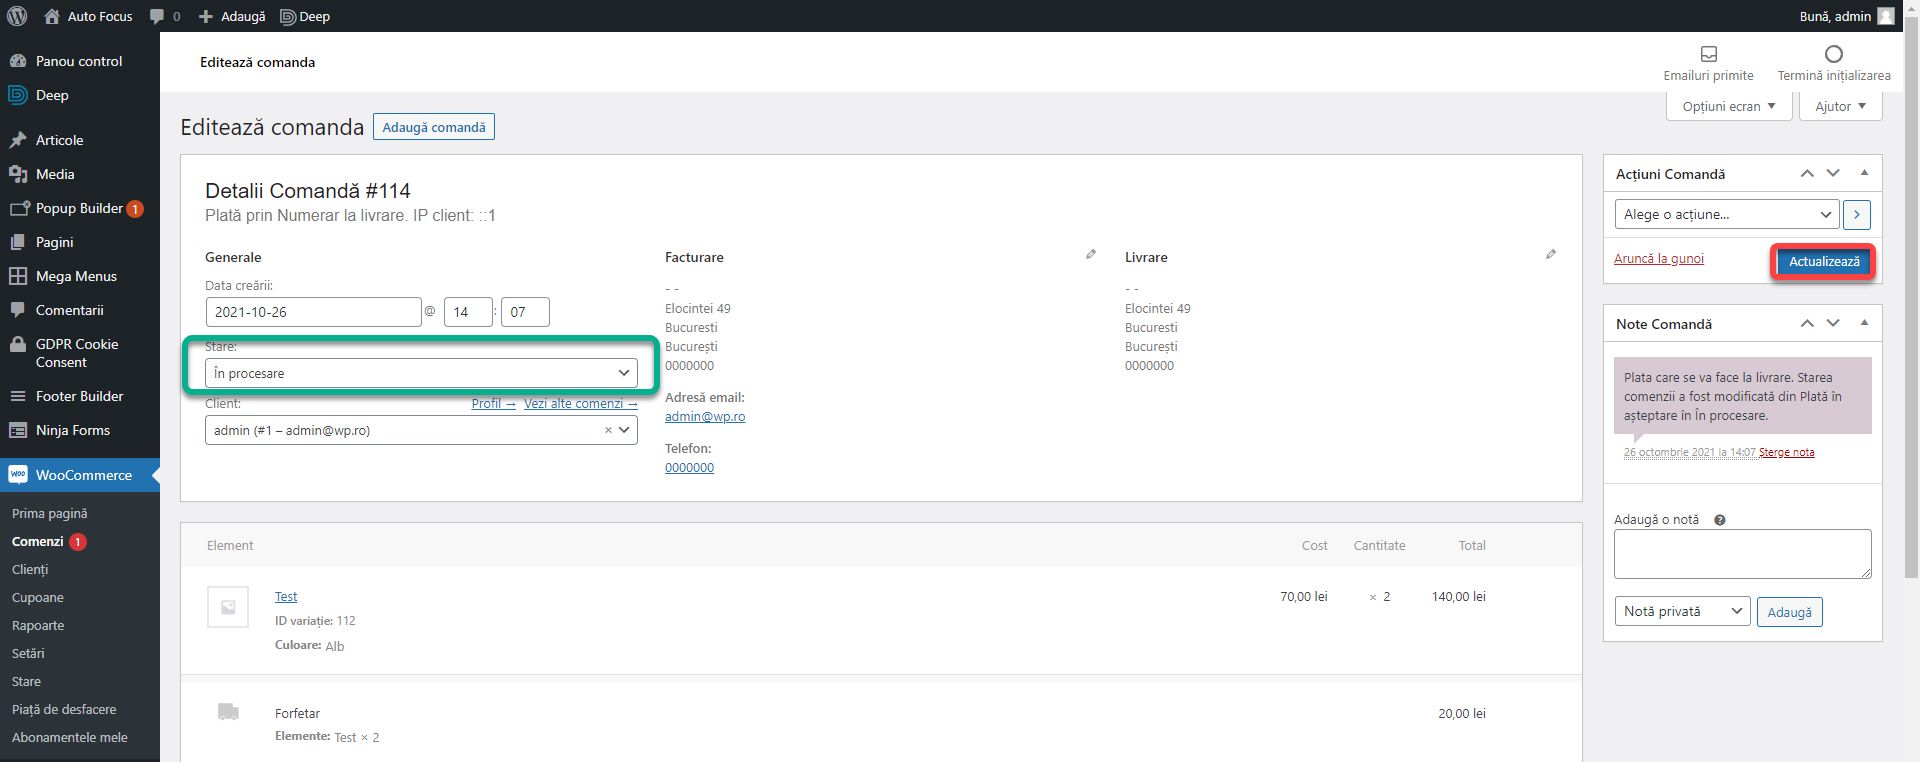
To see the orders received, go to Woocommerce, Orders section. Here you will find a list of all orders placed and their status. Click on an order to see details.
Here you can see the details of the order or change its status (Completed, Canceled, Failed, etc.) in the Status field. At each change of status the customer will receive an email depending on its nature. Click Update to save the new status.
That’s all you need to know to open an online shop. If you are confused or need help, I am waiting for you on the SenDesign Community Facebook group!


