How to create a website #4: Header and footer
01/10/2021
How to create a website #6: How to create a beautiful website (I)
15/10/2021
How to create a website #4: Header and footer
01/10/2021
How to create a website #6: How to create a beautiful website (I)
15/10/2021How to create a website #5: Creating pages and posts
It’s time to talk about content creation. How to add a page, how to add a post and how to create a menu.
In WordPress, pages differ from posts in being two separate entities. A page has a standard role, to display information with a complex design. Posts are intended for the blog. On the Blog page, we will have a list of posts. Even if edited similarly, articles are specialized to be part of a blog and you can set their categories, tags and other typical features. It’s an important difference because it matters to use either a page or an post where it belongs.
Creating Pages
To create a page, go to the Pages section of the WordPress control panel. Here you will find a list of all existing pages (green box). There are several pages created by WordPress automatically upon installation. Click Add Page.
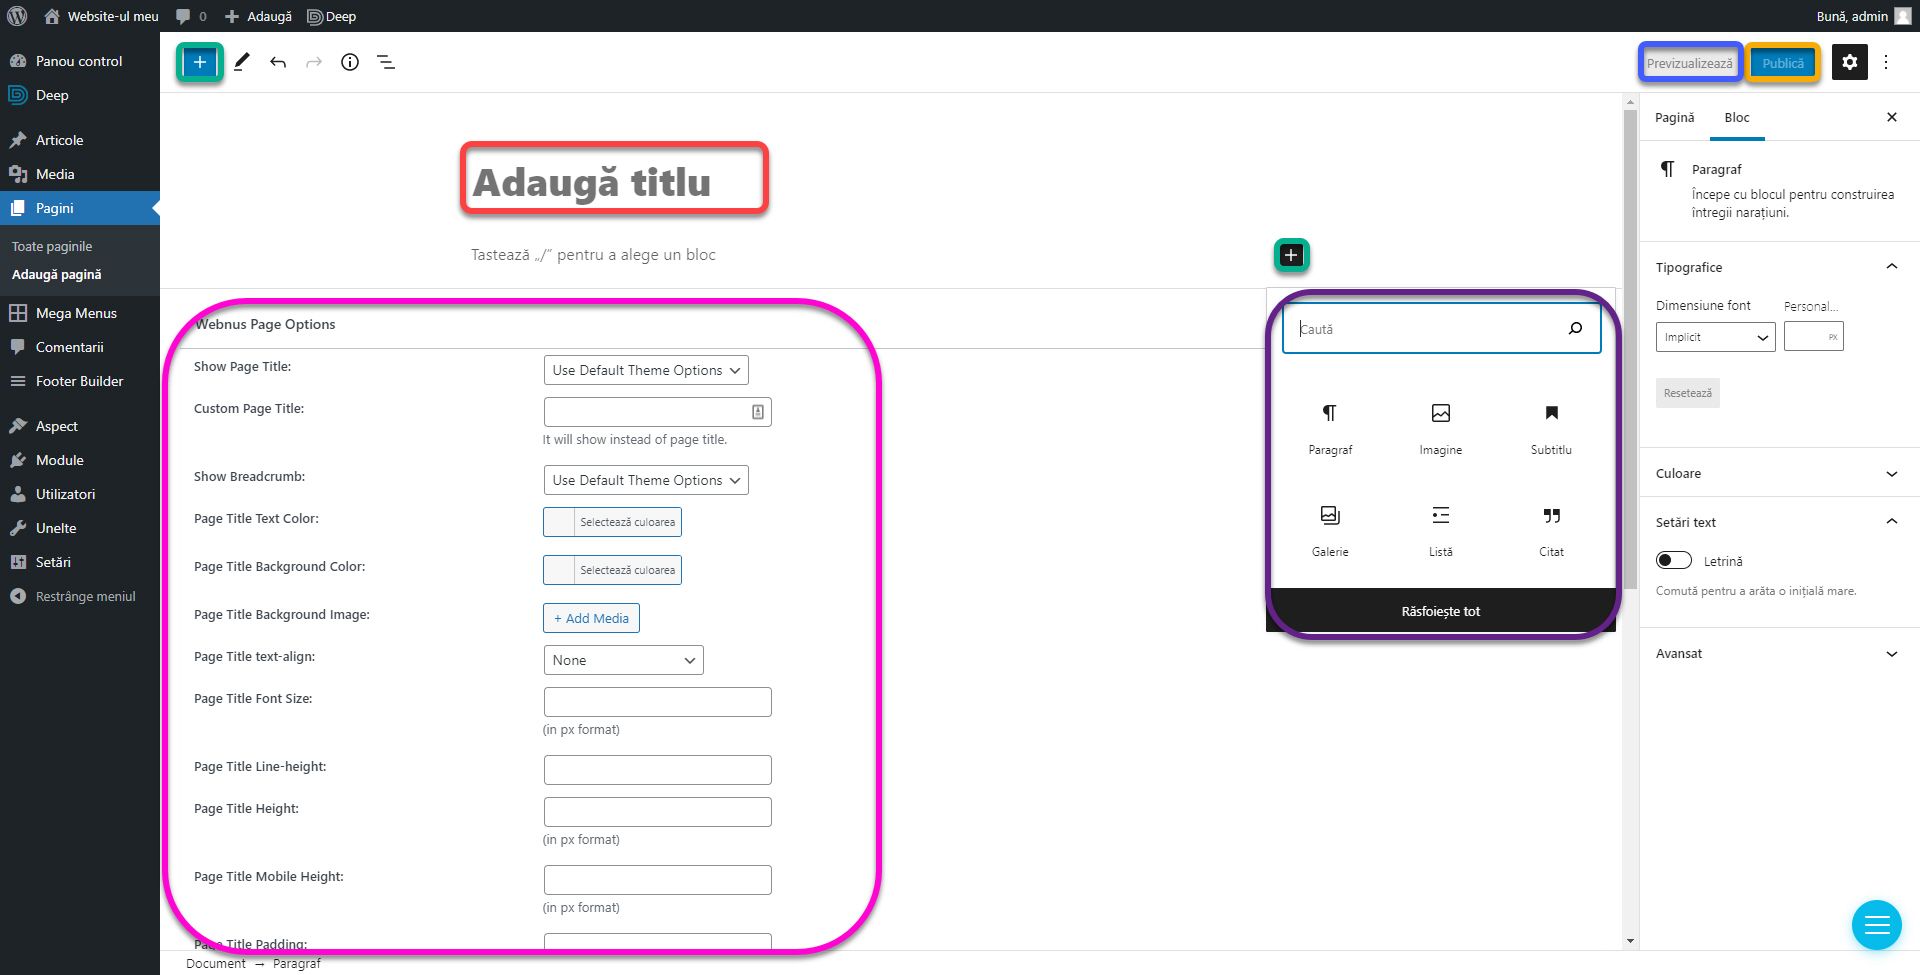
This is the WordPress page editor. In the Add Title section, insert the text Home, as this will be our first page. Just like with widgets, you can add items to the page by pressing one of the two add buttons with the Plus icon. You will find the same list of items as in the previous article. You can click Browse All to view the full list. To preview the changes, click the Preview button in the upper right and choose Preview in a new tab. You’ll see what the page with your changes looks like without saving it. At the bottom of the page, you will find the Webnus Page Options section. This is an options panel provided by the theme where you can customize features per page, regardless of the settings in Page Options. After giving a title to the page, click Publish.
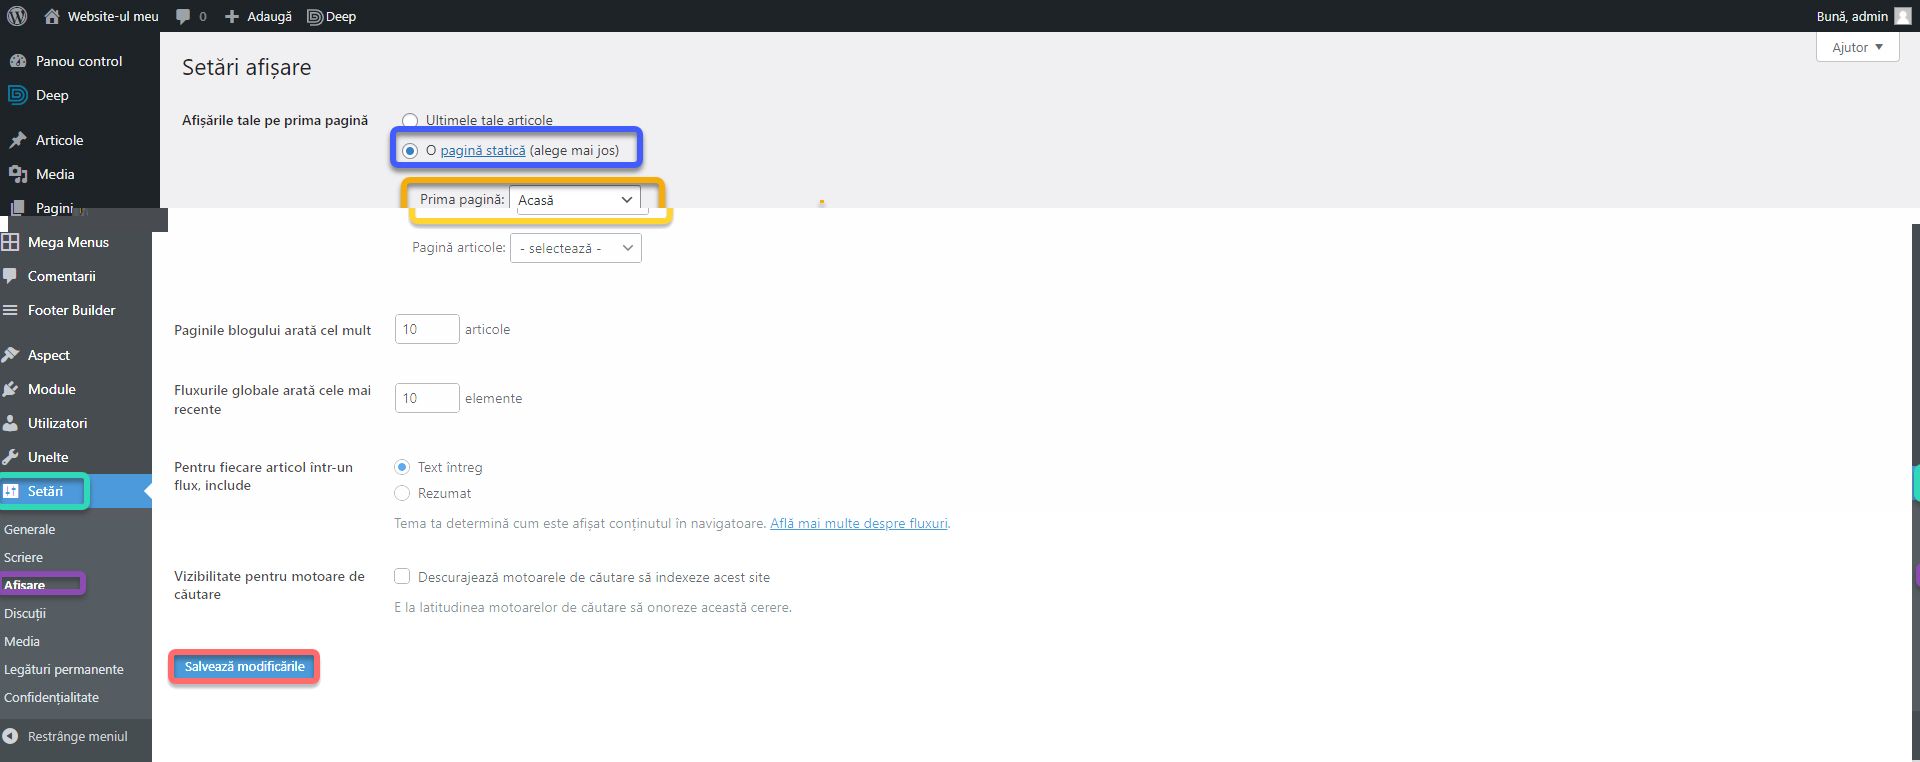
Once you’ve published the Home page, it’s time to set it as the first page of the website. Hover over the Settings button and then tap Reading. Check the A static page option in your Your homepage displays settings. From the drop-down menu called Homepage, choose the newly created Home page. Click Save Changes.
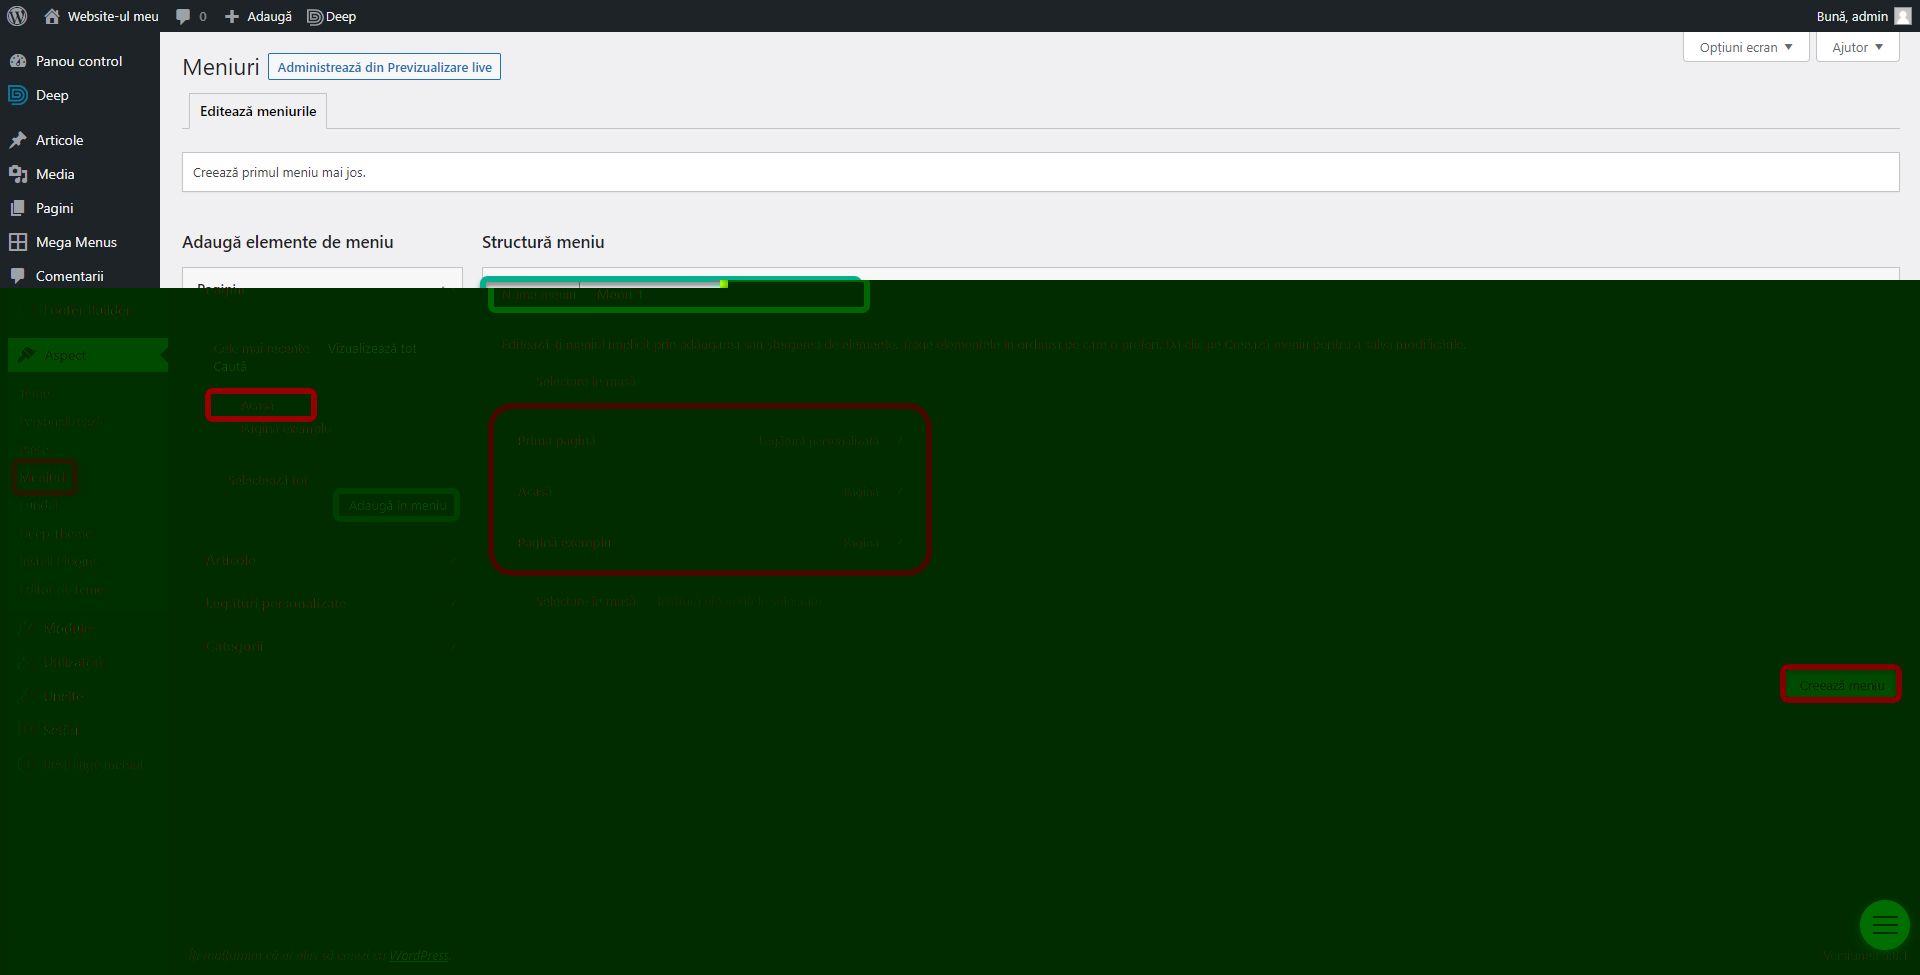
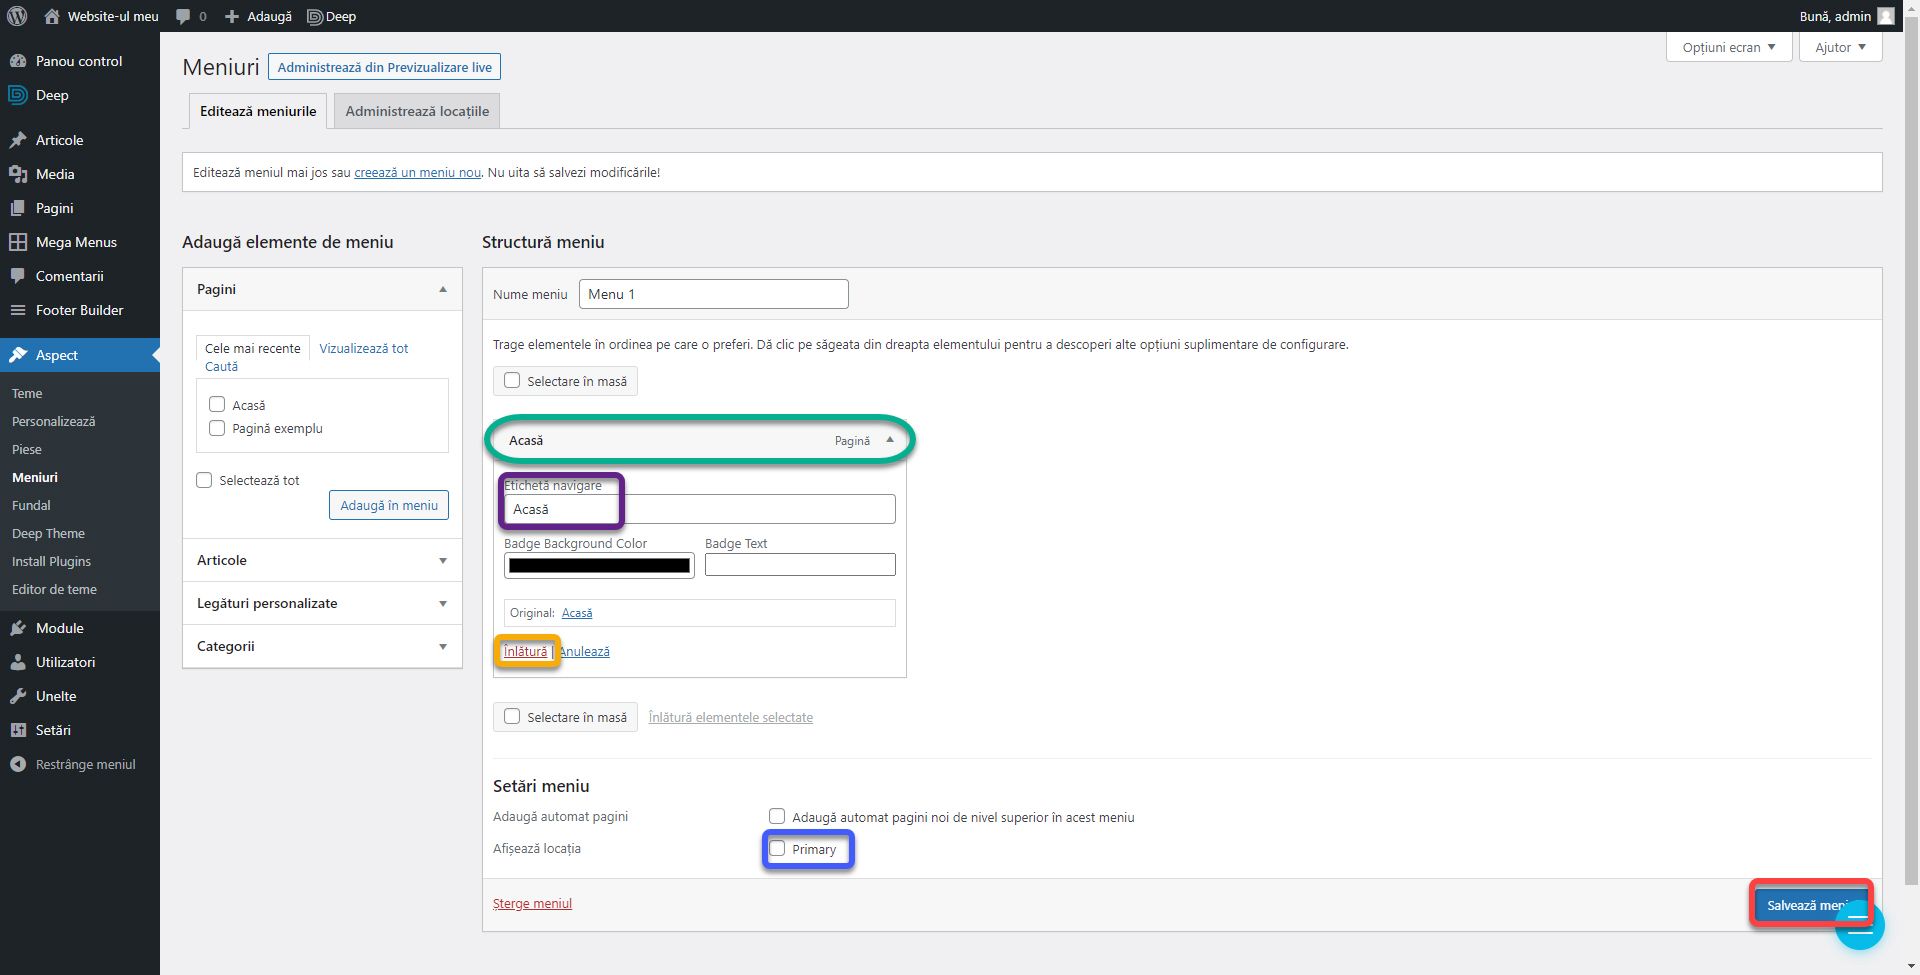
We will now create a menu where we will add the newly created page. Go to Appearance from the WordPress options bar and click Menus. The menus are administered here. When no menu is created, WordPress adds a few pages as an example, Click Bulk Select, select each item, and then click Remove Selected Items. From the side window, you can add menu items. Check the Home page and then click Add to menu. Give your menu a name (green box) and click Create menu.
If you tap on a menu item, an options box will expand. You can remove the item or rename it in the Navigation Label field. So, even though the page is called Home, you can make it appear in the menu under a different name, such as First Page. A menu must be given a location to appear. Each theme has a different set of locations. In the header, in the footer, in the side, in the top bar, etc. Deep Theme provides header builder from where we can set the exact location of the menu. In this case, we just have to set it as the main one. Check the Primary box at the bottom and click Save Menu.
Above we discussed very briefly how to add content to the page and in the previous article related to header and footer we discussed in a little more detail the some options. I did not go into details because this is not the method I recommend to edit pages. The basic WordPress editor does its job but is quite limited making getting a successful design or advanced features quite difficult. I personally recommend WPBakery Page Builder. It costs $45 and is included in the price of many themes such as BeTheme or Deep Theme PRO. I recommend the investment because it dynamically changes the amount of design possibilities. Almost any plugin you install in WordPress has integration with it. That’s why, from now on, I will use it as a basic tool throughout the series. If the cost is too high for you, you can write to the SenDesign Community and I will offer you a test license. This way you will be able to continue following the tutorial.
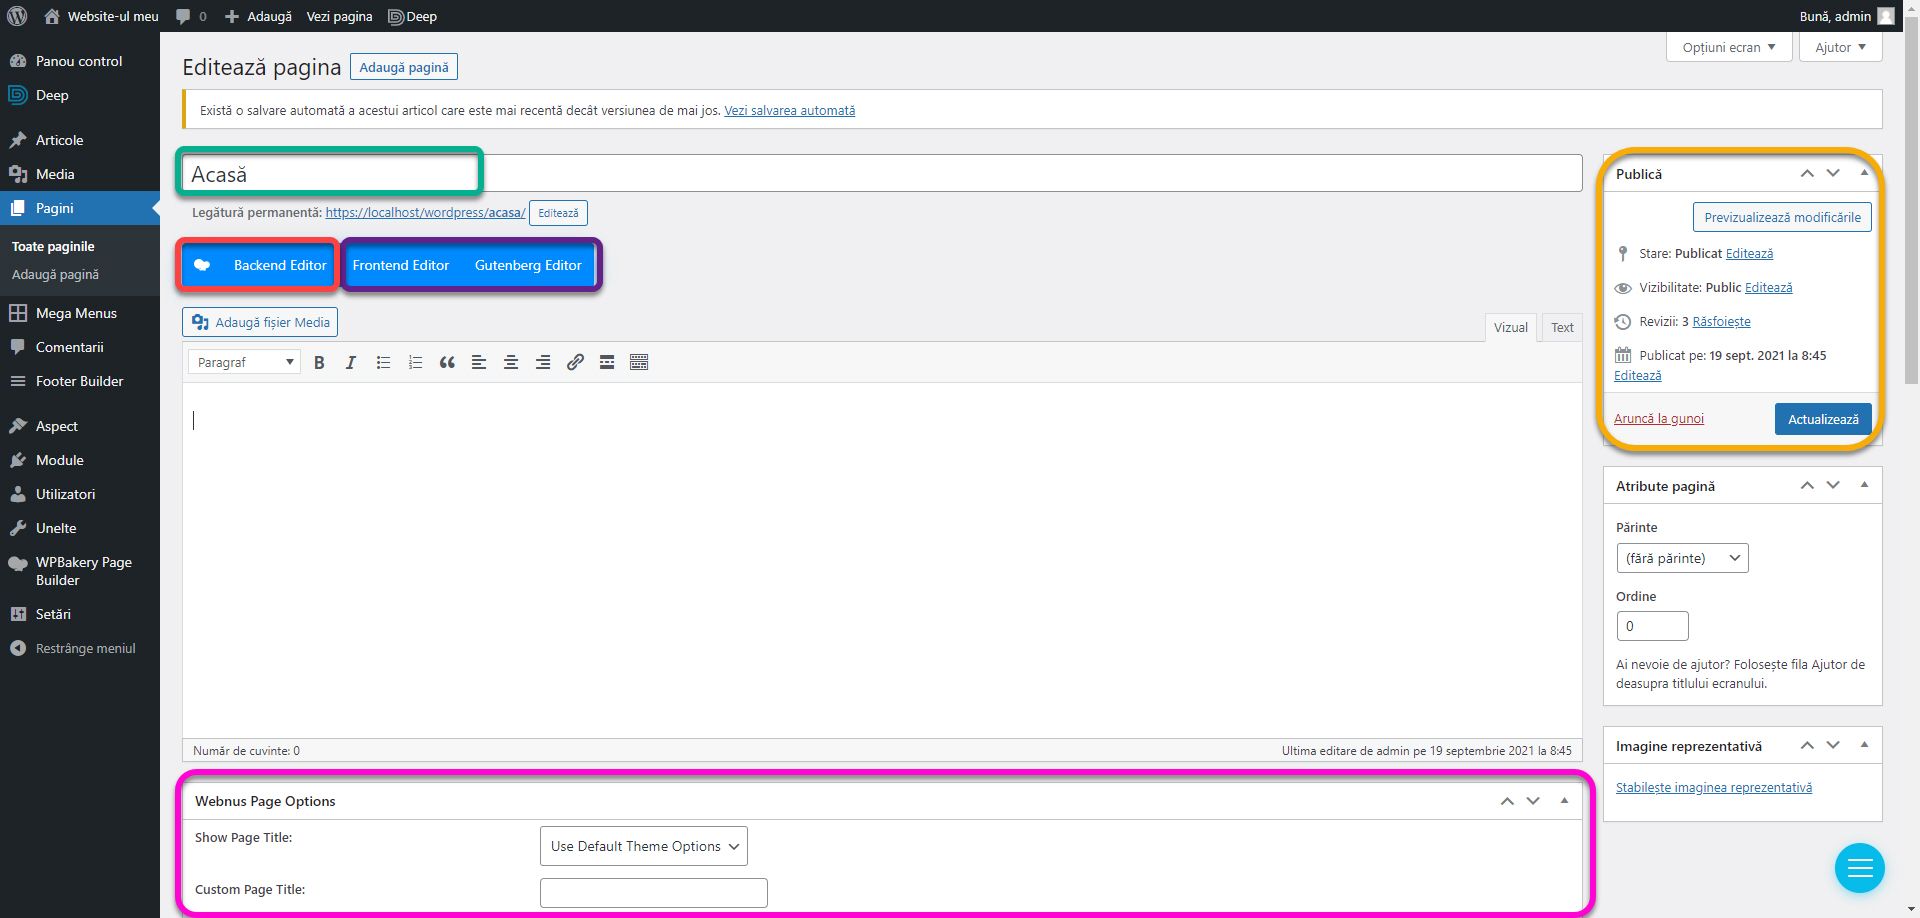
After activating WPBakery Page Builder using the instructions in this article, we return to the pages section. If you place the cursor next to a page, several options will appear. You can delete the page by clicking Trash, you can view it or preview (in case of drafts) a page or you can edit it. Click Edit.
You will notice the appearance of a new button: WPBakery Page Builder. Press this button.
The page layout has now changed. The title bar has moved higher. Below we still have the Webnus Page Options and on the right we have a panel with the Update buttons to save the changes, Trash to delete the page and Preview to see the changes without saving the page. To return to the old editor, you can press the Gutenberg Editor button. Next to it we have 2 options. Backend Editor and Frontend Editor. We are currently using the Backend Editor.
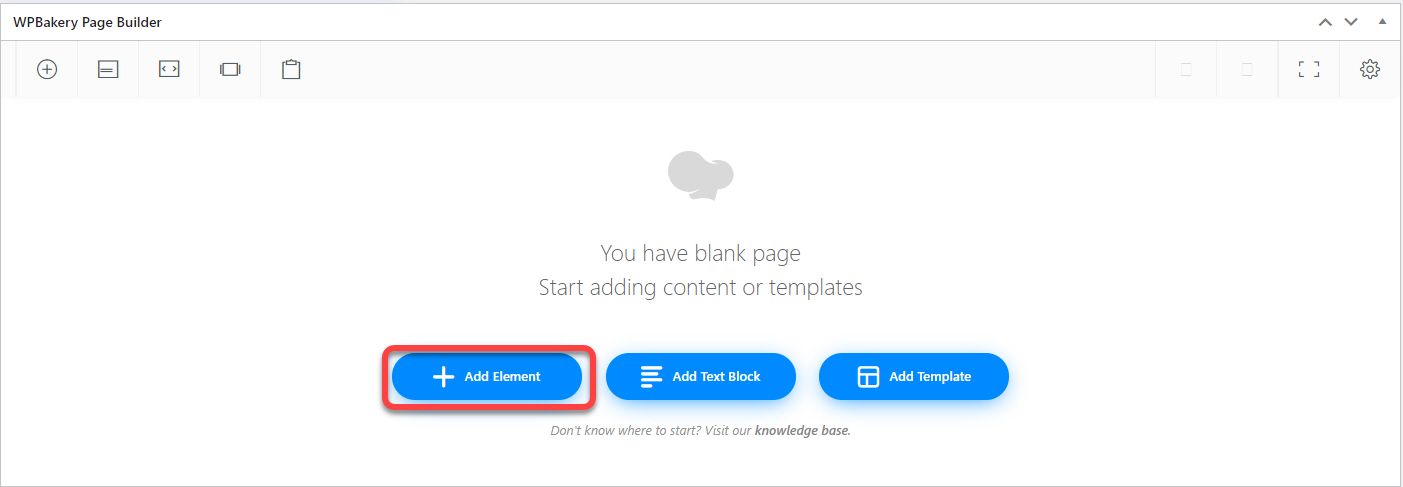
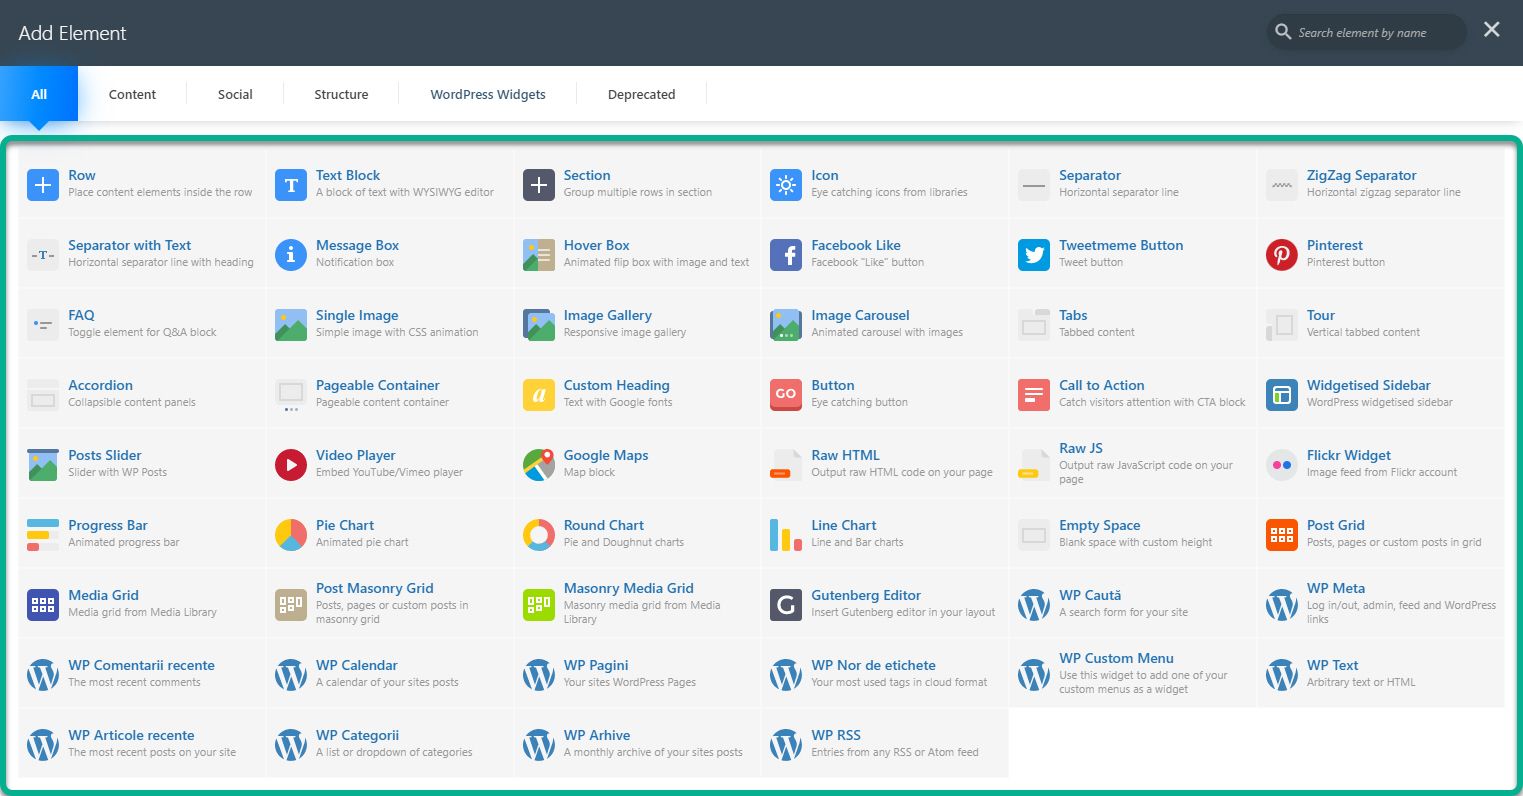
Just like Header Builder (which is inspired by this plugin) click Add Element to see the list of blocks that can be added.
Here the list (green box) is much larger than the old editor. And the amount of elements will increase as we add new plugins.
Precum în cazul header builder și a widget-urilor, nu voi detalia acum utilizarea fiecărui element. Voi face asta în articolul următor, numit Cum să creezi un website frumos unde vom explora setările restante și voi explica cele mai importante blocuri pentru toate secțiunile.
As with the header builder and widgets, I will not now detail the use of each element. I will do this in the next article, called How to create a beautiful website where we will explore the remaining settings and explain the most important blocks for all sections.
Creating posts
Creating posts is similar to creating pages. Go to the Posts section of the WordPress control panel. Here you will have the same window as for pages with the same types of options. Click Add New.
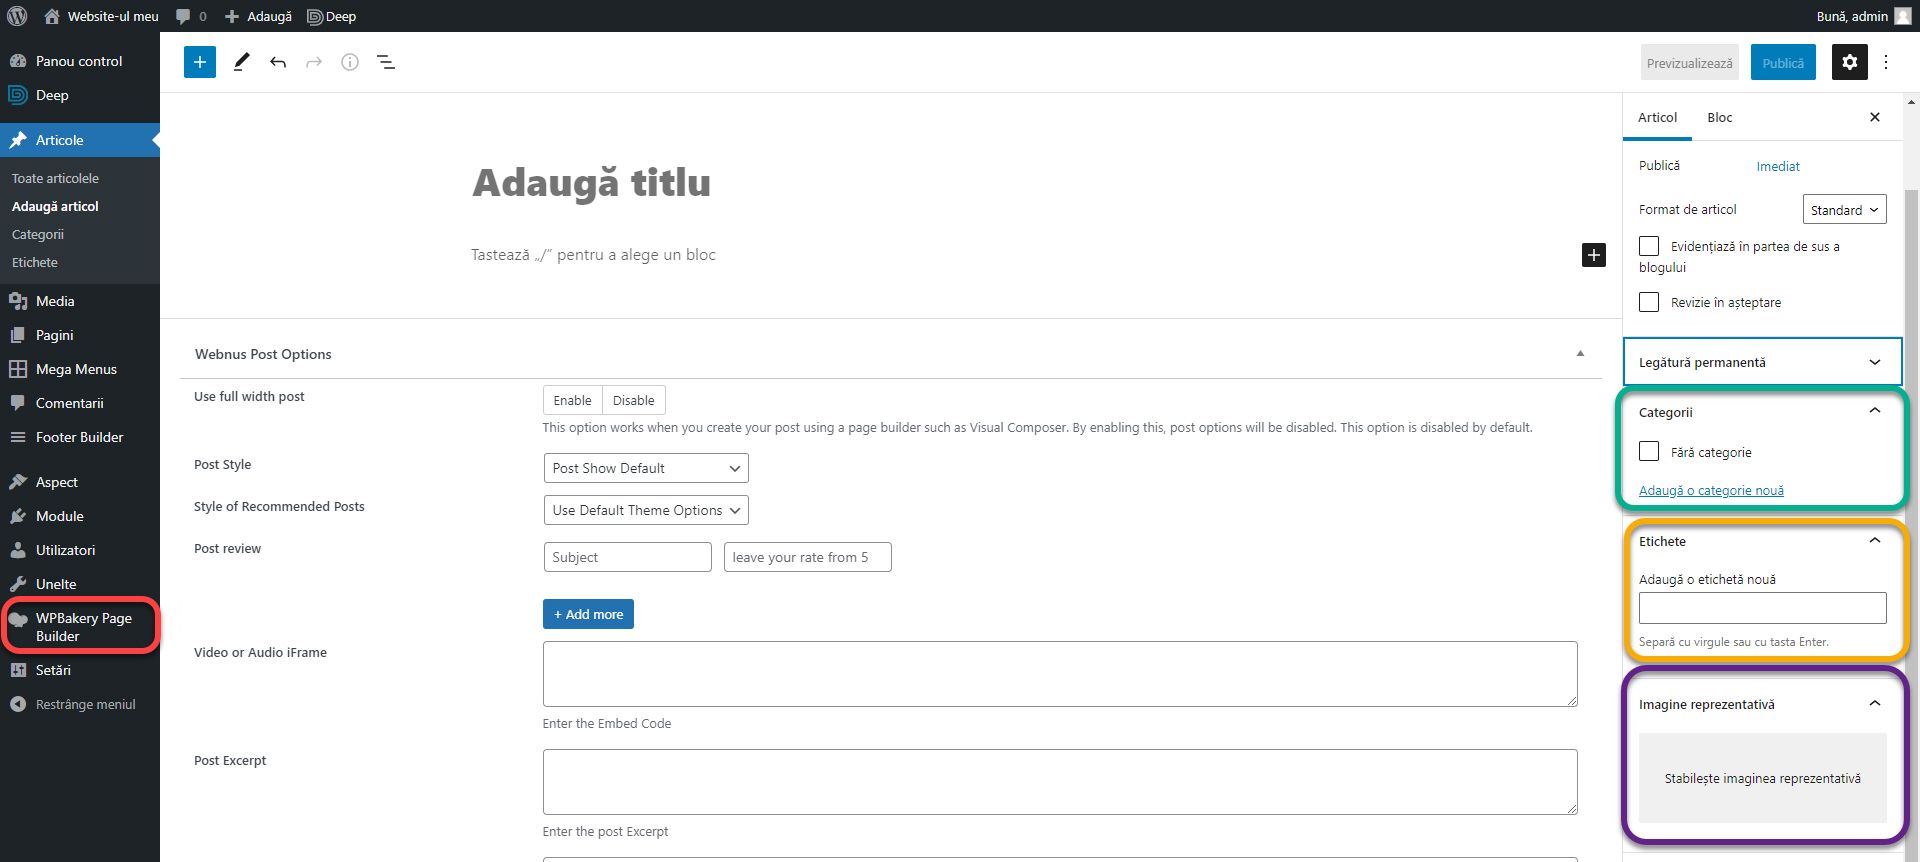
Here we will have the WordPress editor with the same commands as in the case of the pages with the addition of 3 new panels. A post can have a category. Categories are useful for when a visitor wants to see more posts of the same kind. For example, the article you are reading now has the categories Tutorial, Web Design and WordPress. It can also have tags, where you mention topics addressed in the post. In the case of the earlier example, WordPress, web design, website, etc. This way the visitor will be able to easily find articles that address the same topic. The last is the featured image. All articles must have a featured image! This appears on the Blog page, on social media when you share the article, etc. All this helps SEO and we will address them in a dedicated article.
If you want to activate the WPBakery editing plugin for posts as well, click on WPBakery Page Builder in the WordPress side menu.
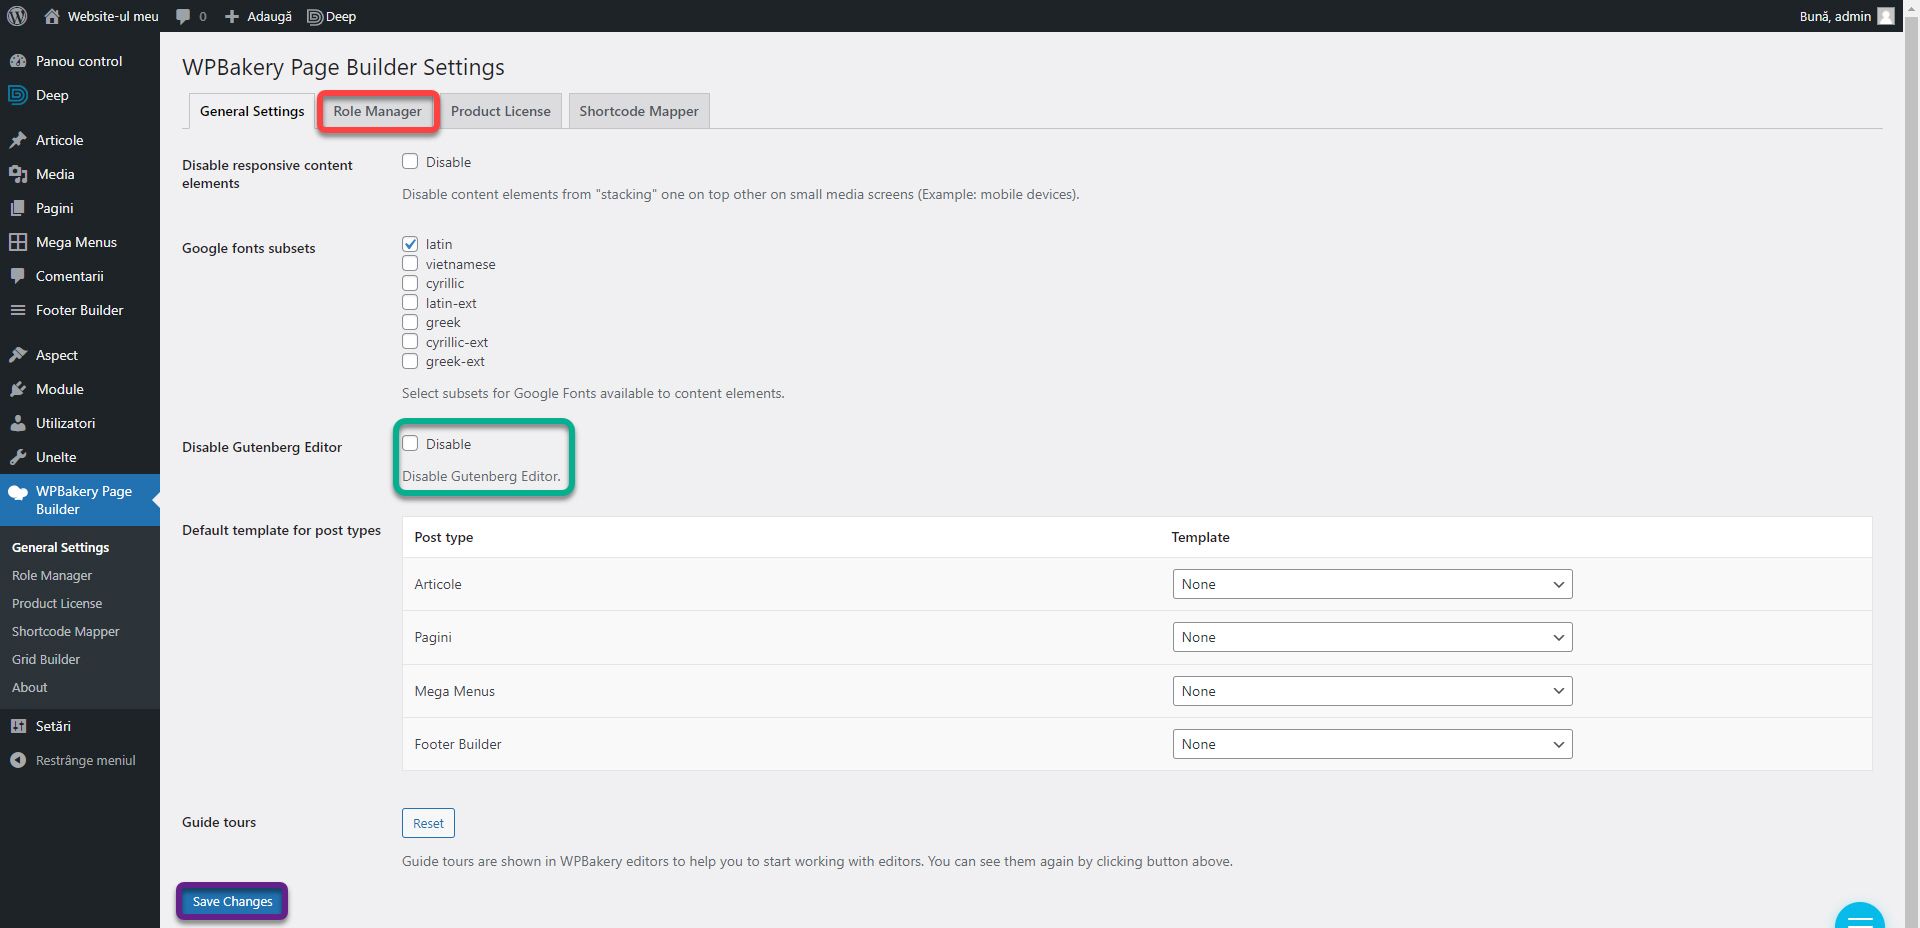
Optionally, from this page you can deactivate the Guteberg editor if you wish, by checking the Disable Gutenberg Editor option and pressing the Save Changes button. It will only keep the WPBakery editor for pages and articles and will appear first when you edit. Click Role Manager.
From this page, in the Post Types drop-down menu, choose Custom. A few new checkboxes will appear below. Make sure that the post, page is checked and if we are still here, the mega menu that we will discuss on another occasion. Click the Save Changes button at the bottom. You will now be able to use the WPBakery editor to edit posts.
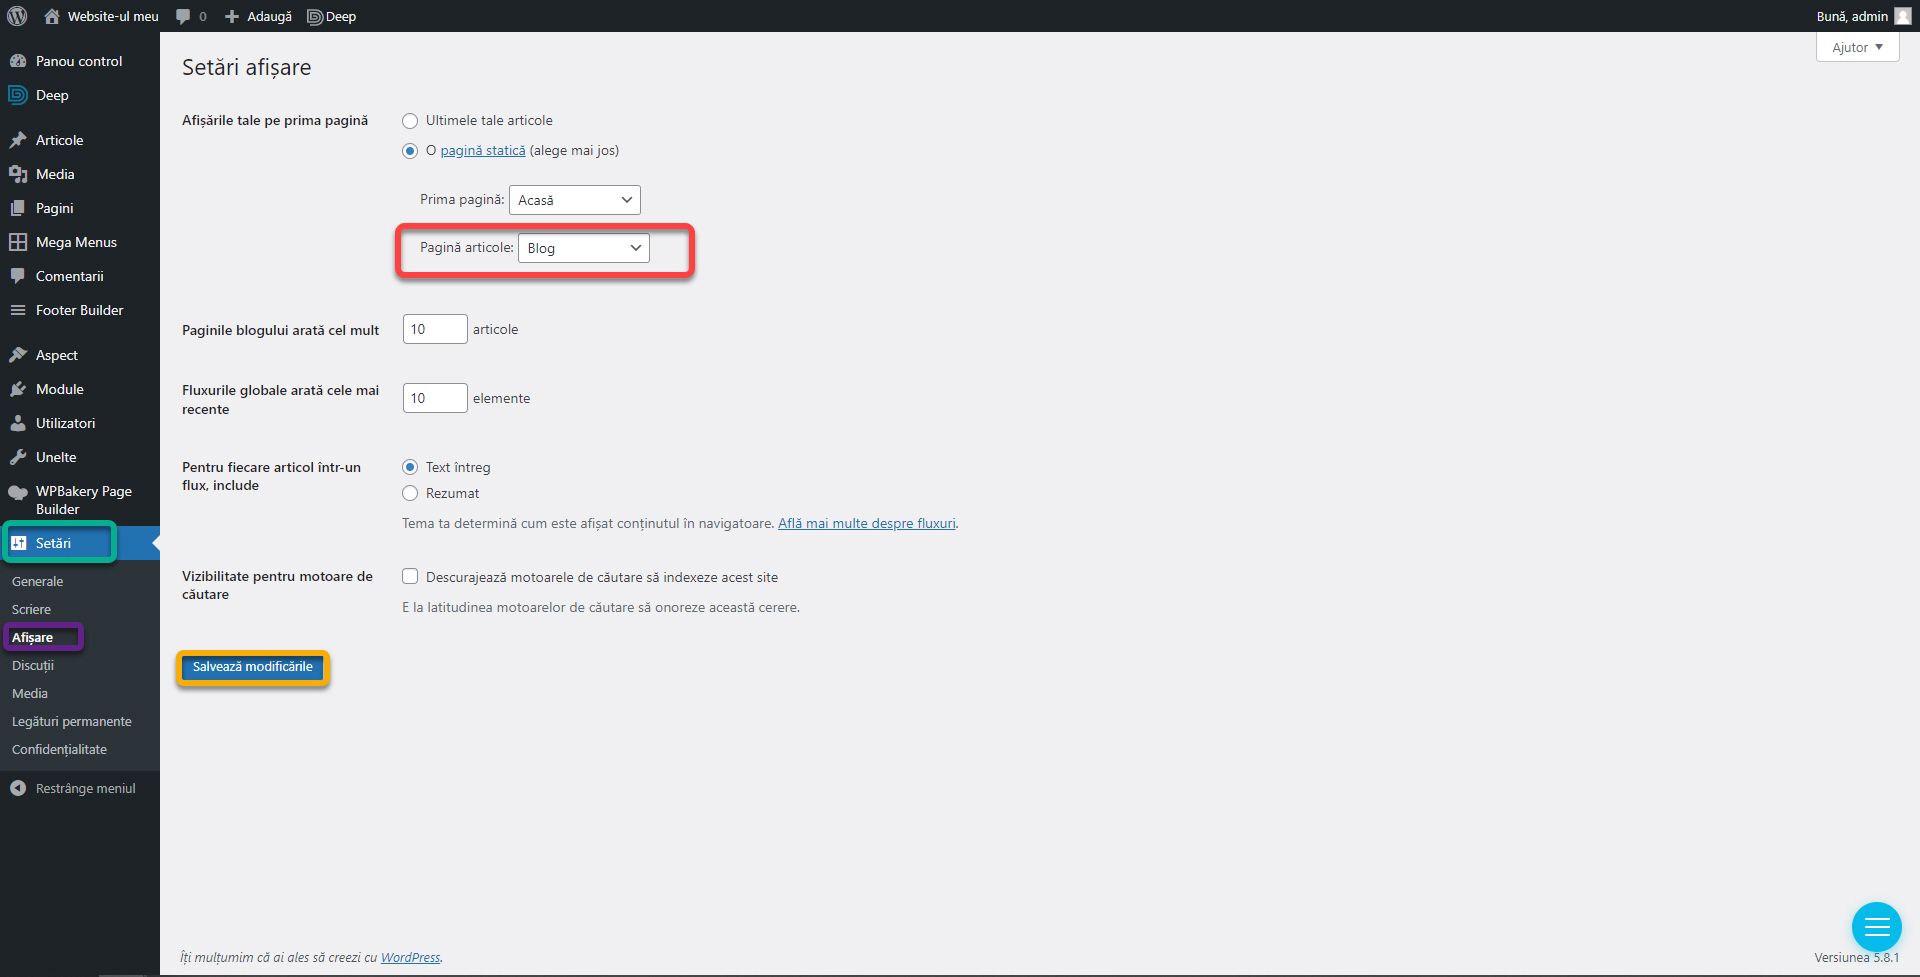
We need another page to display the articles. Create a page called Blog, as we created the home page above. Go to Settings, the Reading section where we set the Home page as the main page. From the drop-down menu called Post page, choose the newly created page, Blog. Click Save Changes. All published posts will appear on the new blog page. Add it to your new menu so you can access it.
That is all about creating pages and articles for a moment. We will explore a case study in the next article for pages and an SEO optimization case where we will publish articles a little later.
If you are confused or need help, I am waiting for you on the SenDesign Community Facebook group!
